How do I install a LAMP stack on Debian 10 (Buster)?
The LAMP is an acronym for software stack that includes Linux, Apache web server, MariaDB database (MySQL drop in replacement), and PHP web scripting language. A LAMP stack allows us hosting dynamic websites and popular apps such as MediaWiki, WordPress, and more. This page shows you how to install a LAMP stack on Debian Linux 10 (Buster) server.
Installing LAMP on Debian 10 (Buster)
- Updating the Debian Linux, run: sudo -- sh -c 'apt update && apt upgrade'
- Install Apache, execute: sudo apt install apache2
- Update the Firewall and open port 80 and 443, run: sudo ufw allow in "WWW Full"
- Set up MariaDB: sudo apt install mariadb-server
- Secure your MariaDB server, run: sudo mysql_secure_installation
- PHP 7.3 installtion: sudo apt install php libapache2-mod-php php-gd php-mysql
- Test your LAMP setup
Let us see all steps in details. But, first log in to your remote server using the ssh command:ssh user@server-ip
ssh -i ~/.ssh/aws-ec2-key admin@deb10-lmum1-box1
1. Updating the server
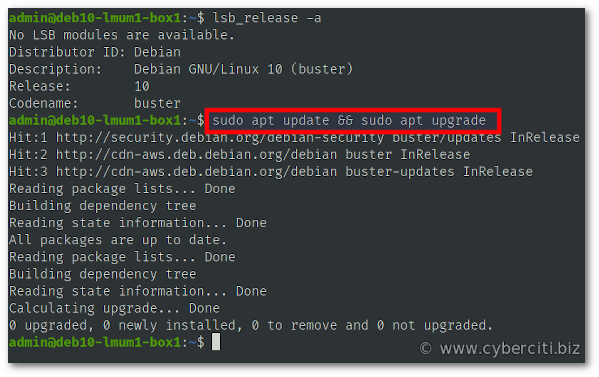
Make sure all packages are up-to-date, run the following apt command or apt-get command:sudo apt update
sudo apt upgrade
2. Installing Apache web server
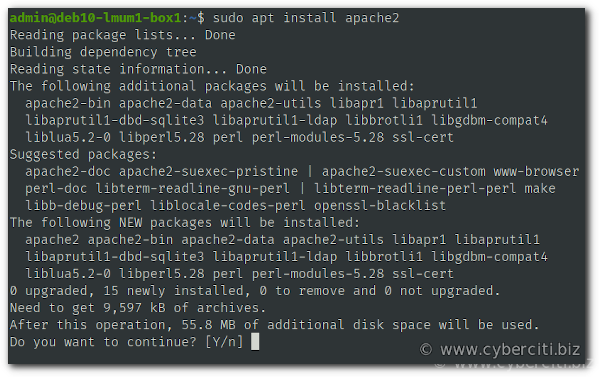
Apache HTTP Server, also known as “Apache.” It is a web server famous for promoting the growth of the World Wide Web. Hence, we are going to install Apache on Debian 10, run:sudo apt install apache2
How to start, stop, restart and get the status of Apache server
The syntax is as follows for the systemctl command:sudo systemctl start apache2.service ## <-- Start the server ##
sudo systemctl restart apache2.service ## <-- Restart the server ##
sudo systemctl stop apache2.service ## <-- Stop the server ##
sudo systemctl reload apache2.service ## <-- Reload the server config ##
sudo systemctl status apache2.service ## <-- Get the server status ##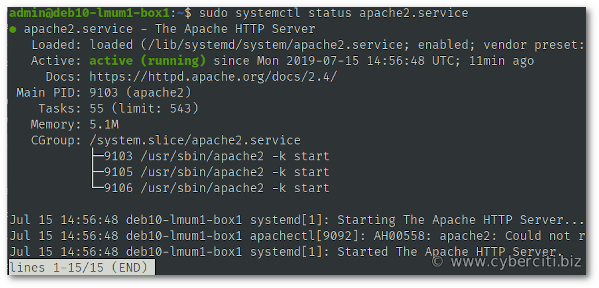
3. Update the Firewall and open port 80 and 443
It is important that you open TCP port 80 (www) and 443 (https) so that LAMP on Debian 10 works. Type the following commands:sudo ufw allow www
sudo ufw allow https
sudo ufw status
Sample outputs:
Status: active To Action From -- ------ ---- 22/tcp ALLOW Anywhere 80/tcp ALLOW Anywhere 443/tcp ALLOW Anywhere 22/tcp (v6) ALLOW Anywhere (v6) 80/tcp (v6) ALLOW Anywhere (v6) 443/tcp (v6) ALLOW Anywhere (v6) |
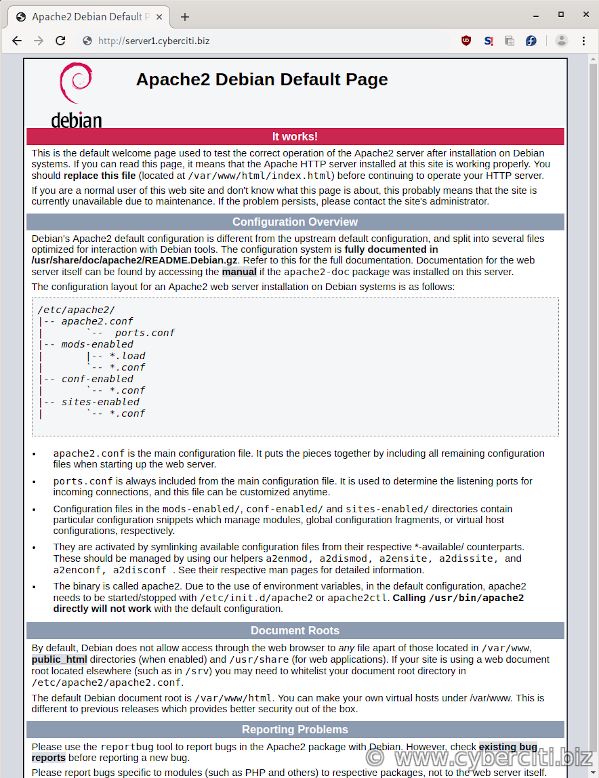
Test it by typing your server’s IP or domain name:http://server1.cyberciti.biz
http://your_public_IPv4_here
Configure Apache
Edit the following file using a text editor such as vi/vim, nano, emacs and so on:sudo vi /etc/apache2/mods-available/mpm_prefork.conf
My updated config file for EC2 with a 2 GB ram and 1 vCPU for running couple of WP sites:
# prefork MPM # StartServers: number of server processes to start # MinSpareServers: minimum number of server processes which are kept spare # MaxSpareServers: maximum number of server processes which are kept spare # MaxRequestWorkers: maximum number of server processes allowed to start # MaxConnectionsPerChild: maximum number of requests a server process serves <IfModule mpm_prefork_module> StartServers 4 MinSpareServers 20 MaxSpareServers 40 MaxRequestWorkers 200 MaxConnectionsPerChild 4500 </IfModule> # vim: syntax=apache ts=4 sw=4 sts=4 sr noet |
Above settings should be adjusted as per your deployment’s needs. Finally, disable the Apache event module and enable httpd prefork, run:sudo a2dismod mpm_event
sudo a2enmod mpm_prefork
To activate the new configuration, you need to run:sudo systemctl restart apache2.service
How to create your first virtual hosts
Make a copy of the default Apache configuration for your domain called www.cyberciti.biz as follows using the cp command:sudo cp -v /etc/apache2/sites-available/000-default.conf /etc/apache2/sites-available/www.cyberciti.biz.conf
Update /etc/apache2/sites-available/www.cyberciti.biz.conf as follows:
<Directory /var/www/cyberciti.biz/public_html> Require all granted </Directory> <VirtualHost *:80> ServerName cyberciti.biz ServerAlias www.cyberciti.biz ServerAdmin webmaster@cyberciti.biz DocumentRoot /var/www/cyberciti.biz/public_html ErrorLog ${APACHE_LOG_DIR}/www.cyberciti.biz_error.log CustomLog ${APACHE_LOG_DIR}/www.cyberciti.biz_access.log combined </VirtualHost> |
Next, create a new directory to store HTML/PHP files for domain:mkdir -vp /var/www/cyberciti.biz/public_html
Add a new Linux user, run:sudo useradd -d /var/www/cyberciti.biz/ -s /usr/sbin/nologin -c 'www.cyberciti.biz user' cbzuser
sudo passwd -l cbzuser
Enable your site and disable default LAMP site:sudo a2ensite www.cyberciti.biz
sudo a2dissite 000-default
Create a new html file named index.html:vi /var/www/cyberciti.biz/public_html/index.html
Append HTML4/HTML5 code:
<html> <head> <title>www.cyberciti.biz on Debian 10</title> </head> <body> <h2>www.cyberciti.biz</h2> <p>This is a test LAMP server.</p> <hr> </body> </html> |
Save and close the file. Use the chown command and chmod command commands to set tight permissions on your Apache DocumentRoot:sudo chown -R cbzuser:cbzuser /var/www/cyberciti.biz/
sudo chmod 0444 /var/www/cyberciti.biz/
sudo find /var/www/cyberciti.biz/ -type d -print0 | sudo xargs -0 -I {} chmod 0445 "{}"
To activate the new configuration, you need to run:sudo systemctl reload apache2.service
Fire a web browser and test it:http://www.cyberciti.biz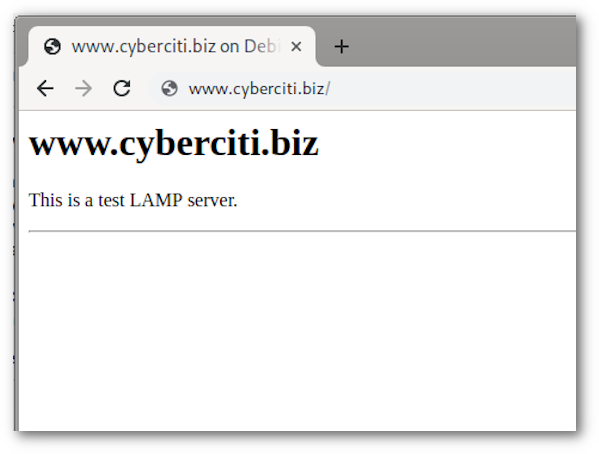
4. How to install MariaDB on Debian 10
Now you have a web server up and running along with your first virtual host too. It is time to install MariaDB, which is a drop-in replacement for MySQL server. Type the following apt command:sudo apt install mariadb-server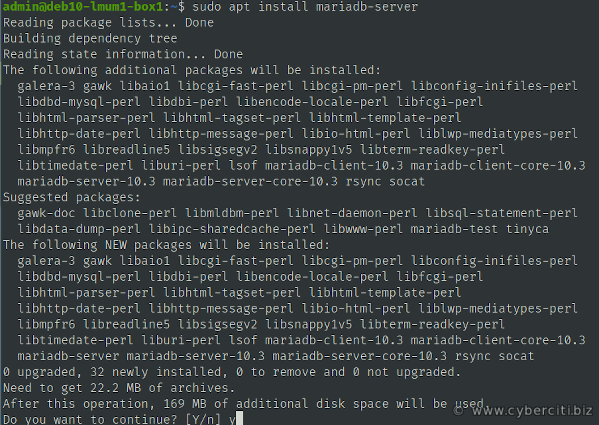
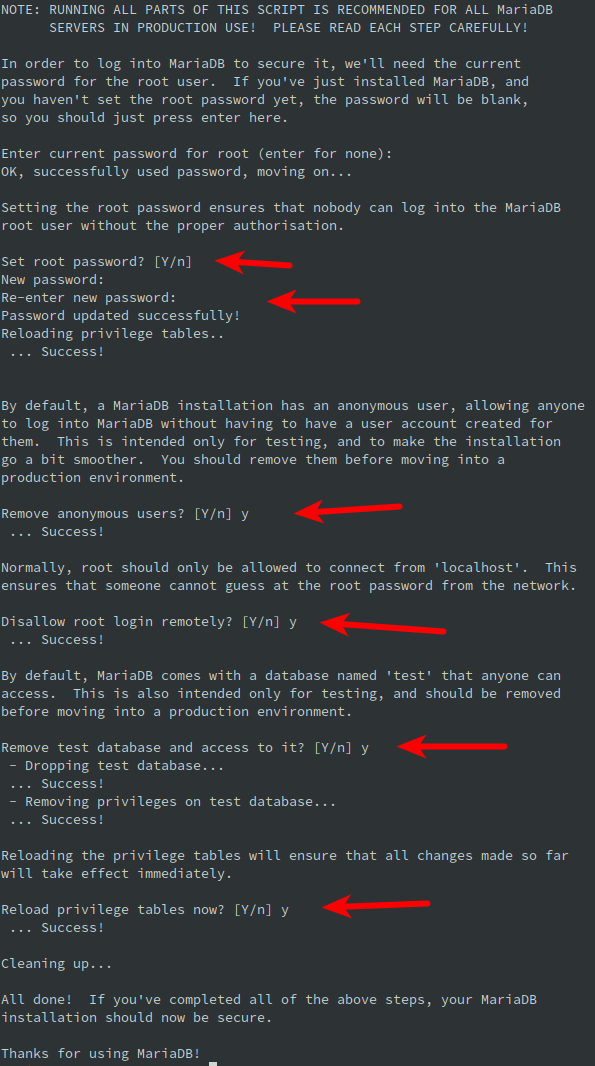
Improve MariaDB installation security
Run mysql_secure_installation script:sudo mysql_secure_installation
This script enables you to improve the security of your MariaDB installation in the following ways:
- You can set a password for root accounts.
- Delete root accounts that are accessible from outside the localhost.
- Remove anonymous-user accounts.
- Erase the test database, which by default can be accessed by anonymous users.
How to create a MariaDB database and user/password
To create a database and grant your users permissions to use databases, run:mysql -u root -p
Enter MariaDB’s root password when prompted. Create a database named ‘wpdb’ and grant your user permissions on it. Change the database name (wpdata) and username (wpuser)/change the password (wppassword):
CREATE DATABASE wpdb; GRANT ALL ON wpdb.* TO 'wpuser' IDENTIFIED BY 'wppasword'; quit |
Test new db and user/password combination:mysql -u wpuser -p'wppasword' wpdb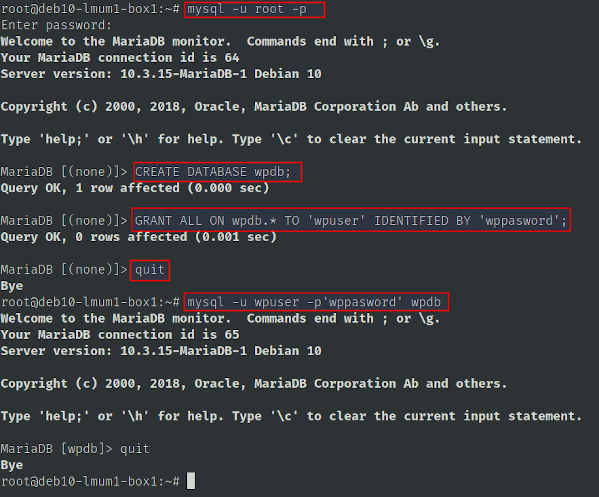
Installing PHP 7.3 for your LAMP on Debian 10
PHP is the last part of the puzzle that makes it possible to produce dynamic webpages. PHP is also a popular web development engine for a LAMP stack. Therefore, let us install PHP:sudo apt install php libapache2-mod-php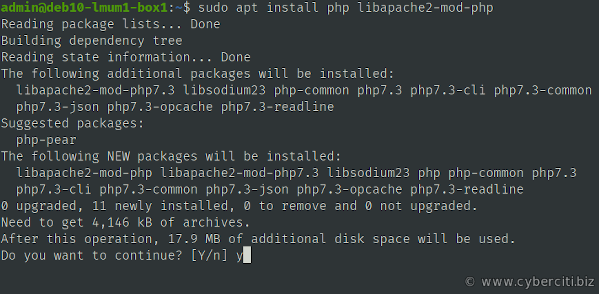
Finding and installing PHP modules
I am also going to install PHP modules that allows MySQL access and GD lib too:sudo apt install php-mysql php-gd
One can get a list of all PHP modules using the combination of apt-cache command and grep command:apt-cache search php | egrep 'module' | grep default
Sample outputs:
libapache2-mod-php - server-side, HTML-embedded scripting language (Apache 2 module) (default)
php-bcmath - Bcmath module for PHP [default]
php-bz2 - bzip2 module for PHP [default]
php-curl - CURL module for PHP [default]
php-dev - Files for PHP module development (default)
php-enchant - Enchant module for PHP [default]
php-gd - GD module for PHP [default]
php-gmp - GMP module for PHP [default]
php-imap - IMAP module for PHP [default]
php-interbase - Interbase module for PHP [default]
php-intl - Internationalisation module for PHP [default]
php-json - JSON module for PHP [default]
php-ldap - LDAP module for PHP [default]
php-mbstring - MBSTRING module for PHP [default]
php-mysql - MySQL module for PHP [default]
php-odbc - ODBC module for PHP [default]
php-pgsql - PostgreSQL module for PHP [default]
php-pspell - pspell module for PHP [default]
php-readline - readline module for PHP [default]
php-recode - recode module for PHP [default]
php-snmp - SNMP module for PHP [default]
php-soap - SOAP module for PHP [default]
php-sqlite3 - SQLite3 module for PHP [default]
php-sybase - Sybase module for PHP [default]
php-tidy - tidy module for PHP [default]
php-xml - DOM, SimpleXML, WDDX, XML, and XSL module for PHP [default]
php-xmlrpc - XMLRPC-EPI module for PHP [default]
php-zip - Zip module for PHP [default]
Restart Apache:sudo systemctl restart apache2.service
Testing PHP instllation along with LAMP on Debian 10
Create a file named test.php as follows:sudo vi /var/www/cyberciti.biz/public_html/test.php
Append the following code:
<?php phpinfo(); ?> |
Save and close the file. Set permisions:sudo chown -R cbzuser:cbzuser /var/www/cyberciti.biz/
sudo chmod 0444 /var/www/cyberciti.biz/
sudo find /var/www/cyberciti.biz/ -type d -print0 | sudo xargs -0 -I {} chmod 0445 "{}"
Open a webbrowser and type url:http://your-ip/test.php
http://www.cyberciti.biz/test.php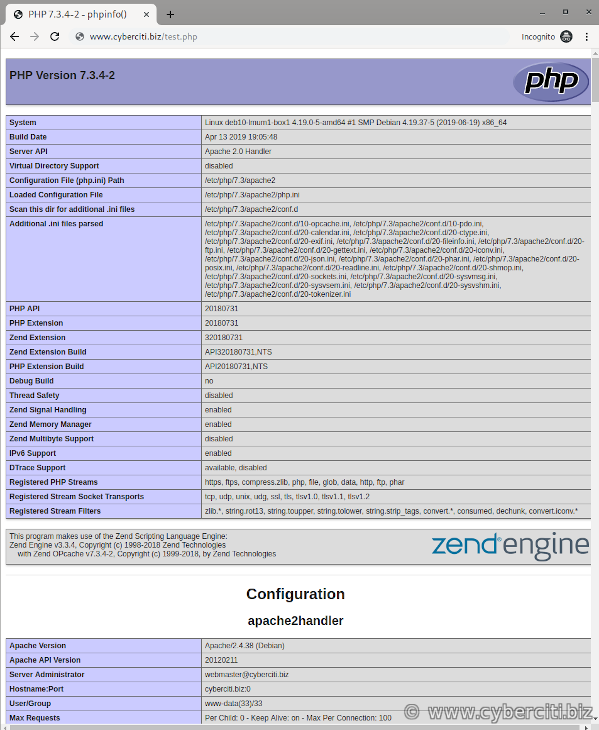
This page indicates that your PHP 7.3 is working correctly on a LAMP server. It is time you delete that page as it exposed sensitive information using the rm command:sudo rm -v /var/www/cyberciti.biz/public_html/test.php
Conclusion
This guide explained how to install Linux, Apache, MariaDB, PHP (LAMP) stack on Debian Linux 10. For more information see this page here, here, and here.