Want to know how to implement AMP in WordPress? Then, you’ve come to the right place. This article is the definitive guide on how to implement AMP for your website.
Simply put, Accelerated Mobile Page (AMP) is a way to make your site load faster on a mobile device. Technical details aside, the important thing is that it helps to improve and increase more traffic to your site.
What is AMP and How Does it Work?
WordPress Accelerated Mobile Page or simply AMP is an open-source library launched in October 2015. It’s used by some of the most popular technology companies like Google, Twitter, LinkedIn, and many more.
Websites take a longer time to load on mobile devices. That’s because web pages contain many elements depending upon the programming language and protocols used. For the same reason, websites might not look great on mobile as well. This can drive away your potential customers.
AMP strips away most of those elements like CSS, JavaScript, third-party scripts, etc. to make your site load faster on mobile devices.
Did you know, according to a study, more than 50% of global search queries are conducted via mobile? And if you want a higher traffic rate then, optimizing your site for mobile is a must.
Furthermore, it duplicates your site and allows it to be hosted on Google AMP cache. Later, Google serves this cached version to your users. Hence, it decreases the loading time of your site.
Google AMP provides many other pros and some cons as well. Let’s discuss them below.
Pros of Google AMP
- Search Engine Optimization: AMP boosts your site’s speed. Users like sites that load faster which means more traffic and a higher rank on search engine results pages (SERPs).
- Excellent user experience: WordPress AMP allows you to create mobile-friendly pages in a matter of seconds. And, these pages are extremely user-friendly as well.
- Improved server performance: AMP can reduce the bandwidth usage for images by 50% without hampering the image quality to reduce the load on your server.
- Low bounce rate: Mobile users will no longer leave your homepage without performing any action.
- Optimized data consumption: Implementing AMP allows users to install the website on their home screen without the need to visit an app store.
Cons of Google AMP
- Only cached page displayed: Google AMP serves your site’s cached page so your users do not always have access to the latest version of your page.
- Limited elements: Since AMP strips down many elements, it removes many high-definition graphics, animations, and other elements that require CSS and Javascript.
Overall, we would say implementing WordPress AMP is an advantage. It not only attracts more users, but it also helps you increase your revenue as well through heavy traffic.
How to Set Up AMP in WordPress?
Now that you know what AMP is and its importance, let us guide you on how to implement AMP in WordPress. Here’s a step-by-step process for you. So let’s get started.
Step 1: Install the AMP for WP Plugin on Your Dashboard
The easiest way to implement AMP on WordPress is through a plugin. And one of the best plugins has to be AMP for WP. It has 100,000+ active installations.

To install the plugin, first of all, login to your WordPress dashboard. Then, from the control menus on the left sidebar, navigate to ‘Plugins >> Add New’. Then, search ‘AMP for WordPress’ on the search bar.
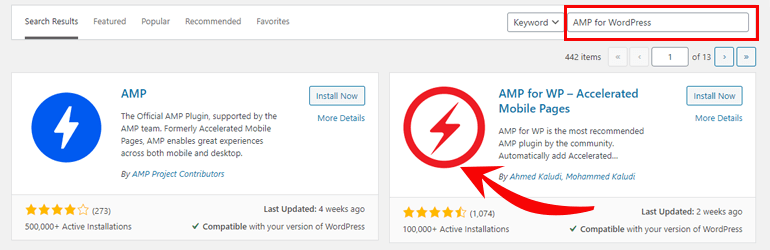
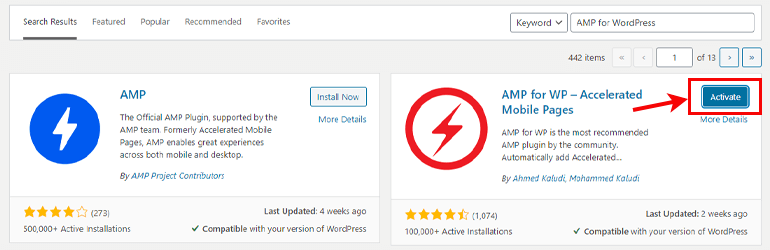
Now Install the plugin and don’t forget to Activate the plugin.
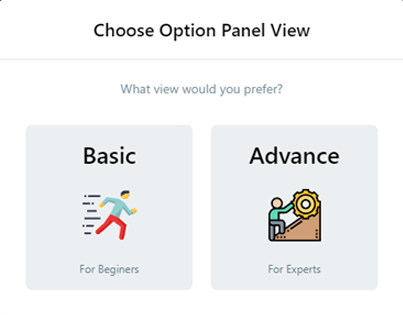
After activation, there is a pop up that allows you to choose the panel view options. You can choose between – Basic and Advance. If you ask us, it’s better to choose the Advanced option. Because it has more options and it’s not that difficult to set up either.
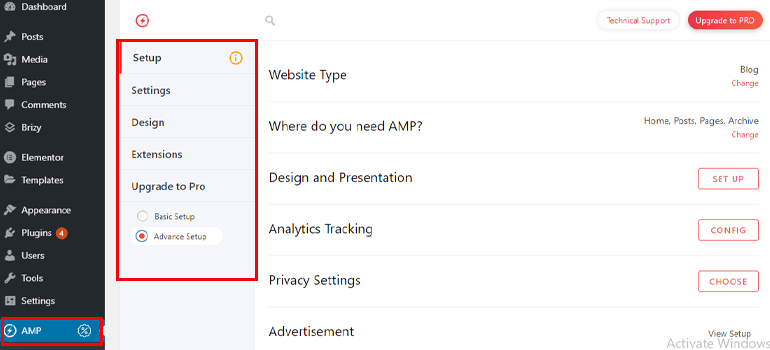
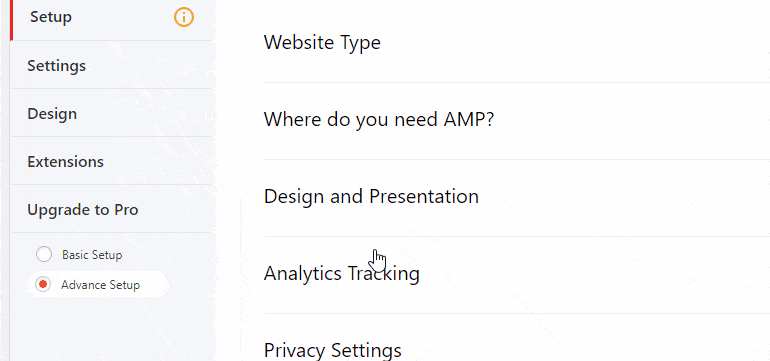
Step 2: Configuring the Setting Options
Now on the left side, you can use different menus such as Settings, Designs, Extensions, and Upgrade to Pro.
Firstly, let’s take a look at the Settings option. Here you’ll find many different options. So, let us break it down to you in an easier way.
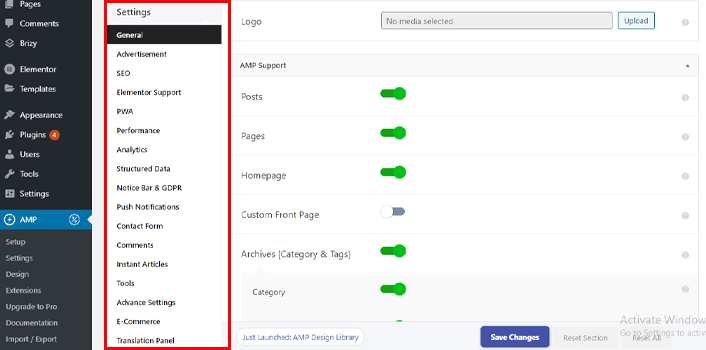
General: In this section, you can set your site’s logo. Furthermore, you can also select where you want the AMP support. By default, it’s enabled on posts, pages, homepage, archives, category, and tags. You can leave the default settings as it is.
Advertisement: This option allows you to add advertisements to your mobile pages and choose their position.
SEO: This section includes meta description settings. Also, the SEO plugin interaction is included. You need to select the SEO plugin you’re using. For example, if you’re using the Yoast SEO plugin then, select Yoast SEO.
Performance: This section allows you to enable the minification option. Minification can further improve the performance of your site.
Analytics: Here you can integrate your Google analytics. All you need to do is add your tracking id. Google Analytics helps you take in-depth data about your site.
Comments: In this section, you can choose to display the comments on your posts/pages or not. In addition, you can also enable/disable the number of comments, user’s avatar, and no follow button.
Advance Settings: Here, you can enter custom HTML for headers and footers, set up mobile redirection, etc.
After making all the necessary changes, don’t forget to click the ‘Save Changes’ button.
Step 3: Customize your WordPress AMP Site
To customize the appearance of your AMP pages, just click on the ‘Design’ tab just below the ‘Settings’ tab. From here, you can choose different ‘themes’ for your site.
In the free version, there are 4 options of the theme you can choose from – Design One, Design Two, Design Three, and Swift. You can select one from the ‘Themes Selector’ drop-down menu. And, if you want more themes, you need to upgrade to the pro version.
Furthermore, you can select color schemes and typography from the ‘Global’ tab. You can also customize the Header & Footer. You can set the custom background color, text color, link color, and much more.
On the Social sharing section, you can decide what social media buttons you want to enable on your site. Options include Facebook, Twitter, LinkedIn, etc. Also, you can decide the position of the buttons.
Additionally, you can customize the date as well. You can select the date format, show the published date of your post, etc.
Lastly, don’t forget to click the ‘Save Changes’ button once you’re satisfied with the customizations.
You can take your AMP pages to the next level by adding the extensions like contact form 7, bbPress for AMP, etc. However, these extensions are only available on the pro version.

Step 4: Preview Your Site
Now, it’s time to see a live preview of how your site will look on the mobile device. To do that, all you need to do is add /amp/ at the end of the URL of any post or page of your site.
For example – HTTP://example.com/amp. This will show you the AMP version of your page.
AMP for WP plugin provides excellent support as well. You can find the ‘Technical Support’ button at the top right.
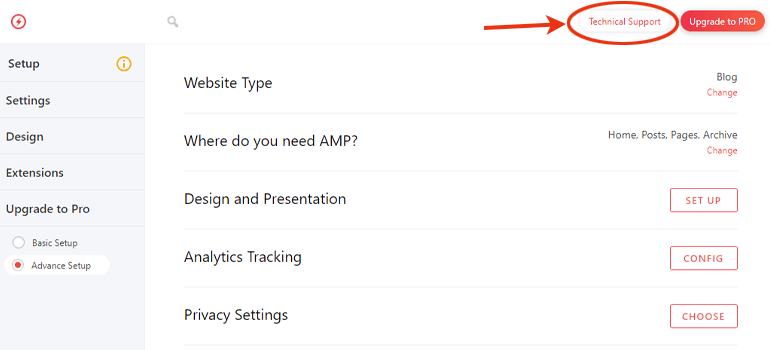
Once you click the button, it’ll take you to another tab. There, you can ask any queries related to AMP.
And there you have it! Your site is now AMP ready.
Wrapping It Up!
AMP is a must if you want your site to rank higher on google search and gain more traffic. With the help of AMP for WP, your site loads at lightning speed on the mobile device.
Not to mention, it’s super easy to implement AMP in WordPress. Furthermore, you can customize it with ease.
And that’s all about how to implement AMP in WordPress. Hope you enjoyed reading this article. And if you did, then don’t forget to share it on social media.
Here is an article about how to add Google Analytics to WordPress that might interest you.
Finally, please share this article on your social media. You can also follow us on Twitter and Facebook for regular updates. And, if you’ve any queries comment down below. We’ll get back to you as soon as possible.
The post How to Implement AMP in WordPress? (Definitive Guide for Beginners) appeared first on ThemeGrill Blog.