Wondering what a WordPress menu is? Or want to have a good looking WordPress menu on your WordPress website? There may be many things you’re curious about in WordPress Menus.
The first and most important reason to use a menu is for navigation. A menu is an excellent navigator for the visitors of your site. That’s why most WordPress menus are called WordPress Navigation menus as well.
In this post, we’ll explain what WordPress menus are, their types, and also how to create menu in WordPress, and more. Let’s get started.
A) What is a WordPress Menu? (Definition)
A WordPress menu is a list of defined links to pages on your website. Commonly placed in the header section of websites, it lets visitors navigate your website with ease. With menus, you can direct your visitors to a specific post or page. Moreover, you can even provide custom links through your menus.
For example, you can see a navigation menu in our site’s header area too.

A WordPress Menu will usually stick in all the pages of your website, not just your homepage. So that users can navigate to a specific page or post regardless of where they are on your site.
Creating a menu in WordPress is easy. Many of the best WordPress themes include a pre-made demo as a primary navigation menu which you can easily customize later.
You can easily create and modify WordPress menus from the ‘Appearance>>Menus’ option in your dashboard. We’ll explain the whole process of creating a menu in the sections below.
B) How Do Menus Work in WordPress? (Explained)
Menus in WordPress are simple. You create one, you add items to it, and then, you publish it. Then, your visitors will be able to see and use the menu.
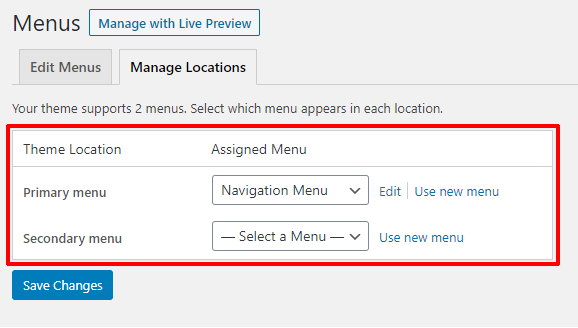
The number of menus and menu locations, though, depends on the particular WordPress theme you are using.
You can only add menus to the menu locations defined by the WordPress theme. You cannot create and display menus in locations not pre-defined by the theme.
For example, the default WordPress theme, Twenty Twenty One provides you with two menu locations.
But, in addition you can also add custom menus on sidebars and widget locations. Now, let’s see different types of WordPress menus in use.
C) Types of WordPress Menus
There are different types of menus in WordPress. It depends on things like the menu location or the number of levels you have in your menu.
If you’re to categorize a menu judging by the levels, then you have two types of menu:
i) Single Level Menus
A single level menu has only one layer of items. Clicking on those items will navigate you to the link provided within the items.
This type of menu is the most common form of menu you can find on most websites. Similarly, social menus are generally single-level menus, because they only contain links to social media pages.
For example, you can see the navigation menu and the social links menu on the Zakra theme’s ‘Travel’ demo website.

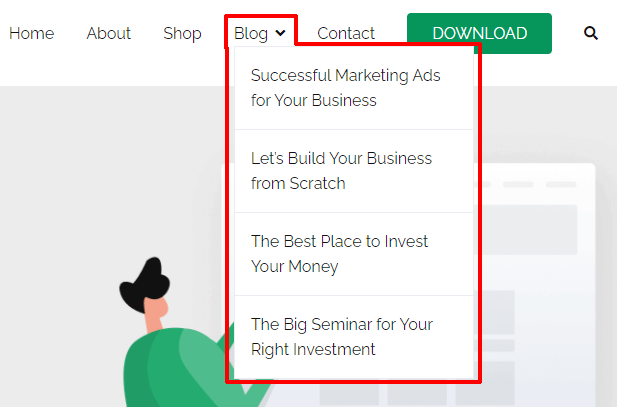
ii) Multi Level menus
A multi-level menu, on the other hand, has two or more layers of items. Primarily, you will only see the first layer or the main items of the menu. But if you hover your mouse over or click the main item, then its sub-items will appear. The levels can go on forever as per the needs of the website.
The 2 most popular types of multi-level menus are:
- Dropdown Menus
- Mega Menus.
Dropdown Menus: WordPress Dropdown menus feature a dropdown interface. If you hover your mouse over the main item, then a list of its sub-items will dropdown.
If you want to learn more, then check our article on creating a dropdown menu in WordPress.
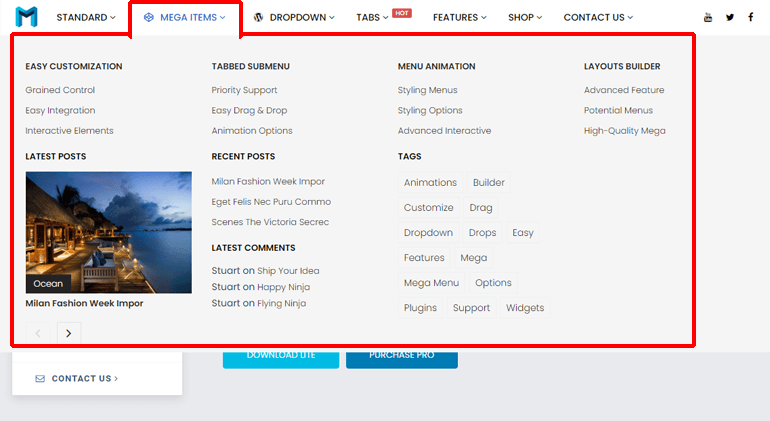
Mega Menus: WordPress Mega menus, as the name suggests, are large menus in WordPress. They contain many items presented in a dropdown layout. Simply clicking or hovering your mouse over the main item will open up a huge number of sub-items to choose from.
D) How to Create a WordPress Menu? (Step-by-Step)
Creating a WordPress menu is simpler than it sounds. To make it even easier, we’ll show you how to create a WordPress Menu, step-by-step.
Step 1. Create a New Menu in WordPress
As mentioned above, your WordPress theme may have a pre-made menu. Preview your website to see how it looks. If you want to customize the existing menu, then please scroll down to section ‘E) How to Customize Your WordPress Menu?‘.
If you want to create a new menu and display it on your site, then you can start following the steps here now.
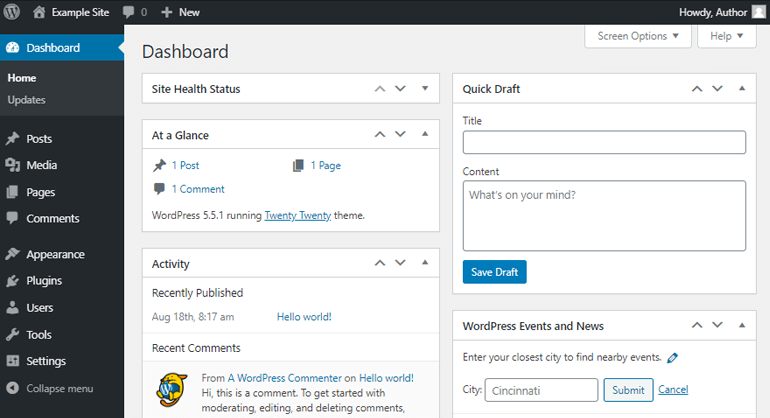
Firstly, log-in to your WordPress dashboard. Once you’re logged in, you’ll see the the dashboard like the screenshot below.
Widgets. This one is our favorite, because you will know the true number of menu locations with this method.
Widgets are blocks of contents in WordPress that you can add to specific areas defined by your WordPress theme. Since menus are also blocks of content, they are also considered a kind of widget.
And, the number of locations to which your menu can go is limited by the WordPress theme you’re using. Although some popular themes will only show two menu locations on the menu locations tab, there are plenty of other areas where you can add a menu, like a footer.
Where on Widgets You Can Menus?
One way to know how many areas your menus can go is to visit the widgets tab on your dashboard menu.
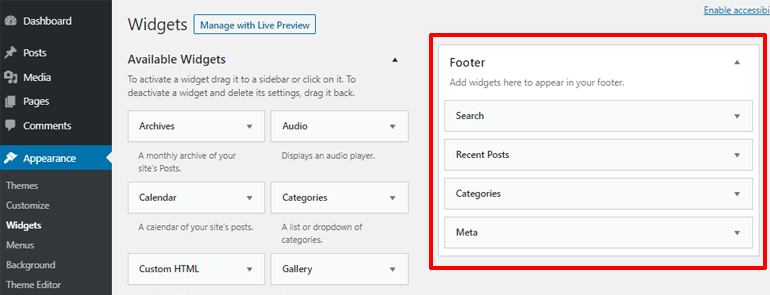
To get started adding your menu through Widgets, go to Appearance >> Widgets.
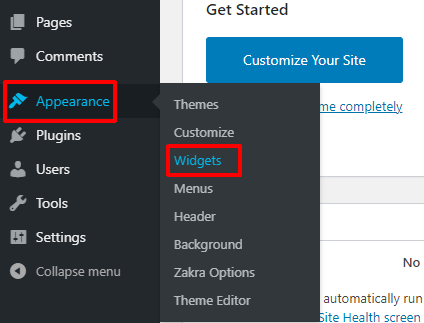
After that, you’ll be taken to the Widgets Window. There you will see the number of locations you can add your widgets. For the default Twenty Twenty One theme, you can only add your widgets to a single location and that is the footer. Inside that footer area, the theme has four widgets added to it.
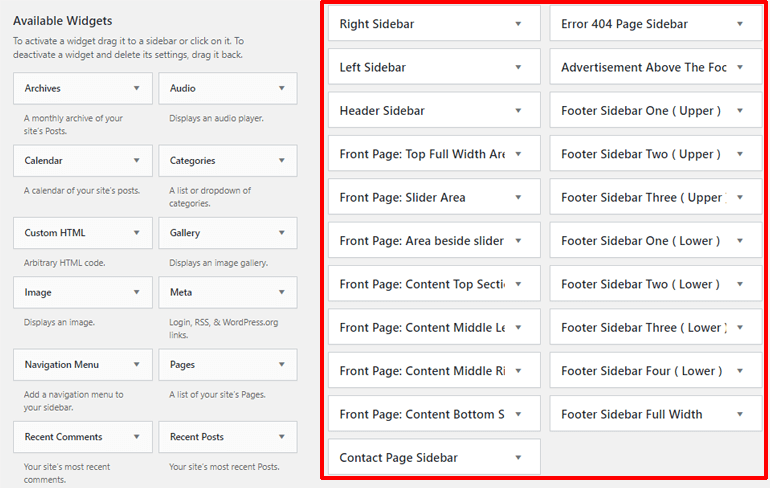
But if you’re using one of the best themes out there, say, Zakra or ColorMag, then you’ll get over a dozen of those widget areas. For example, the ColorMagTheme has over twenty of those locations where you can add your widgets.
So, make sure to choose a good theme with lots of these widget areas and other options.
How to Add Menus in Widget Areas?
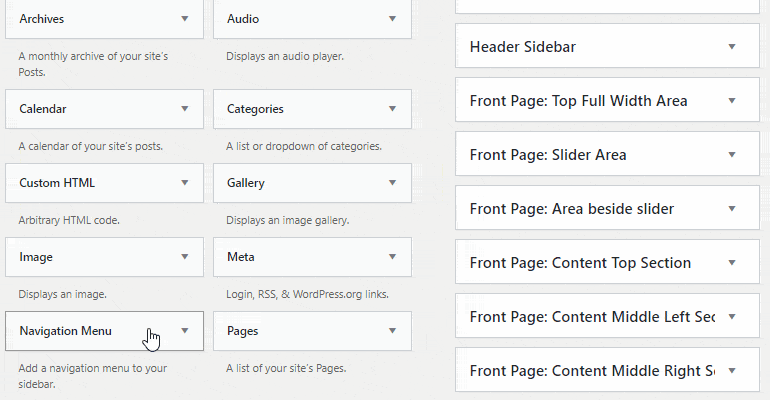
Now for the main part, adding a menu to a specific location is super easy. You just drag the Navigation Menu Widget and drop it to the location you see fit. For example, to add the menu to your header, drag the Navigation Menu to the Header Sidebar Widget Area.
After that, you will need to give a Title for your widget, or menu. And you’ll need to select which menu you want to add through the Select Menu radio button. Finally, hit the Saved button to save your menu in that area.
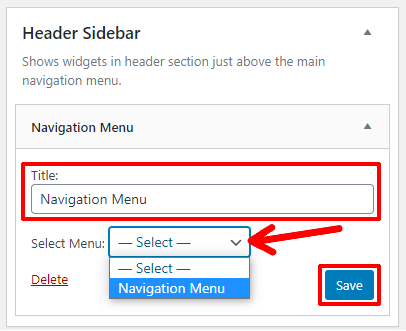
And that’s it. You have just used the power of widgets to add menus to your website. You can use this idea to add other widgets to different locations on your site.
E) Customizing your WordPress menu
As your website grows, you may need to make changes to your WordPress menu. You may want to add a new item or remove an existing one. Whatever the need for your menu may be, WordPress will fulfill it with ease.
i. How to Remove an Item from Your Menu?
If you feel like an item doesn’t belong to your Menu, you can remove it with just a few clicks.
Go to your Menu Editor window. Find the item you want to remove. Click on the arrow icon in the right corner of that item.

On the bottom of the pane, your item has, click on the Remove button. Finally, hit the Save Changes button to apply this new change to your menu.
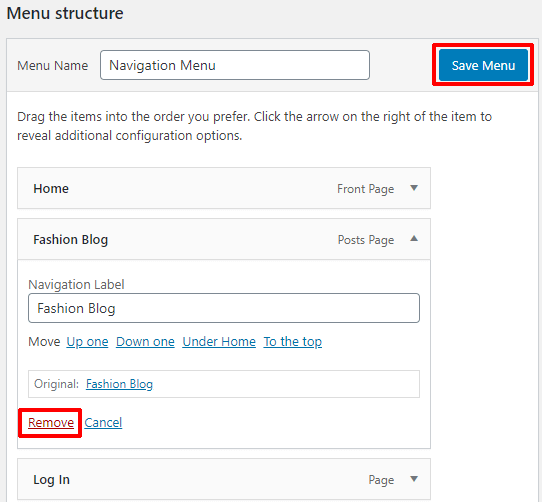
That item has been removed from your menu.
ii. How to Reorder your Menu Items?
Sometimes, the item we want to keep at the top slips to the middle or the bottom because of our order of selection. But fear not because you can easily reorder them.
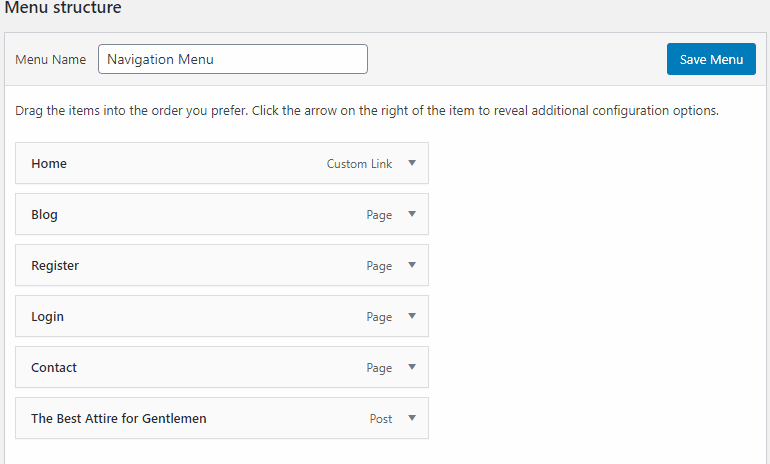
To change the arrangement of your Menu Items, simply drag and place the items in the order you want.
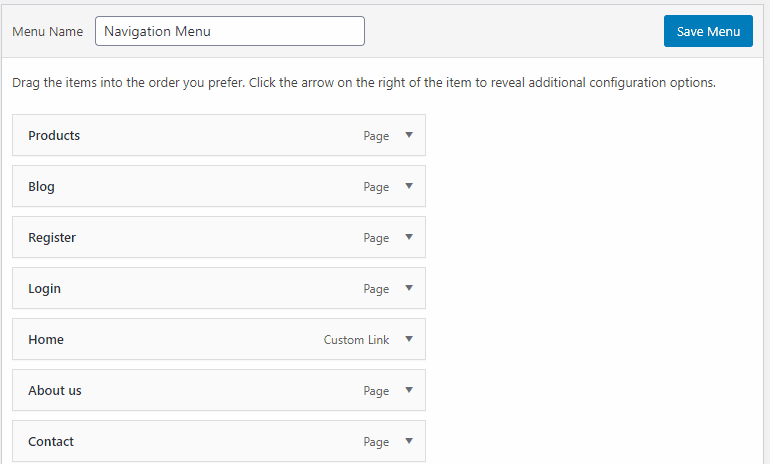
After you’re done click on Save Menu to save the order of your items.
F) How to Create a Social Menu in WordPress?
You may want to direct your users to your social media page to update them about your website regularly. For this, you will need a social menu.
A social menu is a menu with links that direct your visitors to your social media page like Facebook, Instagram, Twitter, or more.
Creating a social menu is as easy as adding custom links to your menu. That’s drawback exactly what it is.
In your Menu Editor window, click on the Create a new menu link.
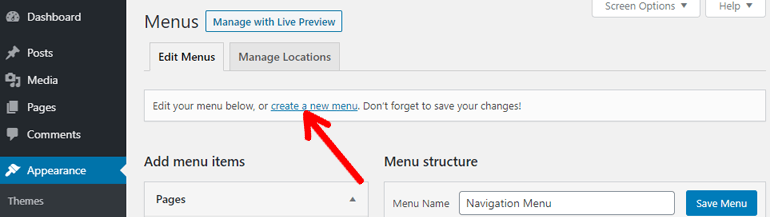
Choose a name for your menu and then, click on the Create menu button.
Use the Custom Links pane to add links to your social media page.
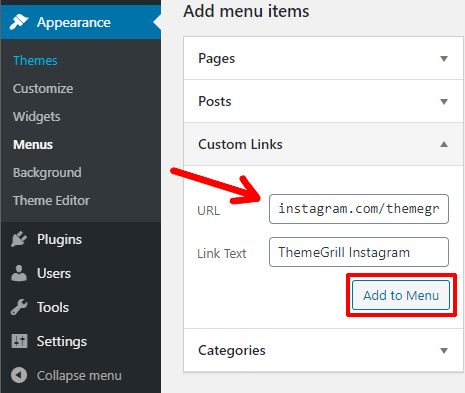
Once you are done adding social media page links, click on Save menu to save your social menu.
Plus, you can create social icons menu using a plugin like Social Icons.
G) Create Multi-Level Menus for your Website
So far, we have Menus that have only one level. But sometimes, we want to add a menu with more items that need to be categorized.
For this, we need menus with more levels. The first level will have to serve as the Main Heading. Then the levels after that will serve as sub-headings or individual items.
But don’t get intimidated by all of the multi-level menu talking. The ‘drag and drop’ interface makes it a piece of cake.
To create multi-level menus with parent-child structure (parent, being the main heading and child, being the sub-headings or menu items), is as easy as creating other menus.
Go to your Menu Editor Window. For this you can go to Appearance >> Customize.
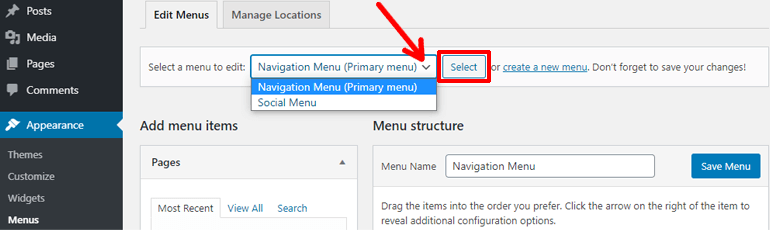
Select the menu that you want to turn into a multi-level menu.
Find the child item. Drag and position it underneath its parent item, slightly to the right.
You will notice that the child item gets indented. It will now have the tag, sub-item next to its name. You can do the same to other items to create a multi-level menu.
Click on Save Menu to save the changes you made
You now have menus with more than one level. This process can be followed to create dropdown menus and mega menus as well.
H) Create your WordPress Menu in Live Preview
Up until now, you have created menus through your dashboard. The drawbacks of this are that you can’t view the changes you made to your menu instantly. But WordPress solves that issue with its live preview. WordPress has a feature, WordPress Customizer, that lets you create and edit your menus in real-time.
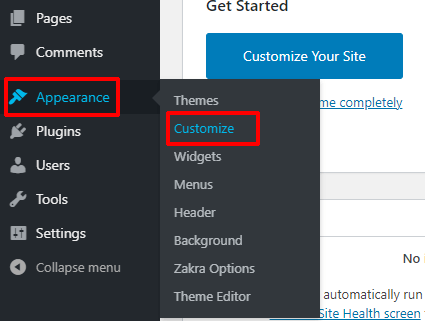
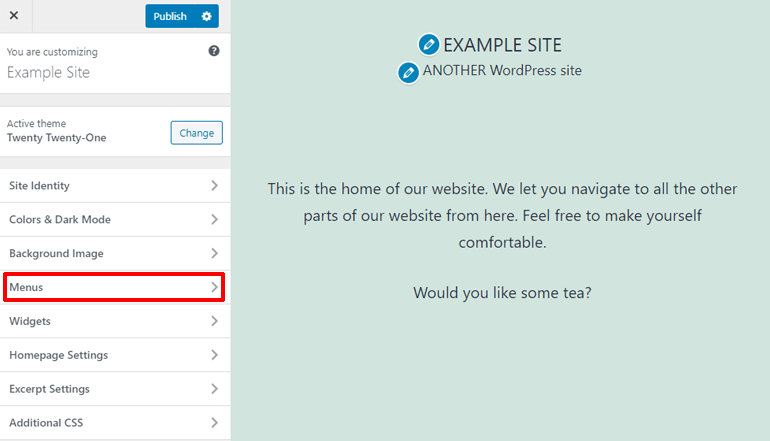
In your WordPress Dashboard, go to the Appearance tab and click on Customize.
On your right-hand side, on the customization menu, click on Menus.
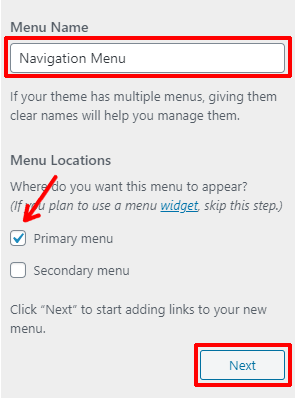
Click on Create New Menu.

Type a name for your menu in the Menu Name box. Select the Menu Location. To do this check the box that says the location you want. Click Next.
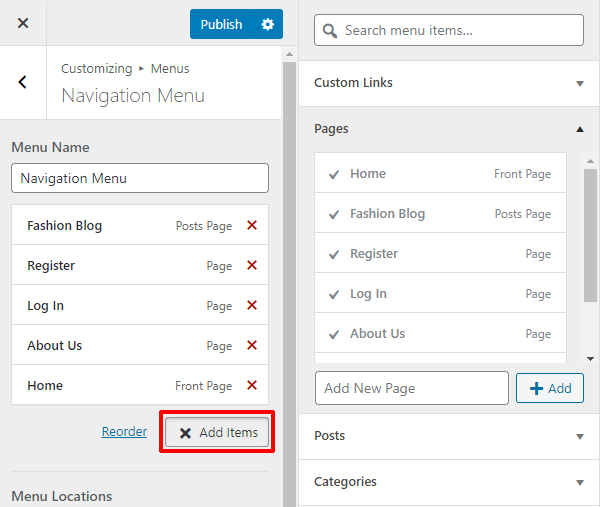
Time to add items to your Menu. To begin, click on the Add Items button.
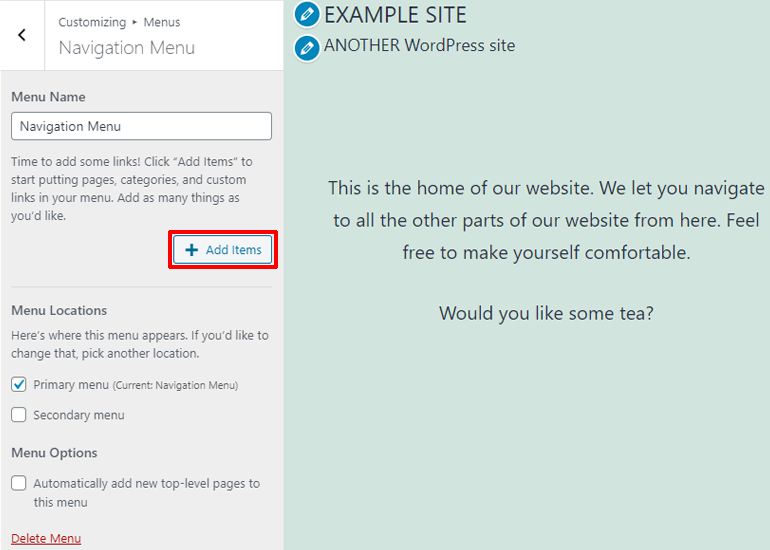
As soon as you click on the button, a list of items will show up on the right side of customizer menu. Click on the item you want to add. If you want to add pages, click on the Pages pane. Click on the pages you want to add. The same is with the posts, tags, and categories.

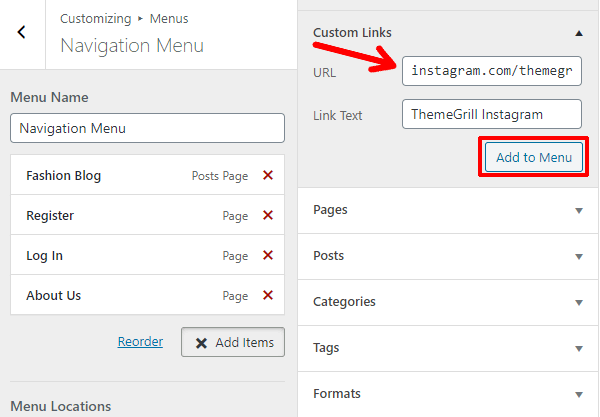
To add custom links, click on Custom Links pane. Fill the URL, type the link text you want your visitors to see. Then, click on Add to Menu.
Once you’re done creating and adding items to your Menu. hit the Add Items button again.
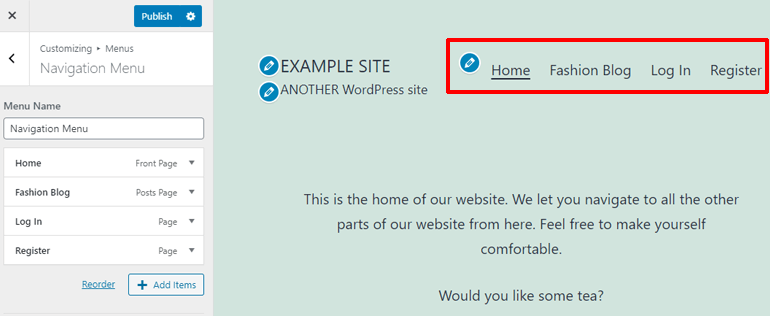
You’ll notice that your items and menu have already been added to your preview on the right. You have just witnessed the magic of the WordPress Customizer in Live Preview.
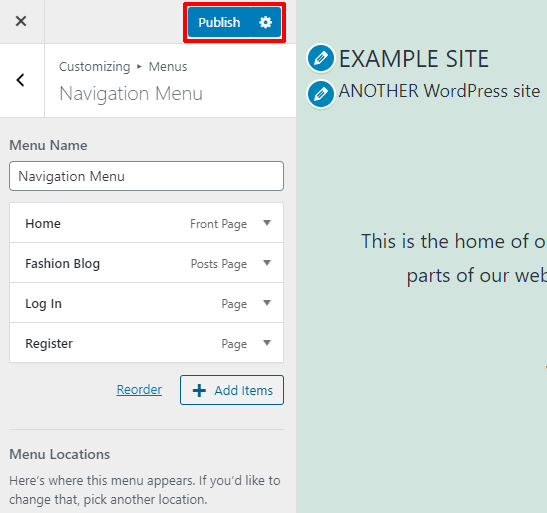
When you’re done adding items and adjusting your menu with the preview, finally hit the Publish button on the top to Publish your menu to your site.
You just created a menu with the live preview. Dashboard or live preview, you can choose whichever option seems easier to you.
I) Creating WordPress Menus with Plugins
Menus simply a collection of links on a specific location in your site for easy navigation. But Menus don’t always have to be just a list of links. They don’t always have to be plain text.
Simple menus can be created with WordPress itself. But creating complex menus, like mega menus can be a bit of a challenge. That’s why the menu plugins exist. Here, we’ll talk about some very popular WordPress menu plugins that make creating complex menus very easy.
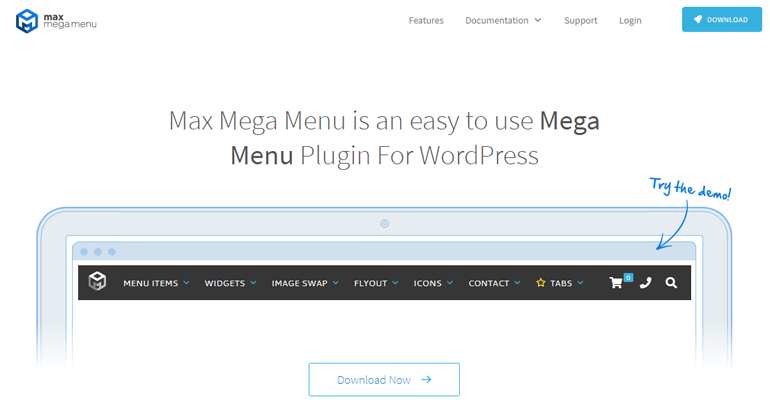
- Max Mega Menu: Max Mega Menu is a plugin for turning your menu into a mega menu. It is a free menu plugin by megamenu.com. With this plugin, you can make almost any customization to your menu. You can add a menu location and assign themes to the menu. There are widgets to make your menu even more interactive.
- WP Mega Menu: WP mega menu is a great tool for creating mega menus in WordPress. WP mega menu is a free menu plugin. But there is a premium version, which opens up more possibilities. There is a drag and drop interface for customizing your menus as well. You can make your menu attractive by embedding, google maps, showcasing products in the menu, adding eye-catching icons, and more.

WordPress menu plugins bring your entire website right in the menu bar. They make your menu more stylish, attractive, and interactive. With increased user experience, your site will gain more visitors as well.
Conclusion
We hope this article helped you know about what a WordPress menu is and how you can create them. With menus, you can improve your site navigation which will ultimately take your website to higher grounds.
Do you also think this article can be helpful to others too? Then go ahead and share it, spread the word.
If you are heading towards building a larger website and thus need a grand menu, then menu plugins are very helpful. Want to know more about plugins? You might like reading about essential WordPress plugins for creating a professional site.
The post What is a WordPress Menu? How to Create a Menu on your Site? appeared first on ThemeGrill Blog.