If you’ve heard about WordPress, you probably would want to know how to go about building a new WordPress site from scratch. It’s not VERY difficult, but we wanted to guide you through all the actual steps, not just the installation but the whole actual procedure from having nothing, to having a complete functional, fully working, optimized WordPress website. If you have just heard about WordPress and want to do it all yourself, this is the article for you 🙂
1. Buy a domain
Have you bought the domain you want already? If not, then now is probably the time to do some thinking about this.
Choose your domain name wisely, have a bit of a thought process. Choose something which is fairly easy to remember by your target audience, ideally in a domain which maybe is already familiar with your target demographic.
Once you’ve thought about it and made a decision, then purchase your domain
2. Get your WordPress hosting sorted
You probably need to get a web hosting page to know where your site is going to live. It’s ideal to chose a web hosting service which specializes in WordPress hosting. There are many out there, we choose to use InMotion for a number of reasons:

3. Get a domain or create a sub-domain
In all likelihood your host will be using CPanel to manage the hosting service. If you choose a package which allows you to host a single website, then you’re already done.
If you are hosting on a service which allows you to create multiple websites, you’ll probably need to add either a subdomain or an add-on domain. And add-on domain is a brand new domain such as https://www.collectiveray.com, whilst a sub-domain would be something like http://awesomeness.collectiveray.com
4. Link the domain to the hosting
The fourth step is to create the “link” between the domain you have bought and the hosting server you have bought.
This is done via DNS.
Essentially, this is done via the name servers functionality of the domain you have bought. Somewhere in the management of the domain you have bought you will find a way to specify what is called the nameservers for the domain.
The nameserver(s) are typically owned by the company where you will host your website – their function is to indicate to the browser try to access the domain you have bought, the exact server(‘s location / IP) which is hosting your website.
So in the fourth step, what you’ll need to do, is discover the nameservers of the hosting company you will be using, and enter these nameservers in the management of the domain you have bought. This step is independent from creating a website using WordPress, whatever technology you use to create your website, you’ll have to perform this step.

There are some users who won’t be running just a single website on their hosting.
Particularly if you are a web designer or an agency, you’re probably going to need plenty of storage. Many hosting accounts will offer an unlimited amount of storage, however it all depends on the actual hosting account you go for.
Many times, you will be able to find hosting companies who can provide you with account with unlimited storage. You should compare and contrast and see what suits your needs before you make an ultimate decision. Particularly if you are an agency, you wouldn’t want to transfer tens or hundres of sites, so consider carefully before you make a final decision.
5. Prepare with the WordPress source files
We’ve now arrived to WordPress specific steps 🙂
First of all, you need to acquire the latest source files for WordPress by visiting and downloading the latest version of WordPress from https://wordpress.org/download/ … once you’ve downloaded the files, you’ll need to upload these files to the hosting server which you’ve bought in the previous steps (do not uncompress the files yet!).
You can do this, either by accessing your server via an FTP program and uploading the zip file you have just downloaded.
An easier way is usually to simply use the File Manager function which is typically available via your hosting control panel.
This should provide you with an easy way to upload the zip file to the root folder of your hosting package. Make sure you upload the file to the public_html folder (there might be other folders). If you want your WordPress website to live in www.yourdomain.com upload the file to public_html.
If you want to have a subfolder, create a folder with the name of the subfolder you want in public_html, and upload it to that folder. For example, if you want your install a new WordPress named MyStory, create a folder named MyStory in public_html, and upload the file to this folder. Your new WordPress installation would then be created in www.yourdomain.com/MyStory.
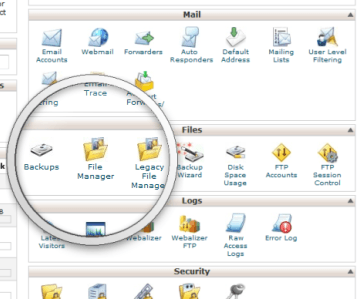
Once you’ve uploaded the zip file, your File Manager should also provide you with the functionality to expand the zipped file via the Extract function. Extract the zipped file now. Why have we opted to extract it now? Well it takes of course much less time and effort to upload a single file rather than a few hundred via ftp 😉
6. Prepare the (MySQL) database for your new WordPress installation
A WordPress installation requires a database to store all of its content, menus, configurations, comments etc in this database, so you’ll need to create a database for WordPress.
This database is queried by WordPress each time somebody access your new WordPress installation, reads the information you have posted, and displays this data to the end user.
Using the control panel of your websites hosting package, you should be able to create a database, together with a username and password for this database. If your host is using CPanel, and use the function MySQL database, creating the database and the user are done as seperate steps:
You first create the database, then add a new MySQL user, and finally grant access that user access to the MySQL database you have just created.
If you want a slightly easier way, you probably should use the MySQL Database Wizard which allows you to create the database, user and give the user access to the database you have created in a number of steps after each other. Make sure you take note of the
- Name of the MySQL database
- Name of the MySQL user and password of the user you have created
- Name of the MySQL server (this is specificed during the creation of the database). It is usually localhost, but it might be different in some hosting servers.
If this step is a bit difficult for you to achieve by yourself most hosting sites will be able to create the database and user for you and give you all of the information you’ll need.
7. Install WordPress
Once you have done all of the above preparations, installing WordPress should take literally a few seconds 🙂 Visit your domain: and you should get a welcome page telling you what information you’re going to need which are the following
- Database name (the MySQL database you have created in Step 6)
- Username (the MySQL user you have created in Step 6)
- Password (the password for the MySQL user)
- The name of the database server host (usually localhost, or the name which was given to you whilst creating the database in step 6
- Table prefix – this should be a couple of characters at random and an underscore, by default they are wp_
Once you have confirmed you have all the infroamtion from 1 to 4 above, press the “Let’s Go” button. You’ll now get a form which allows you to specify the information of the database. Enter the information correctly and click the Submit button. You don’t really have to worry too much about the table prefix, so if you don’t understand what it does, just leave it as it is by default.
If WordPress is able to connect to the database, you’ll get a nice message from WordPress saying it;s now about to run the installation of WordPress. If you have specified some wrong piece of information to access the database, the WordPress installation is going to complain – something along the lines of “Error establishing connection to the database”. Make sure you have the correct information and try again.
Once you are able to perform the “Run the install” step – you’re WordPress site is nearly ready!! Just a final step of configuration and you’ll be done! You should now be seeing a Welcome screen.
Here you can now enter some information about your new WordPress website installation.
- Site Title – give your WordPress website a name. We already said it’s going to be called My Story
- Username and password – these are going to be used to access the administrative part of WordPress, so make sure you create a very strong password. The strength indicator will show you whether you have a good password or not. If you want your website to survive the wild west of the internet DO NOT use admin as the username and password. Do not use admin as the username or password. Infact, make sure that the username and password are difficult to guess by somebody else, but easy to remember by you. I like to use phrases, together with random characters. For example, the username would by MyAdminStory, and the password would be Letmetellyoua$t(0)ry
- Enter your email address for important notifications from your WordPress website.
- Check the privacy options if you would like Google and other search engines to be able to access your website And that’s it!! You now have a new WordPress website. You’ll now be redirected to the WordPress administration to enter your username and password so that you can start creating posts 🙂
Moreover, if you go to www.yourdomain.com you’re going to find a brand spanking new WordPress website!! Hello World!
8. Secure your WP site
WordPress has had an awful history of being easy to hack – but this is something which can be quite easily addressed with the current mature versions of WordPress. There are two very basic things you need to do to make WordPress hundreds of times more secure
- Make sure you allow WordPress auto-updates. This ensures that if a security problem is discovered in your current version of WordPress and a new WordPress is version comes out which addresses this problem – the new version will be installed and your website will no longer suffer from that problem
- Make sure that your administrator username and password are not easy to guess. We’ve already highlighted this above, but we’ll stress this again. Make sure the administrative users of your new WordPress website installation have a username which is NOT admin, and a password which is difficult to guess.
Besides these two steps, the best way to secure your WordPress installation is by allowing the experts to do it for you. If you are not a security professional, then in all likelihood you might miss something, so better leave it to those who exactly what they are doing. We recommend installing Acunetix WordPress plugin and let it do its thing. It will perform a number of fixes on your WordPress installation which makes it much much more secure than a standard WordPress installation.
9. Configure the basics
There are a few steps you really should do to make sure your new WordPress site is up to scratch.
Make the URLs look pretty
If you clicked on the Hello World post, and take a look at the address bar – you’ll see that it the address of the post isn’t exactly ideal. It looks like www.yourdomain.com/?p=1. This how your posts would look if you did not change the default “Permalink” settings.
So head over to the Permalinks section (Settings > Permalinks) and choose how you would like the address of your posts to look. There are various options you can choose, and choose one you prefer as long as you change it from the Default.
Protect your WordPress website from comment spam
The scourge of the ability to comment is that so many WordPress websites get abused by comment spam.
Fortunately, WordPress ships with Akismet, and you can also use the brilliant Jetpack which we have reviewed here, which is comment spam protection service.
Visit Jetpack for the best spam protection
If you’re not ready to opt for Jetpack right now, you should at least set up Akismet.
First of all, choose whether you want comments or not, if you do not want any comments, head to Settings > Discussion and customize the options here to suit your needs. You can for example force users to register before they are able to post comments, or you can choose the disable comments completely. Once you have done this, you should still configure Akismet.
Go to Plugins > Installed Plugins > and click on Activate for Akismet. Once you press Activate you’ll get a huge button which shows you how to register and Akismet account, generate an API key and use this to protect your WordPress installation from comment spam
Give your name a face – activate Gravatar
Gravatar is used by default in WordPress to display images on comments, or wherever Gravat is enabled. Many themes also support Gravatar. You just need to associate your email to Gravatar once, and from then onwards, on your WordPress website or any site where Gravatar is enabled, your name which have a face
10. Choose an AWESOME theme!
Wait – you thought you were done?
Strictly speaking, you are ready of course, but these steps will give your site a few things which is *should* have.
A theme basically is the personality of your new WordPress installation. A few themes comes installed with WordPress by default, and there are literally thousands which you can choose from. There are also thousands of WordPress themes for sale. We’d recommend that you choose one which you reflects the scope of why you are creating a WordPress website in the first place.
Configuring the theme is something which is a little bit outside the scope of this article because it is going to be very much specific to the theme which you have chosen.
What will make or break your WordPress website is very much dependent on what your website looks like. And the way to control what WordPress looks like is through themes. Here’s a little hint – do NOT use a free theme. Many times there are limited, basic, unprofessional, and make your site look cheap. Instead visit this website here for a huge selection of WordPress themes costing usually between $20 and $60. You really should skimp on the look and feel of your website – so really, do yourself a favour and pick up a template from there, and we guarantee your site will look great!
Recommended theme: Divi
We just mentioned that it makes sense for your business to opt for a premium theme, so of course we’re going to make a recommendation for the most amazing WP product ever – and our favorite theme by far: Divi.
Divi is a premium WordPress theme which has grown to become one of the most flexible products, whether you want to use it to create a community, a blog, a single page websites or a mix of all of these, Divi has you covered. It is both a theme and a drag and drop page builder, you know that you can do absolutely anything you want with Divi.
If you want to see what we think of Divi, we’ve got a full Divi review here – don’t miss it!
Have a look at Divi, we can assure you, you’ll not regret it.

Download Divi Now (with 10% OFF until )
We’ve taken the time to choose quite a few WordPress themes which we love and you might as well have a look at them 😉
WordPress themes for setting up an online shop
WordPress themes for setting up a personal blog
25+ Real Estate Website Templates + 20 Proven tips to sell your property online
11. Create a few basic pages
Your WordPress website is of course for getting people to know about you, your company, your product or something else you want your visitors to get to know about. So for your visitors to get to know you quickly and easily you might want to create a few standard pages.
Set the homepage or front page of your WordPress website
This is where everybody lands as soon as they hit your website i.e. when your users enter www.yourdomain.com. By default, WordPress shows a list of your latest posts. If this is the way you want your landing page to be, you don’t need to do any changes. On the other hand, if you want to create a static page, you can go to Pages > Add New and create the content which you want to be displayed as your front page. Once you are done with the content of this page, set the page as the front page of your website by going to Settings > Reading and choose the static page you have just created to be displayed as the front page
About Us page
The about page, of course, will be a bit of detail of who you are. The about page is one of the pages that most people visit who don’t know about your website visit to know who they are dealing with, so make sure you create a succinct description of who you are and what you and your website are all about – hence the About Us 🙂
The contact us page
Once people have arrived on your site, you want to make sure they can get in touch with you as easily as possible. You can either put in an email address, telephone number and other basic contact details. You could also choose to install a Contact Form WordPress plugin, to be able to display a contact form.
Google Maps Widget
One essential page or piece of content you’ll need to add to your site, especially if you are a services-based business, or have a physical location which is even more important than your online presence, then you need to show you people exactly where you are located.
The easiest way to do this is by adding a Google Maps Widget with the exact location of your business, offices, shop or other physical location.
If you’re not too familiar with how to set this up, may we suggest this plugin which will help you get done with this in minutes? You can use either the free version of the plugin which we linked above, or opt for the PRO version, which is actively being used by more than 100,000 users.
Other pages
If your site has a specific scope of displaying information about a product, service, or anything else which you might want to get across to people, you can create pages for the stuff which you want to show to people
Post categories
If you plan to use WordPress as a blog, or somewhere where you want to display posts often, it would be a very good idea to configure categories for your posts. The one thing which you need to keep in mind when creating the post categories is User Experience. You want to optimize the user experience so create categories which make it as easy as possible for your visitors to get to the posts they are looking for in the shortest time possible.
Start posting!
Once you’ve set up the basics, you should now start adding some content. This, of course, is going to be an ongoing process. As a rule of thumb, you should be creating posts which are unique and useful for your visitors. If they are useful for your visitors, they will be more likely to stick around or come back for more.
12. Make your website search engine friendly
By optimizing content for search engines, you make sure that when people are searching for certain phrases, your website is displayed in the search results as often as possible. Although SEO (Search Engine Optimization) is not a one-off thing, there is one thing you need to do to ensure you ease the process of optimizing your WordPress website for search engines. Besides choosing a theme (see below) which is search engine friendly, you’ll want to make sure that you install the WordPress plugin:
WordPress SEO by Yoast

This plugin enhances the SEO features of your website by providing a number of essential features such as
- An XML sitemap of your website. Google, Bing, Yahoo and many other search engines use Sitemaps as a guide of when and what posts to look at when they visit your search engine. If they are guided, they need to guess. An XML sitemap is a detailed map of the content of your website. The Yoast SEO plugin ensures a good sitemap is created for your website, verifies your website ownership on a number of Webmaster tool pages, and submits the sitemap of your WordPress website to the Google, Bing, etc, WebMaster tools portals on your behalf.
- Control of title and meta-data tags Two of the most significant on-page SEO indicators are the title tag and meta-data description. Yoast allows you to configure these tags as necessary for the best possible SEO scores.
- Keyword focus – if you are targeting specific keywords or keyphrases, Yoast makes sure you do all the necessary tweaks to ensure your page will rank as well as it can with onpage changes. Things such as having the keywords appear in headings and sub-headings, keywords appearing in the content at specific densities, appearing in the ALT tags of images and other on-page SEO techniques.
If you’d like to learn more about SEO, we’ve written an excellent article here: WordPress onpage SEO Checklist: a 19 step-by-step guide to boost traffic
13. Make your website fast and sociable
Prepare for social sharing

Besides traffic from search engines, another great source of traffic are Social Networks such as Facebook, Twitter, LinkedIn and Pinterest. So you need to make sure that your website is enabled for social sharing. As a bare minimum you need to make sure all your pages have a share button enabled for Facebook, Twitter and a number of others (where you target traffic demographic visits most often). You also need to ensure that the pages are “share-friendly”, meaning that code is inserted into each page to make sure that the site displays images and descriptions as necessary for each social network. Fortunately, we’ve got you covered, you won’t have to worry too much about inserting these codes into your site. The plugin which we have mentioned above for SEO also covers your site for social sharing.
Make your website fast
Your WordPress will be annoying if it isn’t snappy. If you want the site to be as fast as possible, you’ll need to make sure you’ve gotten a good WordPress hosting server but besides that, you’ll also need to help it along. There are some good plugins out there, however definitely the best one out there to make your WordPress website fast, you’ll need to install WP Rocket.
When installing this plugin, your site immediately gets a boost, besides rating much better in websites such as Google PageSpeed or Yahoo!’s Y!Slow. This means that your site is going to faster and much more pleasant experience to your visitors.
This is not a free plugin, but, as you might know, Google gives a lot of attention to websites which are fast. In addition, the user experience of a slow is something you need to avoid at all costs, (if you want your website to be succesful in the long-term), so do make sure you make sure your website is as fast as it can get it WP Rocket!
Get WP Rocket
14. Do your thing
Of course, if you want to break away from the crowd, you’ll probably need to customize the site to suit your own needs. However, that is now what YOU need to do and where we can’t help you much 🙂
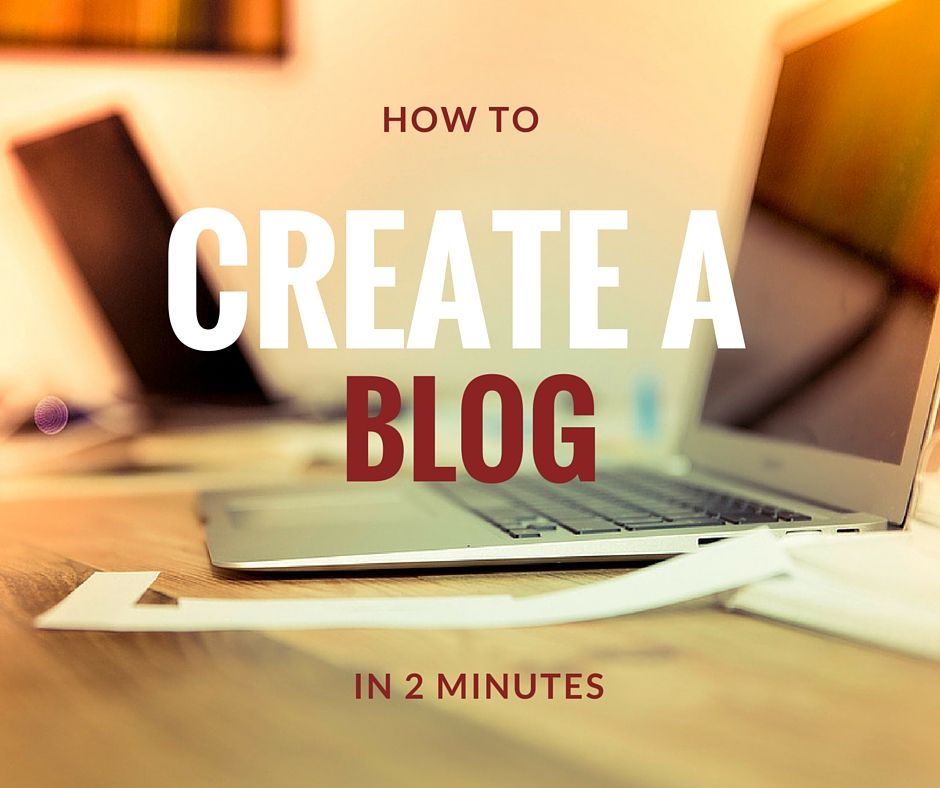
15. Shortcut – Create a website in 2 minutes
Now that we’ve actually shown you how to do it all the long way, there’s also the short version! How to create a website in literally 2 minutes.
If you want to know how to create a blog – the easiest way to do this is, of course, using WordPress. Although you may think it is difficult to create a blog on WordPress – we can show you that is literally very very easy to do this – all it takes is 2 minutes literally if you use our recommended method. This is because rather than having to do it all yourself, you can just create a blog with an automatic installation on a hosting server.
Once again, we’re going to recommend using WordPress. If you heard of ways to create blog, you know of course WordPress is used for all types of websites – but one of its main reasons has always been to create a blog.
1. Create a SiteGround Account
We recommend SiteGround because we have use them ourselves, we find them great, and more importantly, we can show you how to create blog in 2 minutes with SiteGround. You can see our full review of SiteGround here.
2. Create a blog in 2 minutes
Once you’ve logged in to your SiteGround account – you’ll need to visit your CPanel by clicking the button as shown below. Here we will show you how to create blog in WordPress.
Once you are in the CPanel – you’ll immediately be able to see how to create blog via the WordPress autoinstaller. This will do all the dirty technical work for you, so you don’t have to worry about creating databases, passwords, downloading source code and configuring anything. You don’t need to know how to create blog yourself – all of the work will be done for you via the autoinstaller.
Once you click on WordPress – you’ll find yourself on the following screen – as you can see you just need to click on the Install button to create your blog.
Once you click on the Install button you’ll get a few options – but this tutorial on how to create blog will explain everything you need to do in detail so you don’t need to worry 🙂 You can leave all the options as they are – no need to do any changes. The first option is the Protocol – just leave it as it is as http. The second options is the domain, which you should have registered as part of your setup process.
The second part looks more complicated but it really isn’t. The only things you’ll need to do are the following:1. Change the name of the blog to what you would like the blog to be called (don’t worry if you don’t know – you can change this later)
2. Change the description of the blog – again don’t stress too much you can change this later.
3. TAKE NOTE of the admin username and admin password. This is VERY IMPORTANT – though if you forget them we’ve got a way to reset your WordPress password.
4. Change the email address to a working email address which you have.
The rest of the settings are pretty straightforward, and unless you want to change the language of your blog you don’t need to touch anything! We would recommend you enable the Limit Login Attempts as part of the process of how to create blog because it will make your blog more secure against people trying to guess your password.
Click Install to make the magic of creating a blog happen!
Once you do that – you’ll see the below screen whilst the installation happen!
And once this done – you’ll see the next screen as follows – and your blog is ready. You’ll get two address
1. The address of your newly created blog
2. The administration address of the created blog. You’ll use the admin details we told you to take note of earlier to login as the administrator of your blog.
Install a great theme on your created blog
Now your blog is ready – but ff you want to create a blog which makes a hit though, you’ll need to make sure your theme is spot on. Using a default theme, or one which is not visually appealing, or does not offer certain functionality and features for your readers will create a bit of a barrier to your readers. We’ve done a lot of research to find some of the best WordPress themes you can use to power your brand new (or old ;)) WordPress blog.
Here are our favourites blog themes for WordPress. Enjoy!
Divi
Once again, we’re going to stick to our previous recommendation and suggest that you go for the Divi theme. Before you check out any other theme, look at this one first – the great thing about it is, you can start using it for a blog, and as your site matures, Divi will expand and grow with it (it’s a multi-purpose theme which can be used for almost any niche)
If you want to see what we really think of this theme, we’ve got a full Divi review here – don’t forget to read our article here!
Download Divi Now (with 10% OFF until )
Brixtons – Minimal Personal WordPress Blog theme ($38)
One of our favourite themes for a WP blog is Brixtons – News from the City. Very trendy, very hipster – you’ll love this theme with a very elegant and clean design. It is a very good choice for any personal blog, no slideshows or animations, just straight to the point with information presentation cleanly and minimally. Social media is covered with widgets as necessary! Besides the awesomeness of this WordPress blog theme, you also get the PSD files, so that you can do any changes you want. A recent update of the theme has included font-awesome icons. The logo of the theme is also available for free for you to use in any way you would like. Let’s see some of the features Brixton offers:
- UNLIMITED COLOR VARIATIONS
- Super fast loading
- Google Web Fonts
- Full width and boxed version
- SEO optimized
- Instagram Feed
- Made for readability
- Creative Design
- Video, Gallery, Audio, Quote, Standard and Link Posts Templates
- Clean and Crisp Design
- CSS3 Features and Animations
- Detailed written help file
- Use your custom logo and favicon icon.
- 7 Post Templates (Standard, video, link, gallery, audio)
Have a look at the LIVE DEMO here.
Hemlock – A responsive WordPress blog theme ($38)
This is one we really really love! It is an awesome template – we do believe it is quite girly and feminine and a perfect choice for a WordPress travel or food / restaurant or lifestyle blog. The structure and layout is perfect for highlighting the “blog of the day” – gives a lot of prominence to whatever the author is blogging about that day. This theme is all about form, though function is obviously very well done too! This theme will make sure your blog stands above the rest – screaming modern sophistication.
Blogoma – Sweetest Simple Blog Theme ($43)
This is another theme we absolutely love! There’s something about simplicity that makes it the ultimate sophistication! Whilst Hemlock above has a girly feel – Blogoma has very techy feel and is a perfect choice for something such as Tech, Gadget, Sports, Watches, Cars or other technology blog, or other manly or geeky stuff 🙂
Of course, the theme is very adaptable to many uses, so don’t limit yourself to what we’re saying and have a look at the LIVE PREVIEW right now.
John Doe’s Blog – Clean & Personal WordPress Blog Theme ($48)
John Doe’s Blog – just like its name is a simple, clean and modern theme for blog which is ideal for sharing your personal stories. It’s of courses responsive. It’s got many features which won’t bloat your WordPress installation.
The theme features 10 predefined CSS styles, 8 custom widgets, 60+ shortcodes, and 8 post formats including Standard, Aside, Gallery, Link, Image, Quote, Audio and Video.
The powerful and friendly admin panel is focused towards user-friendliness, rather than other bulky themes, where the newbie blogger might get a little bit lost. The theme is also social media ready, so you’ll be able to integrate Facebook, Twitter, Instagram, Flickr, Pinterest profiles with your website from the get go.
It also had Fontello integrated, so you’ve got literally over a thousand icons to choose from to use with this theme. There are also 6 blog layouts, and 15 custom page templates which you can “style” your blog pages with the essential stuff like galleries, contact us pages, filterable blogs and full width pages.
But enough descriptions – maybe it’s better to just see for yourself in the LIVE DEMO ?
Retro Portfolio – One Page Vintage WordPress Theme ($43)
The great thing about the internet is that whatever your style, you’re Going to find something that fits you. So we’ve just mentioned technology and sophistication in our previous two spotlights. Our next WordPress personal theme goes VINTAGE. If you love a retro style, Retro Portfolio is a one page vintage WP theme. It has just been released as a responsive theme…something which happened only quite recently!
Let’s see some of the features of this theme
- Fully Responsive
- Retina integration for logo and banner
- Can easily add, remove and rearrange sections in the homepage
- can easily change the colour of any single section, page or blog post thanks to the introduction of a new color picker
- Google Fonts integration
- New icons
- New responsive slider
- Portfolio gallery
- Anti-spam filter on the contact form
- More CSS, less images
- Completely Translatable
- Updates Notifier
- Detailed Documentation
Check out the live demo of Retro here
Elantra 2015 – Elegant Personal Blogging Theme ($43)
Another really neat and stylish personal blogging WordPress theme is Elanta 2015. If you don’t know how to create website, this template is simple but elegant design makes a very good choice for a personal blog, and it’s powered by Bootstrap 3 – so responsiveness is built-in to the template. It is an absolutely good choice for those wanting to create a travel, hobby, cooking or fashion blog. All images are displayed via Magnific Popop Window, so they literally jump out of the (browser) window when you click them 🙂
It’s easy to add SoundCloud songs, Vimeo/YouTube video, audio and video by WordPress Hosting Url, Quotes & Links posts, or Mosaic/Slider Gallery post.
And with the inclusion of 600+ Google Web fonts – you’re sure to create the special style just for you!
Why don’t you check the beautiful LIVE PREVIEW here?
Conclusion
So what do you think of our choices? Can you make better recommendations? Do you find this article about how to create blog useful or is there something more which we can add to this content? We’d love to help!
Please leave a useful comment with your thoughts, then share this on your Facebook group(s) who would find this useful and let’s reap the benefits together. Thank you for sharing and being nice!