In this blog post, we’ll embark on an exciting journey to build your very own random password generator using the dynamic duo of Python and Flask. I’ll guide you step by step on your journey and by the end of this tutorial, you’ll have a fantastic web interface at your fingertips, allowing you to customize your password requirements like a true tech wizard.
Why Build Your Own Password Generator ?
Well because it’s cool! and in addition, creating your own password generator offers a range of benefits over relying on online alternatives. First and foremost, it grants you complete control and transparency over the security of your passwords. By building your own generator, you can ensure that the code is reliable, free from vulnerabilities, and tailored to your specific needs. Additionally, with a self-hosted solution, you eliminate the need to trust third-party websites with your sensitive data.
Lastly, a notable advantage is the freedom to customize the password generation process according to your preferences. Unlike generic online generators, building your own allows you to include additional options that cater specifically to your needs, such as the ability to exclude specific characters from the generated passwords. This level of control empowers you to create passwords that align perfectly with your desired level of complexity and security.
Tell Me What I Need To Get Started ?
Before we can embark on our coding adventure, we need to ensure that Python and Flask are ready to work their magic. In my lab, I’m using Ubuntu Server.
Step 1: Installing Python on your Ubuntu system. You can follow these simple steps:
- Open a terminal window on your Ubuntu server, or establish an SSH session to it
- Update the package lists by running the following command:
sudo apt update
- Once the update is complete, you can install Python 3 by running the following command:
sudo apt install python3
This will install Python 3 along with the necessary dependencies.
Step 2: Installing Flask
Now that you have Python installed, it’s time to install Flask, the magical framework that will power our password generator. To install Flask, follow these steps:
- Open a teminal window on your Ubuntu server, or establish an SSH session to it
- Type the following command and hit Enter to install Flask using pip, the Python package installed:
pip install flask
This will fetch and install Flask and its dependencies
Now that Python and Flask are all set up and ready to go, it’s time to dive into the exciting world of coding! Get ready to awaken your inner programmer, as we embark on the most thrilling part of our journey. Don’t worry if you’re new to coding – this is where the real fun begins! We’ll guide you step by step through the code creation, ensuring you have a blast along the way. So, put on your coding cape, grab your keyboard, and let’s embark on this exciting coding adventure!
Setting Up Our File And Folder Structure
Note: If needed, password generator project files can be downloaded from my Github repository.
First, we need to create an empty file with the Python extension .py. In my lab, I’ve created a directory within /home/sysadmin, where sysadmin is my Ubuntu username. I named the directory python-pwgen. You can either use the same name or choose your own folder name. To create the folder, open your preferred terminal and type:
mkdir /home/sysadmin/python-pwgen
Next, we’ll create an empty file called pwgen.py using the following command:
touch /home/sysadmin/python-pwgen/pwgen.py
In addition, we’ll create a directory called ‘templates’ which serves as the storage location for our index.html file, used by Flask. To create both of these, enter the following command in your terminal:
mkdir /home/sysadmin/python-pwgen/templates
touch /home/sysadmin/python-pwgen/templates/index.html
Now, let’s open the Python file using nano (a powerful and highly configurable text editor). Ensure you are in the /home/sysadmin/python-pwgen directory by typing:
cd /home/sysadmin/python-pwgen
Then enter the following command:
nano pwgen.py
Setting Up The Flask Environment
To begin, we need to set up a Flask environment. Import the necessary libraries by typing the following lines of code:
from flask import Flask, render_template, request
import string
import secrets
- Flask is a micro web framework for Python that allows us to create web applications easily.
- render_template is used to render HTML templates in Flask.
- request is used to retrieve for data sent from the web page.
- string is a built-in Python module that offers a range of helpful tools for working with text.
- secrets module provides a secure way to generate random numbers and selections
Creating The Flask Application
Next, we’ll create the Flask application. Add the following code:
app = Flask(__name__)
In the code snippet app = Flask(__name__), we are creating a Flask application instance named app, and the __name__ part refers to a special Python variable.
In Python, __name__ is a built-in variable that represents the name of the current module. When we run a Python script directly, the __name__ variable is set to "__main__". However, when a module is imported by another script, the __name__ variable is set to the module’s name.
Defining The Password Generation function
Now, we’ll create the password generation function. Enter in the following code:
def generate_password(length, use_uppercase, use_lowercase, use_special_chars, use_numbers, exclude_chars): characters = '' if use_uppercase: characters += string.ascii_uppercase if use_lowercase: characters += string.ascii_lowercase if use_special_chars: characters += string.punctuation if use_numbers: characters += string.digits if exclude_chars: characters = characters.translate(str.maketrans('', '', exclude_chars)) if not characters: return "Error: You must select at least one character type." password = ''.join(secrets.choice(characters) for _ in range(length)) return password
The generate_password() function takes in several parameters: length (password length), use_uppercase, use_lowercase, use_special_chars, use_numbers (booleans indicating whether to include specific character types), and exclude_chars (characters to exclude).
An empty string called characters is initialized.
Based on the selected options, the appropriate character types are added to the characters string.
If exclude_chars is provided, the characters listed in exclude_chars are removed from the characters string using the translate() method.
If no character types are selected, an error message is returned. “You must select at least one character type”
The password is generated by randomly selecting characters from the characters string for the specified length.
The generated password is returned.
Defining the Route and View Functions
Lets define our Route and View Functions next. Enter in the following code:
@app.route('/', methods=['GET', 'POST'])
def home(): if request.method == 'POST': length = int(request.form['length']) use_uppercase = 'uppercase' in request.form use_lowercase = 'lowercase' in request.form use_special_chars = 'special_chars' in request.form use_numbers = 'numbers' in request.form exclude_chars = request.form['exclude_chars'] password = generate_password(length, use_uppercase, use_lowercase, use_special_chars, use_numbers, exclude_chars) return render_template('index.html', password=password, default_length=length, default_exclude_chars=exclude_chars) return render_template('index.html')
The route ‘/‘ is defined, which corresponds to the web home page.
The view function home() is associated with the ‘/‘ route.
If a POST request is received (form submission), the function retrieves the form data (length, checkbox values, and excluded characters).
The generate_password() function is called with the form data to generate the password.
The rendered index.html template is returned with the password and default values passed as template variables.
Running the Application
Enter in the remaining Python code:
if __name__ == '__main__': app.run(debug=True)
The if name == ‘main’: condition ensures that the application is run only when the script is executed directly.
The application is run using app.run(debug=True), which starts the development server.
With this code, the Flask application is able to handle form submissions, generate passwords based on user preferences, and render the index.html template to display the user interface.
Creating the HTML Template
Now remember the index.html file we created earlier within the templates folder ? We are going to be editing it with nano and creating our web front end.
cd /home/sysadmin/python-pwgen/templates
nano index.html
Enter in the following code:
<!DOCTYPE html>
<html>
<head> <title>The Password Generator Wizard</title> <style> body { font-family: Arial, sans-serif; } h1 { color: #333; text-align: center; } form { margin: 20px auto; max-width: 400px; padding: 20px; border: 1px solid #ccc; border-radius: 4px; background-color: #f5f5f5; } label { display: block; margin-bottom: 10px; font-weight: bold; } input[type="number"], input[type="text"] { width: 100%; padding: 10px; border: 1px solid #ccc; border-radius: 4px; box-sizing: border-box; font-size: 14px; } input[type="checkbox"] { margin-top: 10px; } input[type="submit"] { display: block; width: 100%; padding: 10px; margin-top: 20px; border: none; border-radius: 4px; background-color: #337ab7; color: #fff; font-size: 14px; cursor: pointer; } .generated-password { font-size: 24px; font-weight: bold; text-align: center; margin-top: 20px; border: 1px solid #ccc; border-radius: 4px; padding: 10px; display: inline-block; } </style>
</head>
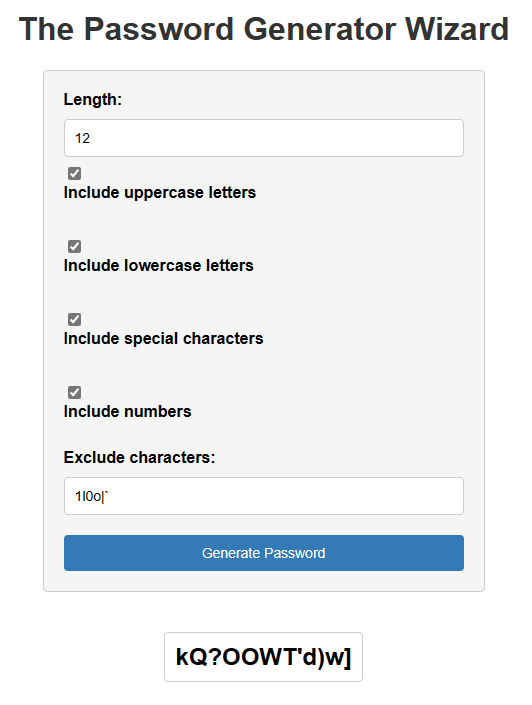
<body> <h1>The Password Generator Wizard</h1> <form method="POST" action="/"> <label for="length">Length:</label> <input type="number" id="length" name="length" min="1" max="100" value="{{ default_length|default('12') }}" required> <br> <input type="checkbox" id="uppercase" name="uppercase" checked> <label for="uppercase">Include uppercase letters</label> <br> <input type="checkbox" id="lowercase" name="lowercase" checked> <label for="lowercase">Include lowercase letters</label> <br> <input type="checkbox" id="special_chars" name="special_chars" checked> <label for="special_chars">Include special characters</label> <br> <input type="checkbox" id="numbers" name="numbers" checked> <label for="numbers">Include numbers</label> <br> <label for="exclude_chars">Exclude characters:</label> <input type="text" id="exclude_chars" name="exclude_chars" value="{{ default_exclude_chars|default('1l0o|`') }}"> <br> <input type="submit" value="Generate Password"> </form> {% if password %} <center><div class="generated-password">{{ password }}</div></center> {% endif %}
</body>
</html>
Please Explain What This Does
The <style> section in the index.html file contains CSS (Cascading Style Sheets) rules that define the visual appearance and layout of the elements within the HTML document. Here’s a breakdown of what each part of the <style> section does:
body: Applies styles to the entire body of the HTML document. It sets the font family to Arial or a similar sans-serif font.
h1: Styles the heading level 1 <h1> element. It sets the color to a dark grayish color (#333) and centers the text.
form: Styles the <form> element. It sets the margin, maximum width, padding, border, border radius, and background color. These styles create a nicely formatted form container.
label: Styles the <label> elements. It sets the display to block, adds bottom margin, and increases the font weight (bold).
input[type=”number”], input[type=”text”]: Styles the <input> elements of type number and text. It sets the width to 100%, padding, border, border radius, and font size. These styles ensure consistent styling for number and text input fields.
input[type=”checkbox”]: Styles the <input> elements of type checkbox. It adds top margin to create spacing between checkboxes.
input[type=”submit”]: Styles the submit button ( <input> element of type submit). It sets the display to block, width to 100%, padding, top margin, removes the border, adds border radius, sets background color to a blueish color (#337ab7), text color to white, font size, and changes the cursor to a pointer. These styles create a visually appealing and clickable submit button.
.generated-password: Styles the <div> element with the class “generated-password”. It sets the font size to 24 pixels, font weight to bold, centers the text, adds top margin, sets the border, border radius, padding, and displays it as an inline block. These styles create a visually appealing container for the generated password.
Now, let’s discuss the <body> section of the index.html file:
<h1>: Represents the heading level 1 element and displays the heading “The Password Generator Wizard”. It serves as the main heading for the page.
<form>: Represents the form element that allows users to input their password requirements. It contains various form controls such as number input, checkboxes, and a text input for excluding specific characters. The form’s method is set to “POST” and the action attribute is set to “/” which means the form data will be submitted to the root URL (“/”) of the web application.
<label>: Represents labels for the form controls, providing descriptions or instructions. Each label is associated with its corresponding form control using the for attribute.
<input>: Represents various form controls such as number input, checkboxes, and a text input. They allow users to specify their password requirements.
{% if password %}: This is a template tag used in Flask’s Jinja2 templating engine. It checks if the variable password is defined or not. If a password is generated (i.e., password variable exists), the following content will be displayed.
<div class=”generated-password”>: Represents a <div> element with the class “generated-password”. It is used to display the generated password. The content of the password variable is displayed inside this <div> element.
In Conclusion
Now, let’s take a moment to reflect on the incredible journey we’ve embarked upon together. From the initial setup of Flask and Python to the creation of your very own password generator, you’ve accomplished something truly remarkable.
By developing your personalized password generator, you have unlocked a realm of secure and distinctive passwords. No longer will you rely on generic combinations or rely on outlandish phrases to protect your digital assets.
Before we part ways, let me leave you with a little programming humor. Why do programmers prefer dark mode? Because, light attracts bugs! Keep that laughter and light-heartedness alive as you continue your coding endeavors.
The post Build The Ultimate Free Password Generator Using Python And Flask appeared first on SYSADMINTUTORIALS IT TECHNOLOGY BLOG.