
Even the most tech-savvy people can find it a challenge to maintain their business website. Many websites are built with WordPress, and the content management system (CMS) goes a long way in helping people get their site up and running with relative ease.
But it’s not always intuitive, and making changes to the settings without a net, so to speak, can be stressful. That’s where BoldGrid comes in. This beginner guide to BoldGrid introduces you to a user-friendly WordPress plugin that enables anyone to easily customize their website with drag-and-drop design while also harnessing the power of search engine optimization (SEO) for effective digital marketing.
- A Beginner Guide to BoldGrid
- How to Manually Install BoldGrid
- How to Install BoldGrid using Softaculous
- How to Get to Your BoldGrid Connect Key in AMP
- How to Log into BoldGrid
- How to Install Your First Inspiration
Improve the performance and security of your WordPress website with our WordPress hosting plans.
![]() Web Application Firewalls
Web Application Firewalls ![]() Free SSL Certificates
Free SSL Certificates ![]() Advanced Server Caching
Advanced Server Caching
View WordPress Hosting Plans
What is BoldGrid?
BoldGrid is a specialized plugin that can be added to your WordPress installation to enhance not only your website design and maintenance, but maximize both in service to your digital marketing goals. BoldGrid allows users to add pages to their website and content to those pages with just a few clicks.
Making design changes to your website template can be a little tricky. Many require you to really “get under the hood,” and if you make a mistake, it can alter the look of your whole site and interfere with some functions. One of the great things about WordPress is that it accepts plugins to make it easier to use so that folks with less technical knowledge can still generate results that look like they require a lot of technical know-how.
An easy way to think about WordPress and BoldGrid is to compare it to baking and assembling a gingerbread house from scratch versus buying a kit with all of the pre-baked parts and icing for assembly. The end result can look the same; it will just take a lot less time and aggravation to get that beautiful finished product with a little help.
BoldGrid for Beginners and SEO
BoldGrid is uniquely primed for SEO because of its own BoldGrid SEO plugin, designed to work seamlessly with WordPress. Users see real-time effects of their SEO changes and can preview their site to see how their search engine ranking can improve after content and design revisions are made based on SEO strategies.
BoldGrid’s SEO plugin assists users with several important page elements that, when taken together, can help or hurt your site’s search engine ranking. In writing and editing your website content, the SEO plugin can help you manage your keyword density, page content, and content length.
Alerts will help ensure your page titles, page descriptions, and header tags support rather than detract from your SEO strategy. Behind the scenes, the SEO plugin can guide you toward using image alt tags and follow/no-follow links appropriately, and developing canonical URLs to eliminate problems with too-similar content across pages.
How to Manually Install BoldGrid
Before you can begin building your BoldGrid website, you will need to install the BoldGrid plugin suite for WordPress. Note that this walkthrough is for those looking to install BoldGrid on an existing WordPress installation. If you have not already done so, install WordPress to your desired domain.
If you’d like to make this process easier, we also have a way for you to install BoldGrid as a one-click installation via a software application installer called Softaculous. We will cover how to do this later in this article.
Manually Installing BoldGrid
- Download the BoldGrid plugin and login to the WordPress Dashboard.
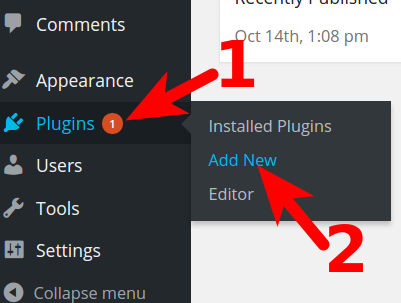
- Roll your mouse over the Plugins, and click Add New.
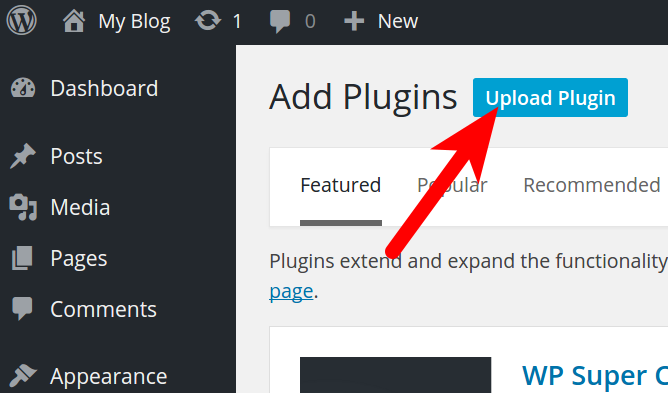
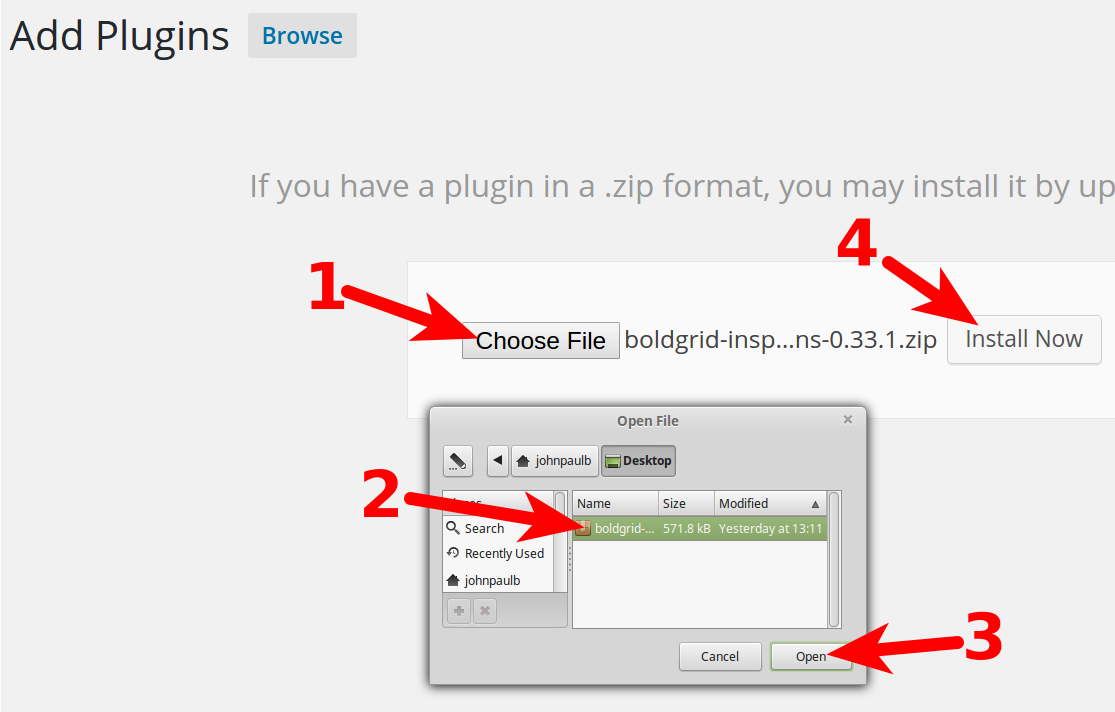
- Click the Upload Plugin.
- Click the Choose File button on the Add Plugins page, choose and open the BoldGrid plugin, then click the Install Now button.
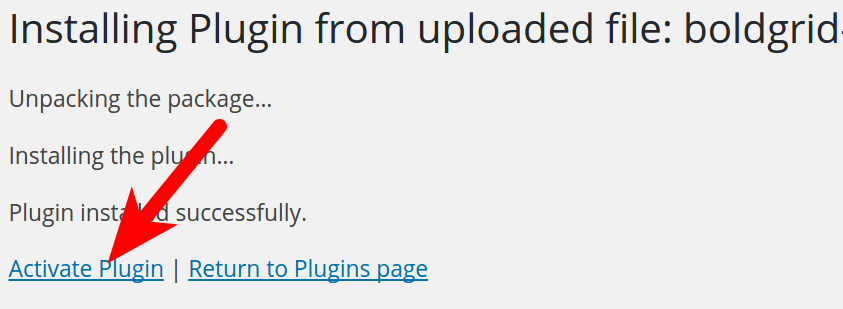
- When you see a “Plugin installed successfully” message, click the Activate Plugin button.
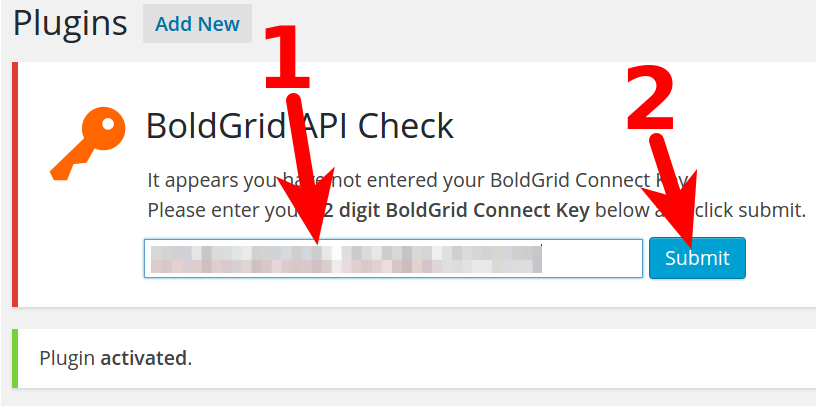
- You will then be on the Plugins page. Enter your 32 digit BoldGrid Connect Key in the BoldGrid API Check section, then click the Submit button.
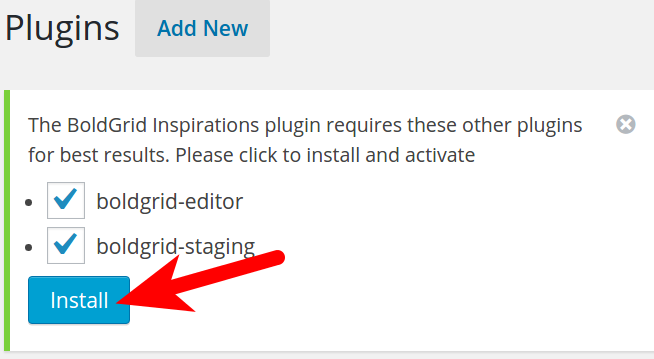
- You will then see a message stating “The BoldGrid Inspirations plugin requires these other plugins for best results. Please click to install and activate.” Make sure the listed plugins are checked, then click the Install button.
- You are finished manually installing the BoldGrid plugin when you see an “Installation successful!” message. Click the Plugins link in the Dashboard, to see them listed.
If you are not an InMotion customer, you can visit the Manual Installation of BoldGrid and other articles click here to visit the BoldGrid Support Center.
How to Install BoldGrid using Softaculous
While you can install BoldGrid on an existing WordPress installation, we also have a way for you to install it as a one click installation. This is done through the software application installer known as Softaculous. Follow along below as we go over how to get BoldGrid installed in your account using Softaculous.
- Log into your cPanel.
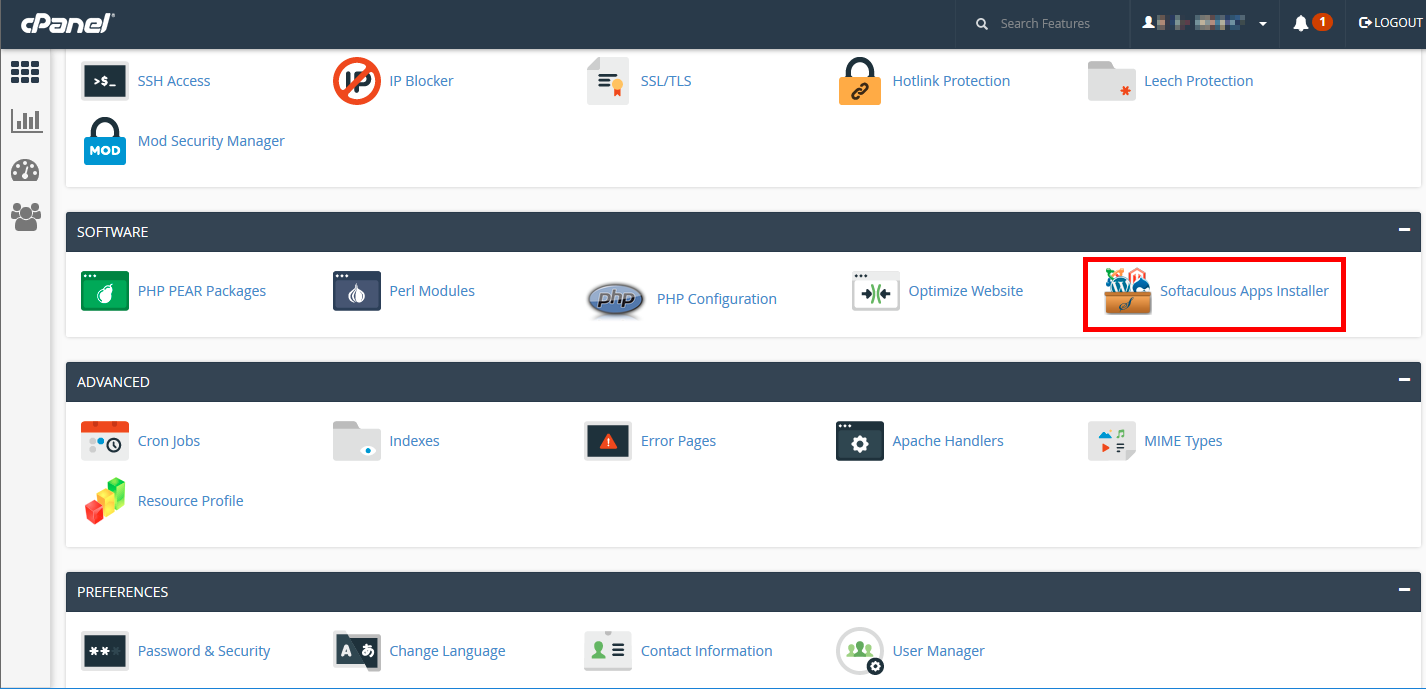
- Click on the Softaculous Apps Installer icon located under the Software category.
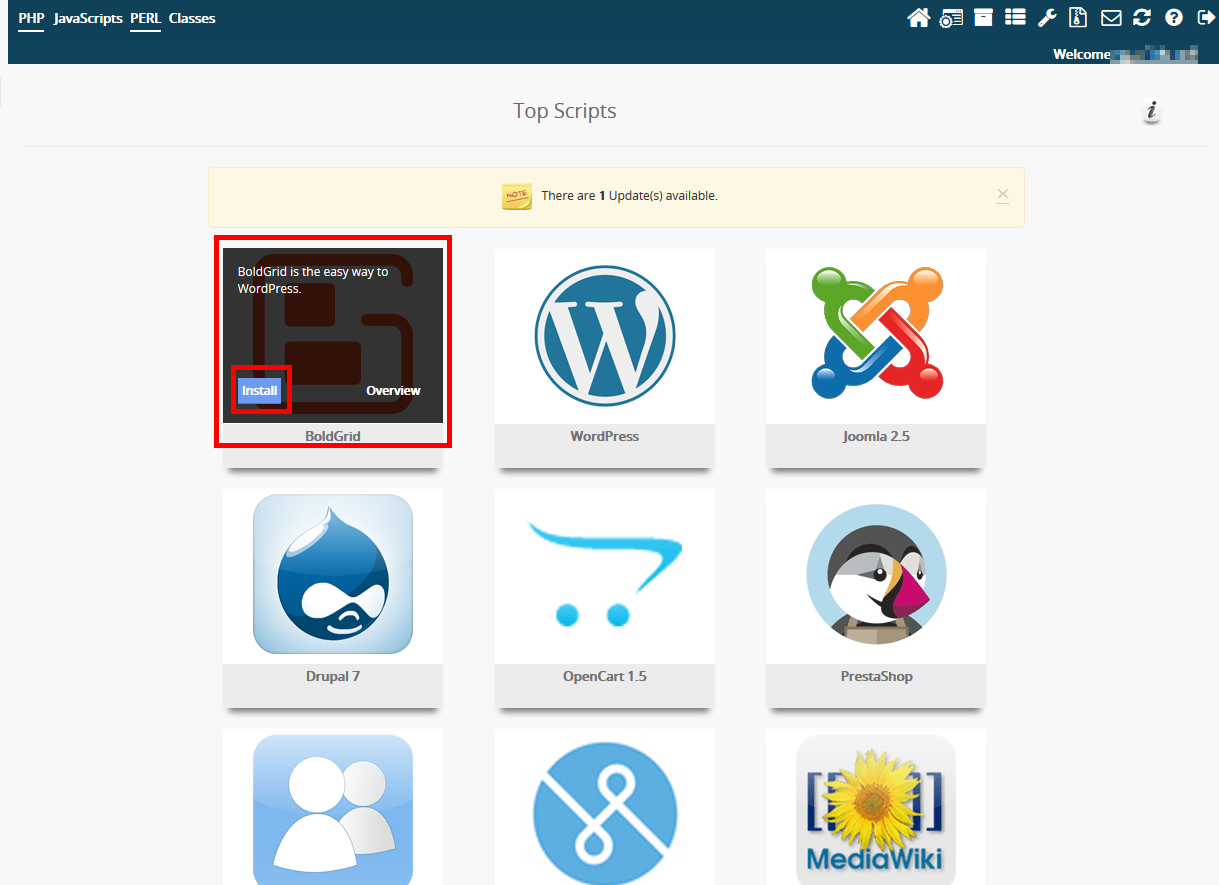
- Hover over the BoldGrid icon from the main Softaculous page and click Install.
- Fill in the fields for Software Setup.
Choose Protocol – Select whether to use the https:// or https:// (secure) protocol. Note that you need to have an SSL certificate installed to use the https:// protocol. We suggest using AutoSSL from the beginning to avoid having to fix this later.
Choose Domain – Select the domain to which you want to install BoldGrid from the dropdown.
In Directory – If you want to install BoldGrid into a subfolder and not the main domain, enter the folder name here. The folder cannot yet exist as it will be created upon installation. (example.com/subfolder) - Enter your Site Settings.
Site Name – Enter the name of your site. Example: Joe’s Widgets.
Site Description – Enter a tagline or subtitle. Example: The best site for widgets!
Enable Multisite – Checking this box will enable multisite. Leave this box unchecked for BoldGrid. - Enter your Admin Account information to create the administrator account for your site.
Admin Username – Give the admin user a name. Do NOT use ‘admin’.
Admin Password – Enter your desired password. Pay attention to the strength indicator as the password you choose must be a strength greater than 40.
Admin Email – Enter the email address you wish to use for the admin account. Make sure it is a valid email address so you can receive information from your site. - Choose the language you want to install for BoldGrid.
- Select the key box if you already have a BoldGrid Connect Key or will be getting one from within your WordPress admin dashboard.
- Click the Install button.
How to Get to Your BoldGrid Connect Key in AMP
When working with BoldGrid, you will need a unique connect key. This key identifies your account and is used to activate the BoldGrid suite. It also is used in conjunction with your BoldGrid Coins account. If you install BoldGrid using the installation tool in the AMP (Account Management Panel) you likely will not even see the key during the process.
But, if you do a manual install you will need to find it. Below we show you how to find it within your AMP. We will also tell you how to get the connect key if you have manually installed BoldGrid.
Finding Your BoldGrid Connect Key
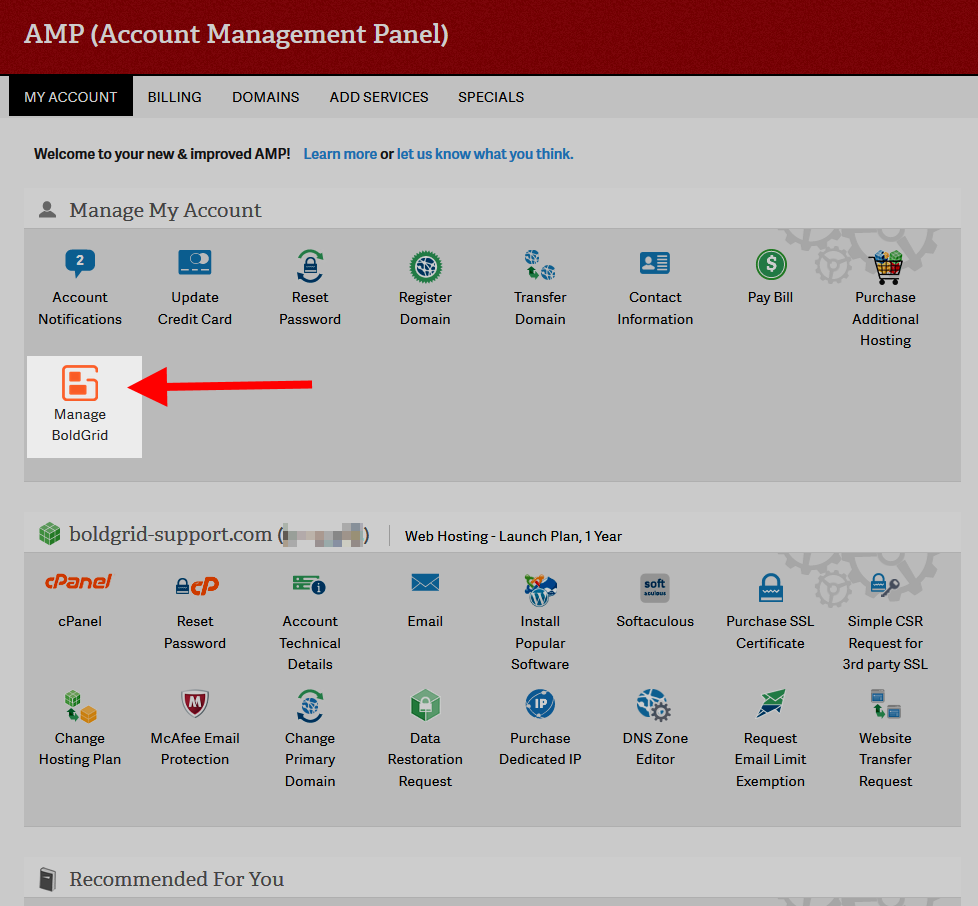
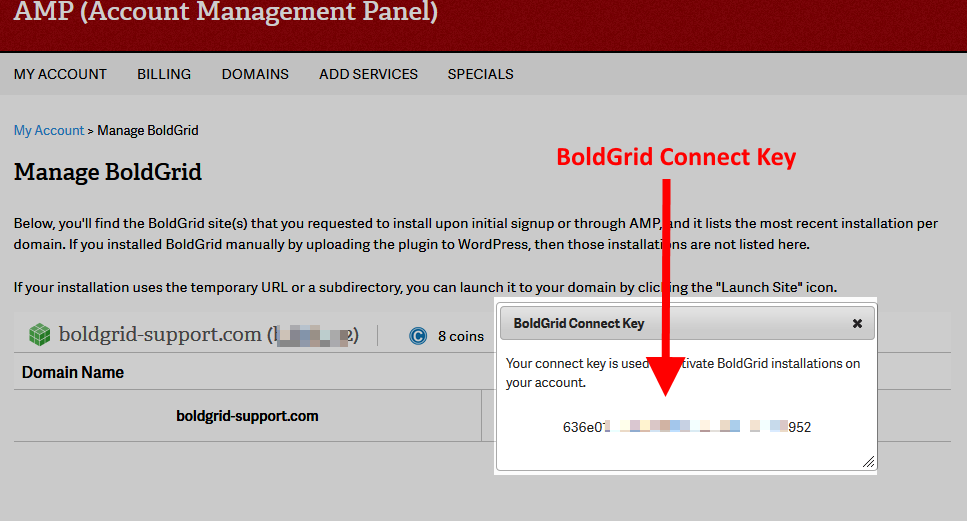
- Log into your AMP (Account Management Panel) dashboard.
- Look under the Manage My Account section and click on the Manage BoldGrid icon.
- On the Manage BoldGrid page, locate and click on the View Connect Key link.
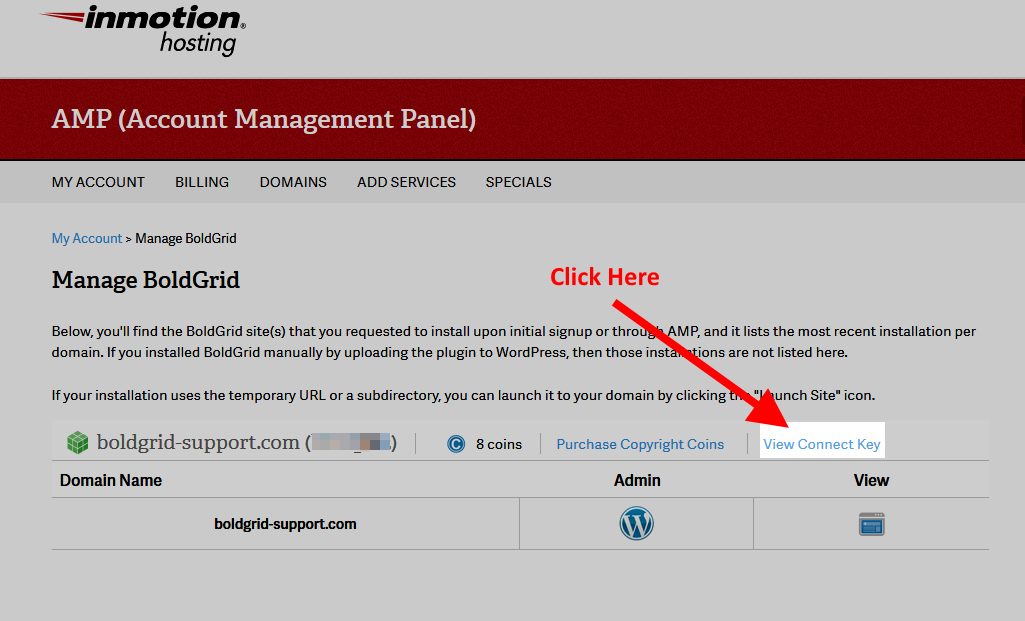
- A popup will appear that contains your BoldGrid Connect Key.
Finding Your BoldGrid Connect Key if you Manually Installed BoldGrid
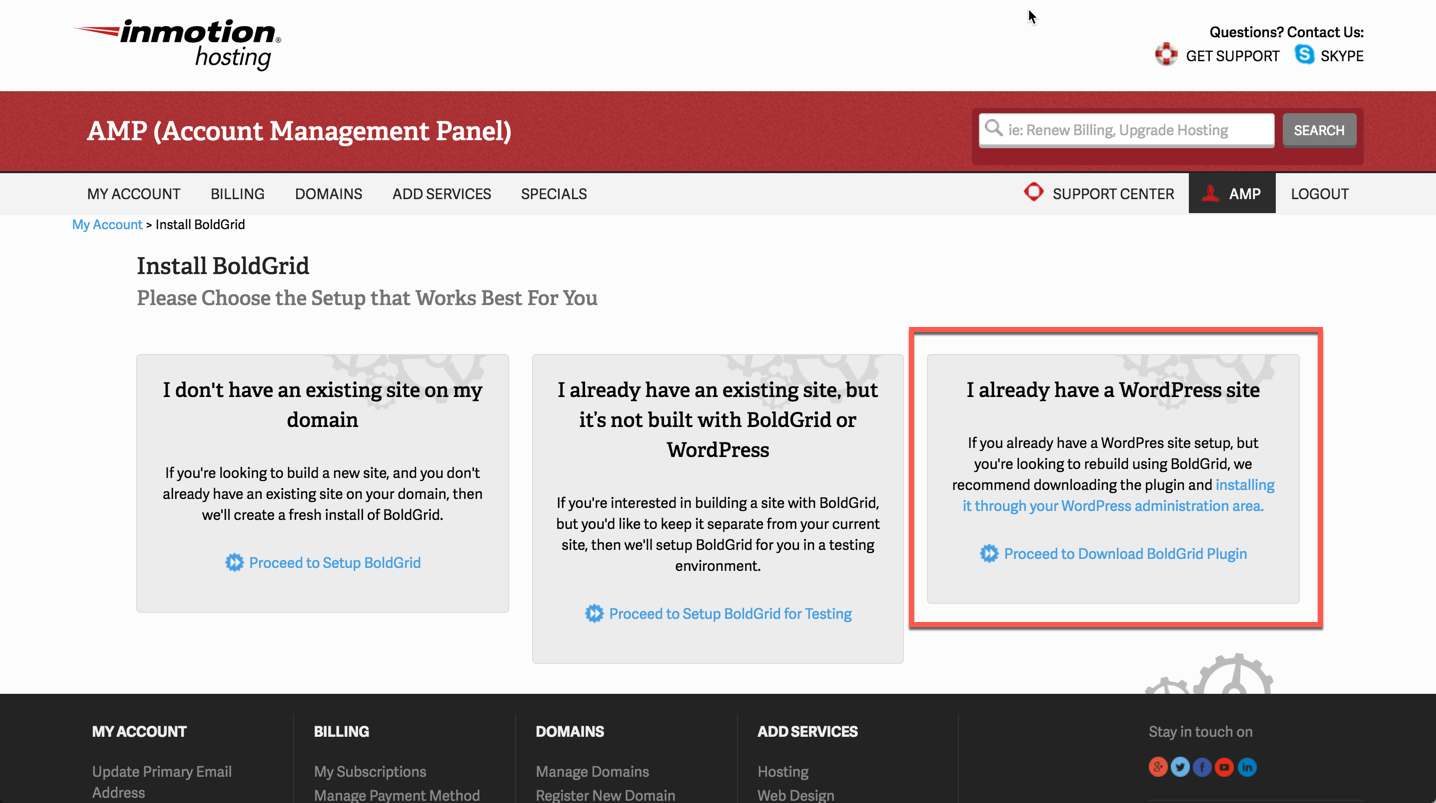
- Log into your AMP (Account Management Panel) dashboard.
- Look under the Manage My Account section and click on the Install BoldGrid icon.
- After you click on the Install BoldGrid icon you will see three setup options for BoldGrid. Click on option #3 – I already have a WordPress site.
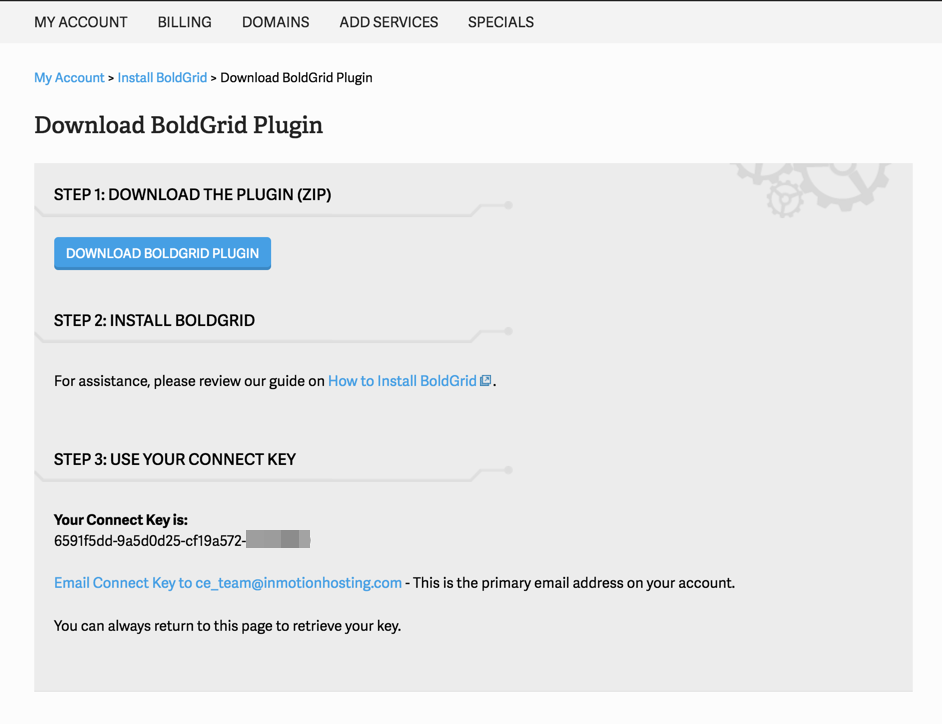
- Here you will see three steps. You will find the Connect key under Step 3.
How to Log into BoldGrid
To begin working on your BoldGrid site, you will need to log into the BoldGrid Admin Dashboard. Below are simple instructions on how to do that.
Logging into Your BoldGrid Site
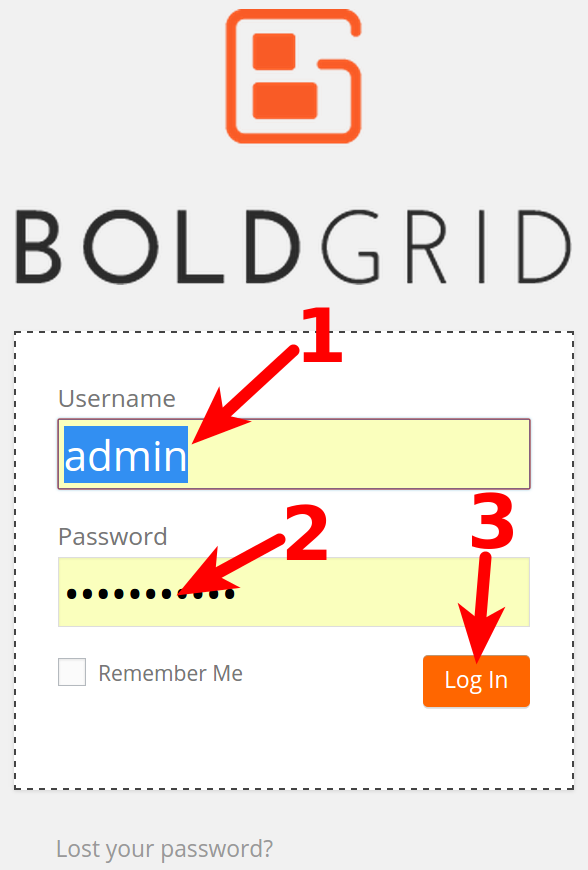
- Visit your site by adding /wp-admin to the end of your domain name. For example, if your domain name is example.com then you would type example.com/wp-admin.
- This brings up a screen where you will enter your username and password.
- Once entered, click on the Login button.
- You are now logged in and taken to the main dashboard screen. From here you can continue to create or modify your BoldGrid site!
Installing Your First BoldGrid Site [ BoldGrid Inspiration]
After installing BoldGrid onto your account and going through the introduction, you will be ready to begin building your first site. The instructions below take you through this process step by step.
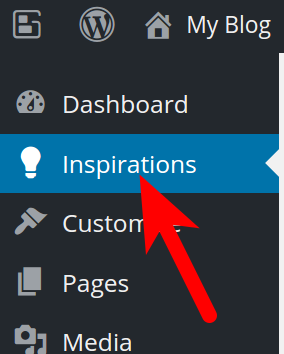
- Login to the Dashboard
- Click on Inspirations.
- Select if you want to install an Active site or a Staging site. Below is a description of the options.
Active Site – An Active site is the website that everyone sees when click on on your domain name. Changes made to an Active site are immediately available to be see on the public-facing website.
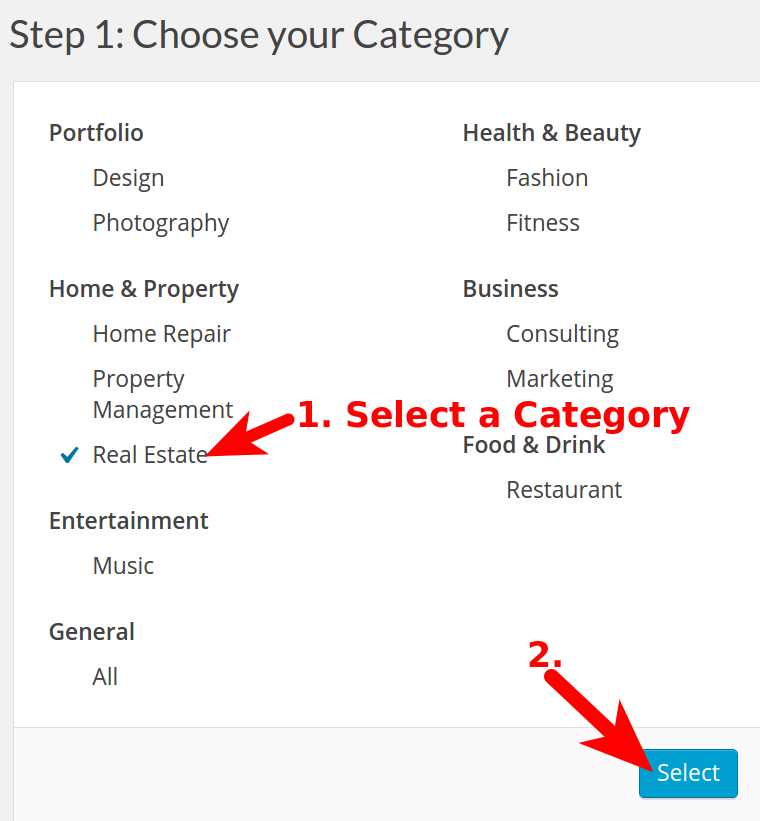
Staging Site – A Staging site is a website is used for creating a site that will eventually be active. This allows you to create a website that no one will see until you have finished creating it. - Next, you will need to select the Category that you will use to build your site. When you click on the category, you will see a checkmark appear. Click on the button labeled Select to proceed.
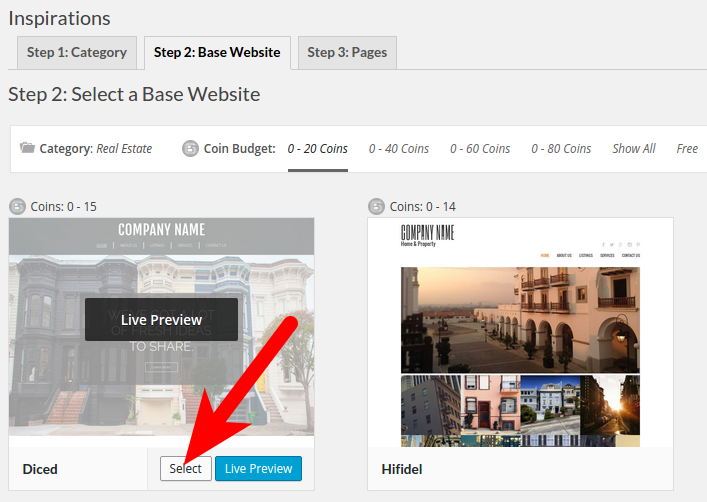
- On the next screen, roll your mouse over the design you want to use, then click the Select button. You will also see a line labeled Coin Budget. You can also click on Show All or Free BoldGrid Coins or Coins for short, are the unit of currency used to purchase licensed content.
- When you click on the design you intend to use, you will then be asked to choose the Page Set for that design. There are two default page sets for every theme: Base and Kitchen Sink. There may be other options depending on the chosen theme.
Base – standard page set with the most common pages
Kitchen Sink – all of the pages included with the category. You can customize pages as needed.
Choose the Page Set that you want to use and then click on Select to proceed. - At the far right of the page, click on Select to finalize the design you have selected. You can also click on Preview in order to preview the design.
- At this point, you are given a small window that congratulates you on having completed the beginning steps for creating your website with BoldGrid. This is the last screen before it commits the design that you have selected. Click on Install this website to complete the Inspiration installation.
- Once the installation is completed you will see a few paragraphs of text explaining the next phase in the development of your website: Customization. Click on Continue to your Dashboard in order to start making custom changes to your website.
Become a master of WordPress plugins! Protect, optimize, secure, and expand the functionality of your website easily with the help of WordPress plugins!