Getting your popups in front of the right user can seriously boost your campaign results. Hustle gives you complete control over who can view your popups with visibility conditions.
How many times have you heard marketers say that “popups can be annoying but they are also highly effective”?
Hustle’s visibility conditions are the key to more effective, less annoying popups.
In this tutorial, we cover the following:
- What are visibility conditions?
- Available conditions in Hustle
- How to add visibility conditions
- How the ‘show’ and ‘hide’ functions work
- How the ‘all’ and ‘any’ rules work
- Why some conditions won’t work together
- The relationship between condition groups
- What to do after setting visibility conditions
Click on the links above to jump to any section of this tutorial or watch the video below:
What Are Visibility Conditions?
Hustle not only lets you create eye-catching pop-ups, but also slide-ins, embeds, and social shares.
By default, all of these are automatically set to show everywhere on your site.
Considering that ALL of these modules can run simultaneously on your site (and in unlimited numbers with Hustle Pro), you can easily see how this can become too much information for your users, especially someone who is not an intended target for your campaigns.
Fortunately, Hustle gives you precise control over where your popup (and slide-ins, embeds, and social shares) will be shown with visibility conditions,
Visibility conditions enable the right users to see your message when the right conditions are met.
And you set those conditions.
Hustle’s visibility options use conditional logic rules to make this happen. You can apply a whole load of precise conditions to make your pop-ups automagically display to your target users.
Hustle’s Available Conditions
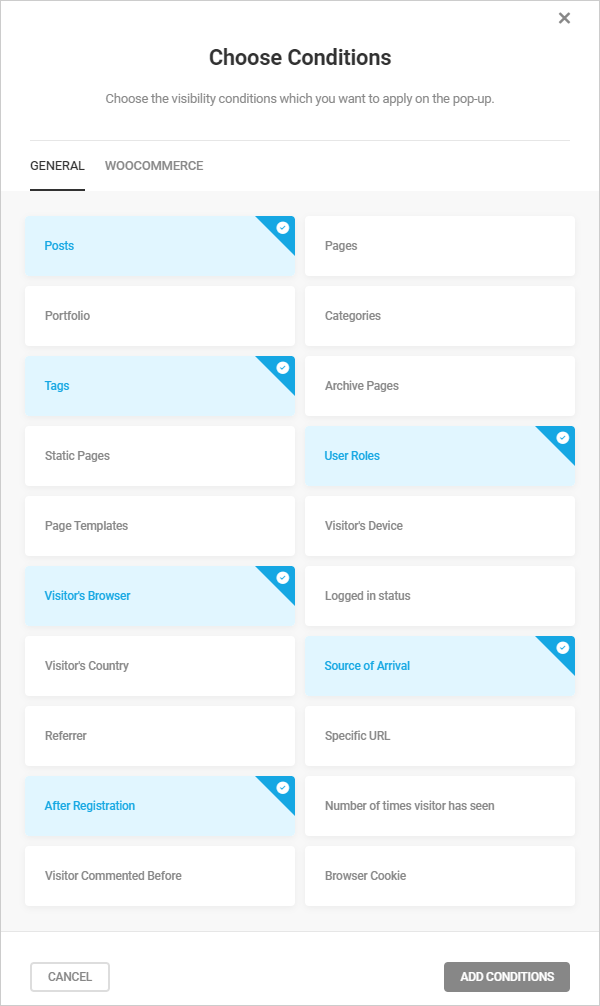
Hustle makes many visibility conditions available.
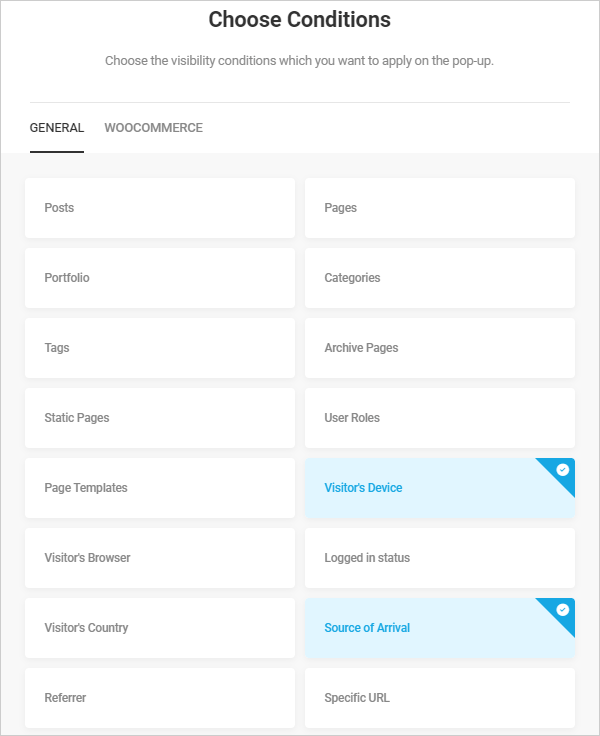
You can choose conditions based on a combination of elements like posts, pages, categories, tags, custom post types, users’ login status, device, country, browser cookie, and more.
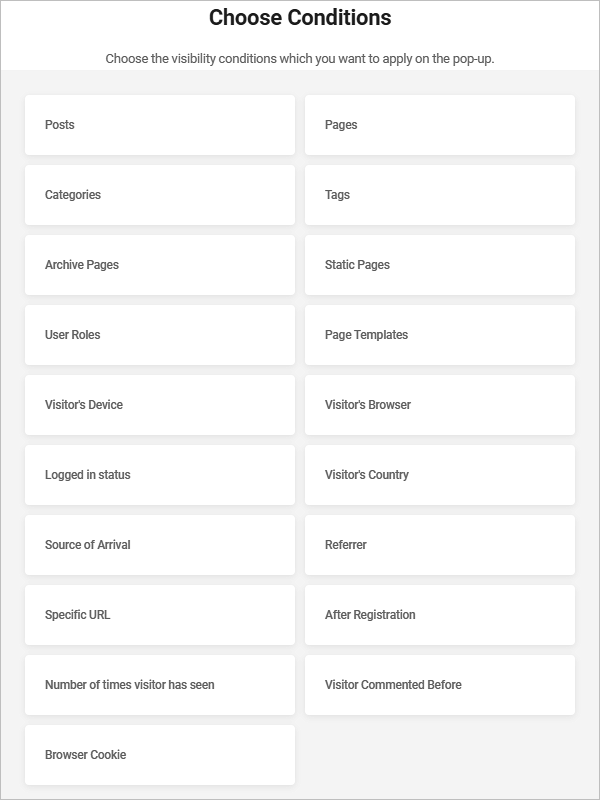
Some conditions like Posts, Pages, Categories, Tags, etc. are straightforward and easy to configure. Simply choose to include or exclude them as a condition to show or hide your pop-up.
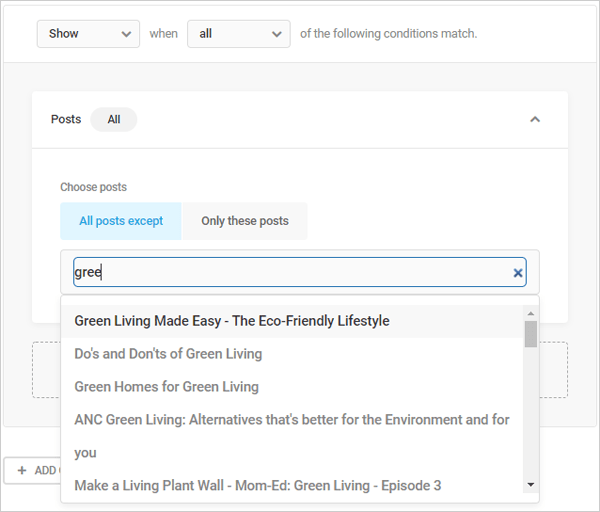
Hustle even has an auto-search feature that makes this easy.
Other conditions let you select and/or combine different options using dropdown menus, inputting data into fields, specifying a range of values, etc.
This gives you precise control over the visibility of your pop-ups.
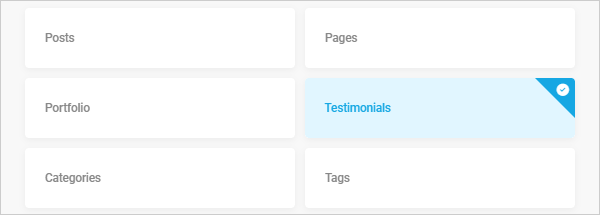
Additionally, Hustle will recognize custom post types being used on your site (e.g. adding a testimonials plugin) and make visibility conditions available for these too.
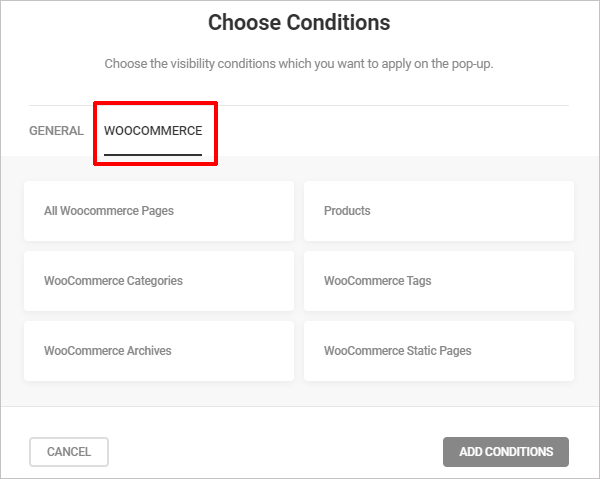
If your site uses WooCommerce, Hustle will even add an entire set of Woo-specific conditions to help boost your sales.
You can choose to add as many conditions as you like to a module and configure these to your individual needs and goals.
If you are not sure how certain conditions will work on your site, refer to Hustle’s visibility modules documentation. We also recommend testing your modules on a staging site to make sure that everything is working as intended.
How to Add Visibility Conditions in Hustle
As stated earlier, visibility conditions apply to all of Hustle’s modules. For simplicity’s sake, we’ll focus only on using visibility conditions to create targeted pop-ups, as everything else is the same.
The only difference between popups and other modules like Embeds and Social Shares is that these let you specify additional display options.
Note: A little strategic planning is required to make sure that your pop-ups will display to your intended target audience only when specific conditions are met.
Before adding visibility conditions, then, think about the experience you’d like to create for different user groups, such as first-time visitors, returning users, and users to whom your popup would have no value at all.
Next, create condition groups that include one or more visibility conditions.
You can also create multiple condition groups, each with a different set of rules.
As we will cover shortly, each condition group can be set to Show or Hide your pop-up if Any or All of the conditions within the group are met.
Let’s go through an example.
To add visibility conditions in Hustle, create a new pop-up or edit an existing one, and click on the Visibility menu.
This brings up the Visibility screen with an initial condition group already set up.
Click on the + Add Conditions section to add visibility conditions (we’ll address the ‘Show/Hide’ and ‘Any/All’ rules in the next section).
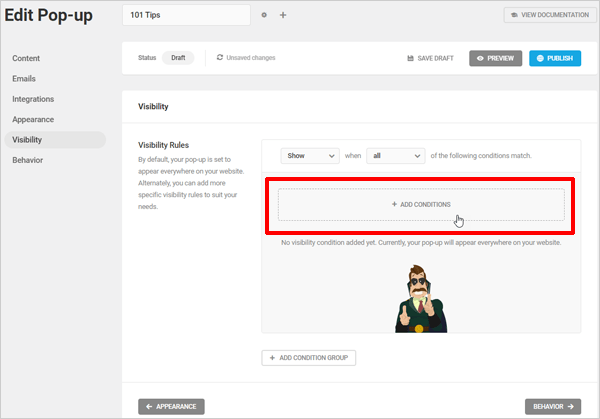
Select one or more visibility conditions and click on the Add Conditions button.
Select one or multiple visibility conditions.
You can add visibility conditions to a group (or remove them) at any time.
Now, go through and configure your conditions.
With posts, for example, do you want your pop-up to display to users when they visit only specific posts?
Then select ‘Only these posts’ and begin typing the name of your post(s) to select these.
How about displaying pop-ups only on posts with certain tags, to users assigned specific roles, who are viewing your content via a Chrome or Safari browser on their mobile device, having arrived on your site from an external URL…and only if they have registered within the last seven days?
That’s the power of Hustle’s visibility conditions.

You can add multiple condition groups, with multiple visibility conditions to every pop-up you create (create unlimited pop-ups if using Hustle Pro).
Removing visibility conditions and deleting condition groups from modules is as easy as clicking on a trash icon.
Easily remove unnecessary conditions and condition groups.
Show and Hide Functions
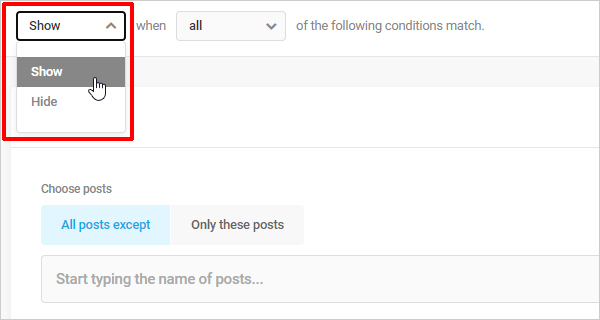
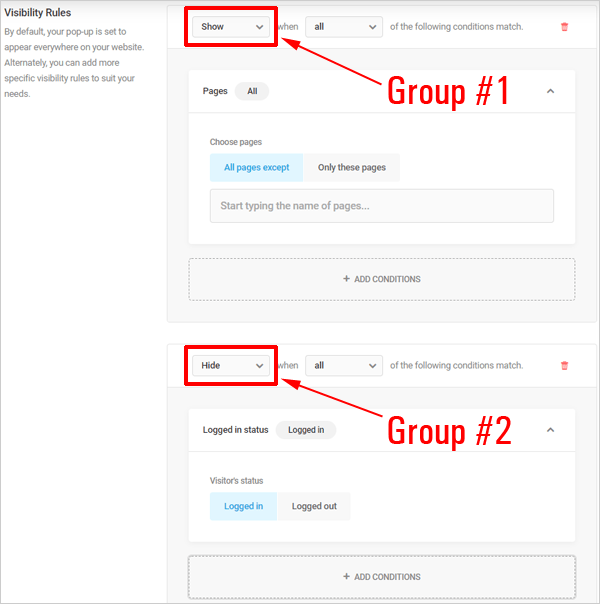
When you first land on the visibility tab you are presented with a drop-down that lets you select whether you want to show or hide the popup based on the conditions you set.
For example, let’s say that you want a popup to show on all pages but don’t want logged-in users to see it.
You would set up the following options on the same popup module using two separate condition groups for Show and Hide:
- Group #1 – Show pop-up on all pages.
- Group #2 – Hide pop-up from logged-in users.
All and Any Rules
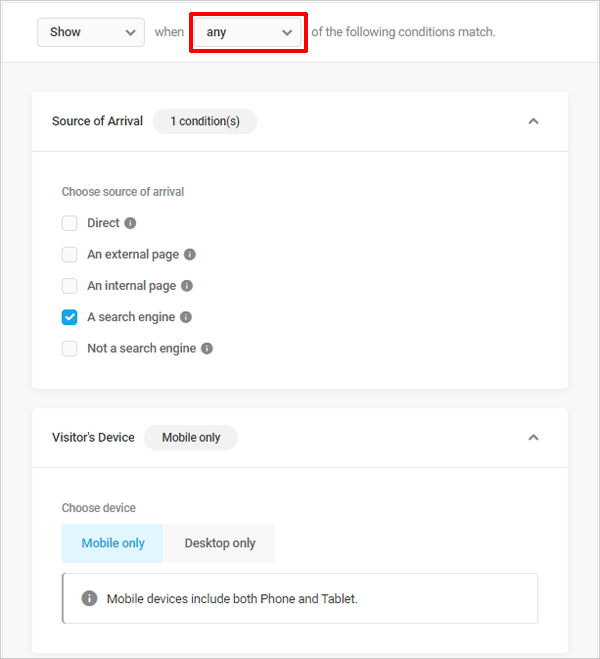
The next option for displaying pop-ups and other modules is a drop-down where you can apply ‘all’ or ‘any’ rules.
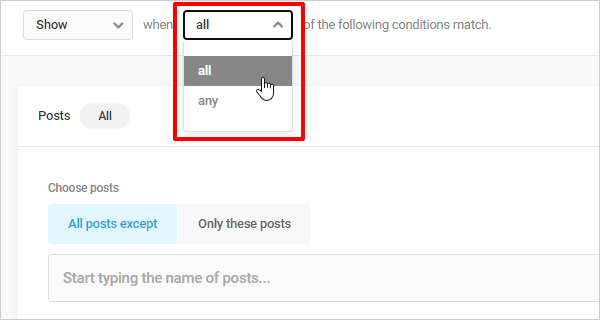
Selecting ‘all’ means that all the conditions you apply in this group have to be met for your popup to show or hide.
Choosing ‘any’ means the popup will show or hide if any one of the conditions in that group is met.
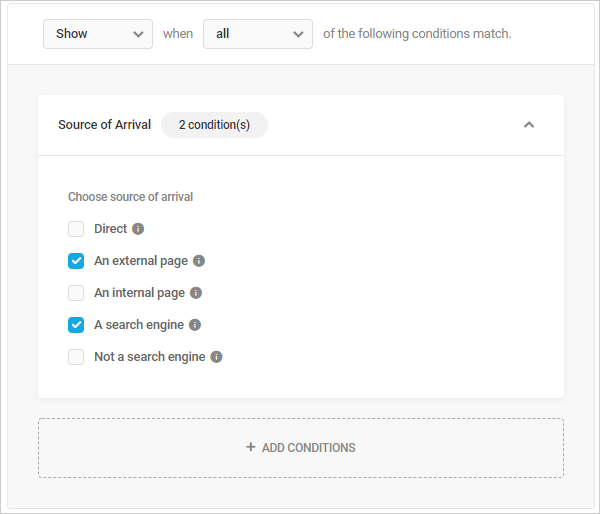
For example, let’s say that you want to show a popup to a user who has come from a search engine and is on a mobile device.
You would select ‘show’ when ‘all’ of the following conditions match:
- Source of Arrival – Search Engine
- Visitor Device – Mobile Only
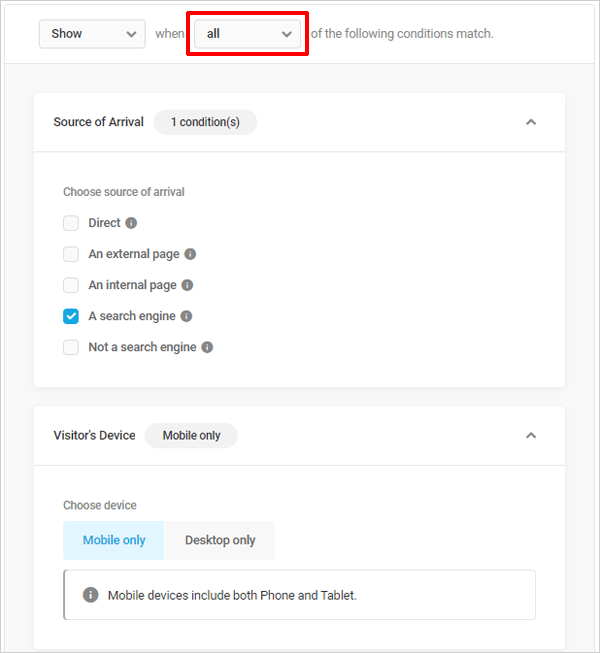
For the visibility conditions, select ‘Source of Arrival’ and ‘Visitor’s Device’ and click the Add Conditions button.
With the ‘Visitor’s Device’ condition set to Mobile only, check the search engine box in the ‘Source of Arrival’ condition.
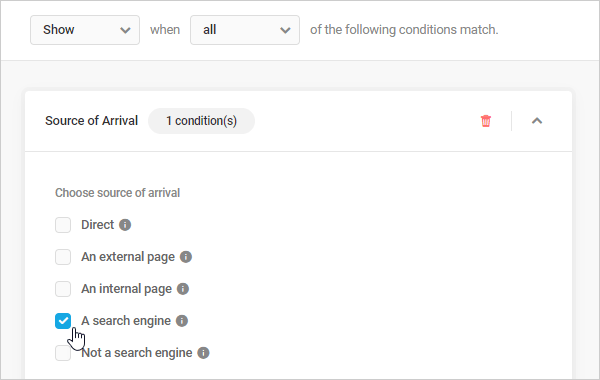
Remember to click Update to save your settings.
Your popup will now show only when a user arrives from a search engine using a mobile device.
If you change the rule from ‘All’ to ‘Any’ in this example, your popup will show to visitors who arrive either from a search engine or if viewing your site from a mobile device. Only one of these conditions needs to be met.
Why Some Conditions Won’t Work
If you find that a popup is not behaving in the way you expect, you could have set up conflicting visibility conditions.
This can happen if you select the ‘all’ rule and add conditions that are mutually exclusive.
For example, if you select ‘Show’ when ‘all’ of the following conditions match and add ‘Pages’ and a ‘Posts category’ as the conditions of your module, your popup will not show because a page cannot be a post category.
For this condition to work, you would need to select ‘any’ instead of ‘all’. Your popup will then display to users visiting either the selected pages or the posts in the specified categories.
Relationship Between Condition Groups
As stated earlier, your popups are not limited to one condition group.
You can add multiple condition groups to work independently of each other.
For example, let’s say that you have a module that you want to show on a specific page of your site to users with the Author role who log in with their mobile device, and also show that same module to site visitors on a different page regardless of the device being used.
You would set up two Condition Groups with the following visibility rules:
Condition Group 1:
- Logged in status – Logged in
- Visitor’s Device – Mobile Only
- Pages – Only these pages: Add logged-in pages (e.g. Members)
- User Roles – Only these: Author
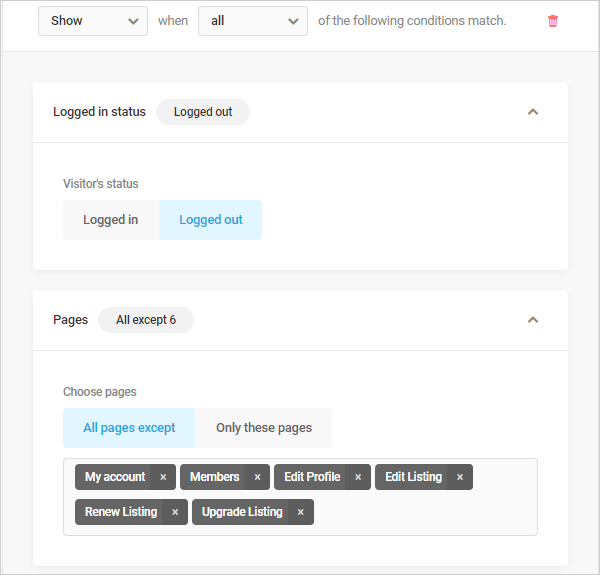
Condition Group 2:
Logged in status – Logged out
Pages – Only these pages: Add logged-out pages
Visibility Conditions Are Set…What Next?
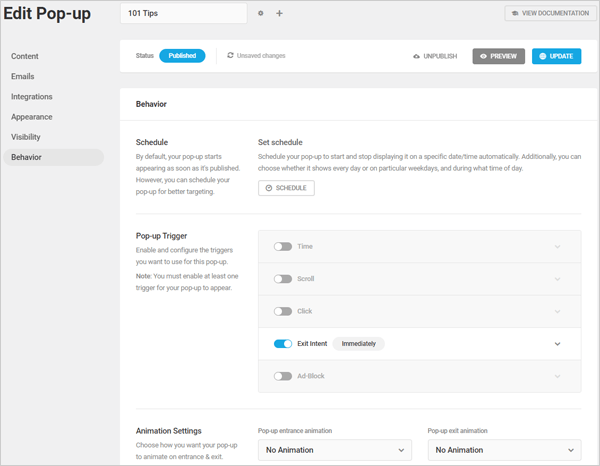
After setting your module’s visibility conditions, the next step is to configure your module’s behavior settings.
Essentially, visibility conditions let you specify who your popups should display to and behavior settings let you specify when and how your popups should appear.
Hustle’s built-in wizard guides you step-by-step through this process, so all you have to do after configuring your module’s visibility conditions is to scroll down the screen and click on the Behavior button to continue to the next step.
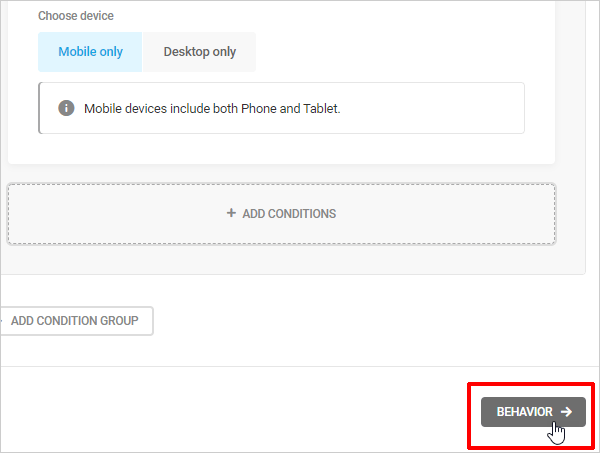
The Behavior screen lets you set up precise triggers for your popups to display when your visibility conditions are met.
Check out our tutorial on how to get the most out of Hustle for more details.
If you want your popups to be more effective and less annoying to users, master using Hustle’s visibility conditions and behavior settings, and you will be well on your way to boosting your opt-in conversions.
Be sure to check out Hustle’s documentation for an in-depth explanation of each visibility condition and if you are a WPMU DEV member, feel free to contact our super support team who are available 24/7 to help you with any WordPress-related issues or questions.
Source: wpmudev.com