Make sure your business, agency, or reseller clients are always connected and powered on with our optimized Managed VPS Hosting.
WooCommerce, like WordPress itself, allows you to install third-party
extensions, addons, and plugins to extend your store’s capabilities.
For example, maybe you want to integrate shipment tracking,
membership, or PDF invoices like other stores are offering. You can
do all of these things with WooCommerce extensions, add-ons, and
plugins.
- WooCommerce Product Addons, Extensions, and Plugins
- Working With Extensions and Product Licenses
- Create a Mobile App For Your Store With the Appmaker Plugin
- WooCommerce Business to Business (B2B)
- Further Resources
WooCommerce Product Addons, Extensions, and Plugins
You can quickly add features to WooCommerce by using one of the many
Extensions, also known as Addons, or Plugins. In this guide, we will
go over some of the popular options for expanding the functionality of
WooCommerce. This should help you learn about the available tools and
decide if they will work for your site.
Amazon/Ebay
If your plan is to sell products from your WooCommerce store on Amazon
and Ebay there is an integration plugin. With this tool, you can
quickly list and manage your products on these popular platforms
automatically. Everything from pricing to shipping and inventory can
be handled right in your WordPress Dashboard.
| Extension | Price |
|---|---|
| Amazon and eBay Integration | Free |
Direct Checkout
Do you want to customize the “Add to cart” button, or allow customers
to go straight to the checkout page? This plugin can increase sales by
streamlining the checkout process and allowing the customer to make
purchases quicker.
| Extension | Price |
|---|---|
| WooCommerce Direct Checkout | Free |
PDF Invoices
Do your customers prefer an invoice in PDF form? You can easily
include a PDF invoice with all orders automatically using the PDF
Invoices plugin.
| Extension | Price |
|---|---|
| PDF Invoices | $79/year |
Currency Switcher
If you are selling products to international customers, they may not
be using US Dollars as their currency. The Currency converter widget
allows them to see your prices in their preferred currency. This can
help you sell to a larger international market.
| Extension | Price |
|---|---|
| Currency Converter Widget | $29/year |
Bookings
Do you need to book appointments or take reservations directly from
your website? With the Bookings plugin, visitors can choose their own
time slots and schedule right from your website. This saves time and
money since they do not need to interact with one of your employees.
| Extension | Price |
|---|---|
| WooCommerce Bookings | $249/year |
Membership
Allow visitors to purchase memberships for your site or grant access
when they purchase specific products using the Membership plugin.
| Extension | Price |
|---|---|
| WooCommerce Memberships | $149/year |
Subscriptions
Want to sell subscription-based products or accept recurring payments?
The Subscriptions plugin is a quick way to allow that. Combine this
with the Membership plugin to allow members to make regular payments.
| Extension | Price |
|---|---|
| WooCommerce Subscriptions | $149/year |
Checkout Field Editor
WooCommerce makes a great plugin for modifying the checkout page. This
lets you quickly add or make changes to the available fields to fit
your business.
| Extension | Price |
|---|---|
| Checkout Field Editor | $49/year |
Shipping
Want to save time and money by printing your own USPS shipping labels?
This free plugin speeds up the shipping process by bypassing the lines
at the post office. Your package will be ready to go as soon as you
print the label.
| Extension | Price |
|---|---|
| WooCommerce Shipping | Free |
Shipment Tracking
You can automatically provide shipment tracking information to
customers using the Shipment Tracking plugin. Save time and resources
by automating this process. It is compatible with most major shipping
companies including USPS, UPS, FedEx, and DHL among others.
| Extension | Price |
|---|---|
| Shipment Tracking | $49/year |
Live Chat
Chatting with customers is a great way to close a sale or provide
customer service. This plugin can be installed for free but it
requires a LiveChat license.
| Extension | Price |
|---|---|
| LiveChat | Free but requires a LiveChat license starting at $16/month |
Working With Extensions and Product Licenses
WooCommerce supports a vast fleet of extensions to help you work more
productively. Some of these extensions can be used as free plugins but
there are premium extensions available as well. The difference between
WordPress plugins and WooCommerce extensions is that an “extension” is
a plugin that runs within a plugin (in this case, the parent plugin is
WooCommerce).
You can view and purchase extensions at WooThemes. For each extension
purchased at WooThemes you will be provided a license. In this article
I will show how to purchase licenses and install extensions in
WooCommerce.
To purchase and use extensions from WooThemes you will need to create
a WooThemes account. Once you have your own account you can shop for
free and premium products, including themes and extensions.
Once you are logged in you can set up a purchase and order your
license. You will also get an email confirmation with your order
number and license key. It would be wise to save this email for later
reference.
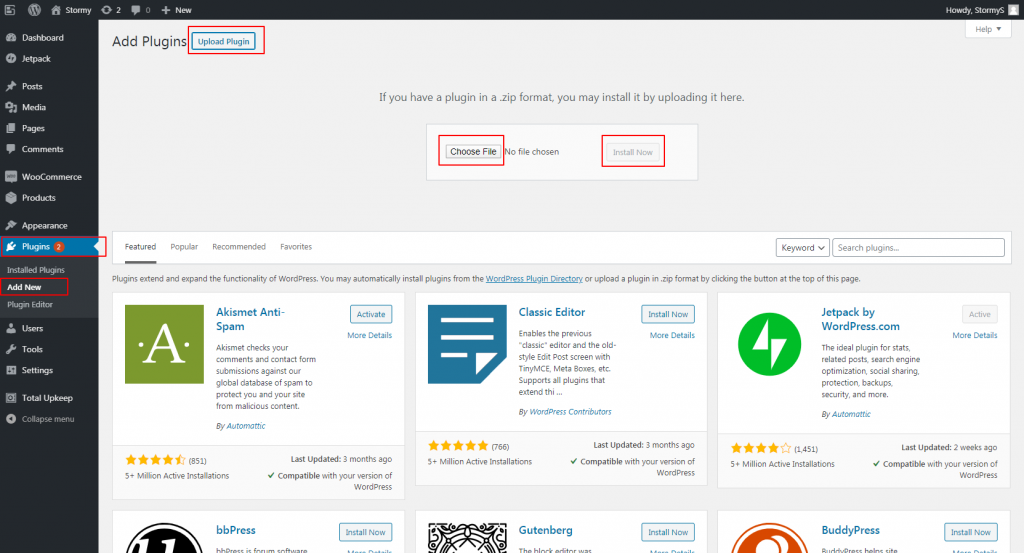
Installing the Extension with Your License Key
You can now download a .zip file of your extension and install it like
a regular WordPress plugin.
- Go to your Dashboard
- Go to Plugins > Add New
- At the top left choose Upload Plugin
- Upload the .zip file
- Activate the extension
Create a Mobile App For Your Store With the Appmaker Plugin
As online shopping continues to grow in popularity it’s only natural
that the next frontier for small businesses is mobile applications for
eCommerce.
Luckily you can create a mobile app for your WooCommerce store easily
and without code with the Appmaker plugin.
Of note, this a paid plugin/service with the lowest subscription
starting at $10 a month. You can try the plugin with their 14-day free
trial.
Installing Appmaker
Getting started with Appmaker in your WordPress dashboard is
easy. Simply follow the instructions below to install the plugin:
- Login to your WordPress dashboard.
- Navigate to Plugins > Add New.
- Search Appmaker.
- Then click Install > Activate for Appmaker WooCommerce. Of note, there is also an Appmaker plugin for non-eCommerce sites.
Connecting your WooCommerce Store to Appmaker
Once AppMaker has been installed, it’s time to connect your
WooCommerce store to Appmaker.
- Navigate to WooCommerce > Appmaker App Settings.
- Click Create New App.
- The Appmaker dashboard will open in a new tab. Enter your website URL and click Next.
- You’ll then have the option of building the app yourself or booking a demo with their team. For this tutorial we chose I want to build my app myself.
- Register by entering the required information into the form or login using Google or Facebook.
- Once the account has been created, your WordPress dashboard tab will be redirected to the Appmaker dashboard. You should see your website URL. Enter a name for your app in the appropriate field then click Submit.
- Next, you’ll need to connect your store. Use the keys presented by Appmaker and enter them into the respective fields in your WooCommerce settings. You can get there by navigating to WooCommerce > Appmaker App Settings then clicking Connect Store With App.
- Enter the keys and then click Activate.
Creating Your Mobile App in Appmaker
Now it’s time to create your app.
- On WooCommerce > Appmaker App Settings, click Go To App Dashboard.
- Your Appmaker dashboard will open in a new tab. Click on Customize App.
- Under Customize App, you can add, edit, and delete sections and blocks within pages, as well as create new pages. You can also edit your app menu by clicking Menu under In-App Pages. Once you’ve completed all of your changes, click Save.
- Navigate back to your AppMaker Dashboard and click Preview to review your newly created app. If you’re good to go, click Upload To Store to add it to the Apple App store and the Google Play store.
WooCommerce Business to Business (B2B)
Depending on your needs, establishing wholesale functionality on your
WordPress website can quickly become complicated. Cobbling together
plugins and code to satisfy your needs often ends in frustration and
you begrudgingly simplify your wholesale functionality to just
something that works.
Luckily, your days of scaling back your online wholesale operation are
over. Enter WooCommerce B2B, the first all-in-one reseller/wholesale
plugin that will make your WooCommerce store business-to-business
friendly. With WooCommerce B2B you’ll no longer need to install
multiple plugins to create the online wholesale solution you need. All
the features for successfully running a business-to-business store
online are included in one software package and accessible through one
interface in your WordPress dashboard.
WooCommerce B2B Features
The WooCommerce B2B plugin will give you access to many powerful
features. Some of these features include:
- Hiding product prices to guest users and only allowing registered
customers to see prices and purchase products. - Categorizing registered customers by customer groups.
- Setting single product prices by customer group, global percentage
discount or both. - Creating product discounts by customer group.
- Showing prices with and without taxes.
- Configuring specific product categories to be visible depending on
the customer group. - Approving customer registration and determining which customer gets
access to which sections of your wholesale website. - Setting a minimum purchase quantity and minimum total order amount.
Explore the demo and view the screenshots below to learn more about
how this powerful plugin can support your online business-to-business
goals.
Installing WooCommerce B2B
To install the WooCommerce B2B plugin, you will need to first purchase
it from the developer site. Once purchased, import the plugin file
into your WordPress dashboard by following the instructions below:
- Login to your WordPress dashboard
- Navigate to Plugins>Add New
- On the Add New screen click on the Upload Plugin button
- A file upload box will appear. Click Choose File, select the plugin file, then click Install Now. Once installed, the plugin should appear in your dashboard menu on the left-hand side
Save yourself time and money by using a plugin that provides all of
your wholesale needs, and more, in one software package.
Further Resources
- How to create products in WooCommerce
- How to manage orders and customers
- How to use product attributes