No business or brand or blog can survive without an active social media presence. After all, more than 3 billion people use one or the other social media platforms every month. So, you can ill afford to neglect your readers or prospective clients on social media. But if you’re a solopreneur or a small business owner or a blogger, then it is not possible to hire a team dedicated to handling your social media presence.
Well then, what’s the solution, you might ask?
A versatile social media management tool like Publer that lets you efficiently manage all your social media accounts from a central dashboard to multiply your social media reach without requiring too much time or effort. After all, you have to squeeze everything from content creation to promotion and everything in between within 17 waking hours in a day.
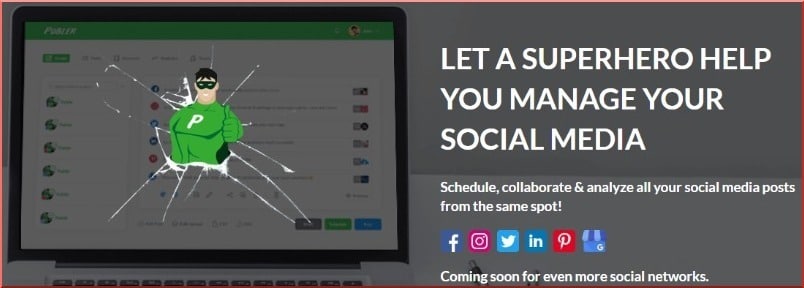
In this Publer review, I will not only analyze each feature of Publer threadbare but also compare it with popular social media management platforms like Hootsuite and Buffer. Publer positions itself as a social media superhero that can accomplish all your social engagement tasks with ease. By the end of this Publer review, you can judge for yourself whether Publer really is a superhero that can replace popular social media tools like Hootsuite and Buffer or not.
So, let’s get started.
- An Inviting Look
- Uncluttered dashboard
- Customizing individual account settings
- Post creation and scheduling
- 3 ways to create posts
- 1.Hashtags
- 2. Customize post for each network
- 3. Add your location
- 4. Media options
- 5. Add signatures
- 6. Auto share content
- 7. Follow-up comment
- 8. Auto delete posts
- 9. Set delay between accounts
- CSV Upload
- Post from RSS
- Schedule Posts in Publer
- 1. Manually schedule posts
- 2. AutoSchedule posts
- 3. Recycle posts
- 4. Recurring posts
- Posts Page
- Social Media Analytics in Publer
- Adding team members
- Publer Pricing
- How does Publer compare to Hootsuite and Buffer?
- Publer review summary
An Inviting Look
The Publer homepage sports an easy and inviting look, and its green superhero logo is impossible to miss.
The first thing you might notice is that Publer allows you to manage your accounts across 6 social media platforms presently: Facebook, Twitter, LinkedIn, Pinterest, Instagram, and Google My Business. More integrations are on the way.
The other remarkable feature is that it offers a free account to manage 5 social accounts with 10 scheduled posts per account. This was a great incentive to make me sign up for Publer to try out its features before I decided to upgrade to their paid plans. More on that later.
Publer offers many minor and major features, but the 3 core features are:
- Posts creation
- Posts scheduling
- Analytics and Tracking
Uncluttered dashboard
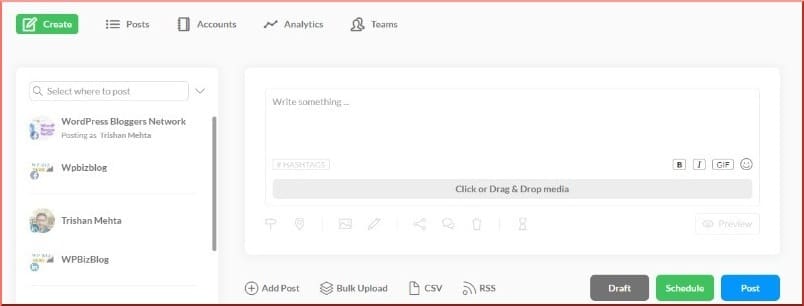
When you first log into your Publer account, you are greeted with a clean and uncluttered user interface (UI). All the tabs are placed in one place. Whether you wish to navigate to the posts creation page, posts scheduling page, or any other page, you can navigate with a single click.
However, before you start scheduling your messages, you will first need to set up your social media accounts. You can create a new account by clicking the Add Account button that is located on the home page (post creation page) as well as the Accounts page. All your accounts are listed on the Accounts page. To add an account, select the social platform from the left menu and then click on Add Account.
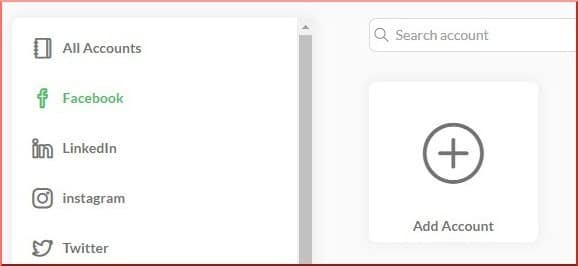
The account creation page then opens where you can add an account for all available social networks available.
So if you wanted to add a Facebook account, you can either click the Add Account button on the home page or follow these steps: Go to Accounts>Select Facebook>Click on Add Accounts>Select any of the social networks available.
Integrating your social media account is a breeze and takes a few seconds. In the future, you will be able to add your YouTube channel as well and upload your videos from Publer without the need to visit YouTube.
After you have added your social accounts, you can customize individual account settings by selecting it on the Accounts page.
Customizing individual account settings
The ability to fine-tune the settings of each account the way you want is a welcome feature in Publer. Let me quickly run you through the options available here.
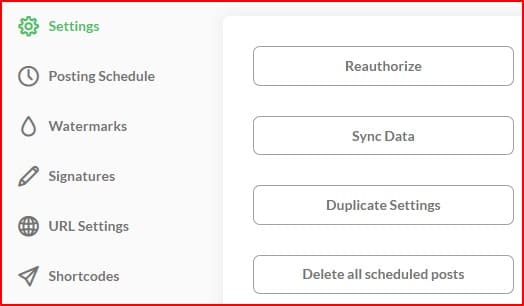
Settings tab: All the options are self-explanatory in this tab. One useful option is the ability to duplicate your account settings to other accounts, which can be a time saver if you do not wish to customize each account individually.
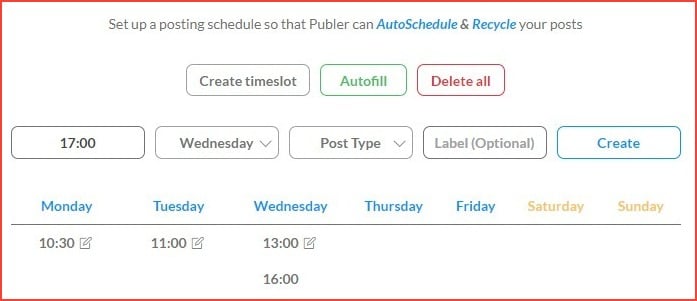
Posting schedule: For some, this is the heart of this social media management tool. You can set the posting schedule in two ways. First is by creating time slots manually for each day of the week. A cool feature is that you can create time slots by post types like Status update, Link, Photo, GIF, and video.
The second method to create a posting schedule is by using the Autofill option. Clicking on the Autofill tab opens a time-range slider. Once you set the time range in which your posts should be posted, you need to select the number of posts to be posted within that time range and the days on which the posts will be scheduled.
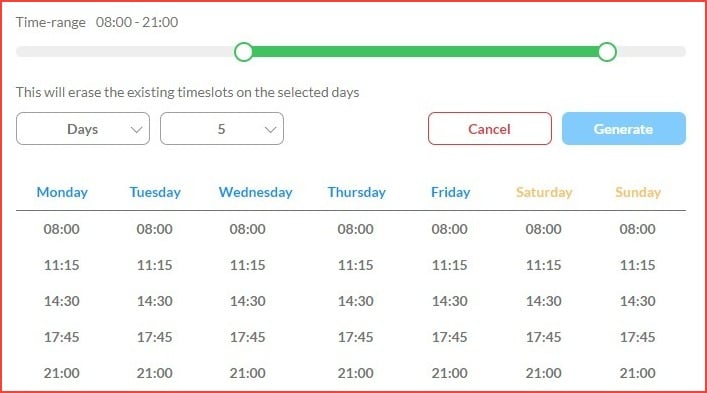
Then click the Generate button and bingo! Your weekly schedule will be auto-generated within the selected time range. Autofill is a convenient feature to save time on scheduling your posts.
I will elaborate on the scheduling features in Publer later on. Right now, let’s discuss…
Watermarks: Did you know that you can add up to 10 different watermarks for each account? These watermarks are applied to your images when they are posted on your social profiles.
Watermarks are helpful not just for copyright protection but, more importantly, for building your brand. Even if the reader does not read your post, he or she is likely to spot your logo on the image.
Signatures: Do you dig email signatures? Then you will like this feature as well. You can add up to 10 signatures per social account. You can even include hashtags in your signature.
URL Settings: Publer allows you to choose from among 7 different URL shorteners per account. What I liked about this feature is that I can choose to shorten my links based on the social platform where I am posting. For instance, Facebook does not like shortened links, so I do not post shortened links there. On the other hand, I can post shortened links on Twitter freely.
You can also set 5 different URL tracking parameters for your links to track link clicks in Google Analytics. This is very useful for monitoring the impact of your social campaigns.
Shortcodes: Is there any end to the time-saving features on Publer? Shortcodes allow you to insert your frequently used hashtags, website URLs, or addresses in your posts. You can add 30 different shortcodes for each account. To insert a shortcode within a post, all you need to do is enclose the shortcode within curly brackets like this: {{shortcode}}.
And remember, you can always duplicate a particular account’s settings to any other account. The Duplicate Settings button in the Settings tab copies your schedules, watermarks, signatures, URLs, and shortcodes to the selected account.
Now, I will walk you through the primary feature of Publer, which is post creation and scheduling.
Post creation and scheduling
At the beginning of this Publer review, I mentioned that the dashboard has a clean, uncluttered look to it. This helps when you create your posts.
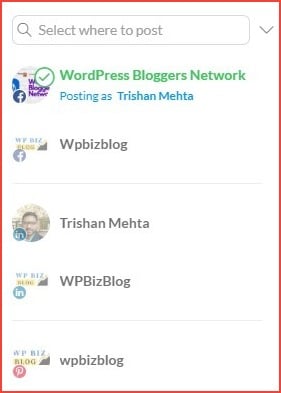
All your social accounts are listed on the left, and if you have multiple accounts, you can also search for them in the search bar. To select an account to post, just click on the account name. You can also choose multiple accounts at once.
3 ways to create posts
There are 3 ways to create posts in Publer.
- Compose a post in the editor
- Upload a CSV file
- Create posts from RSS feed
No matter which of the 3 ways you choose to create posts, you can edit every post before it gets published. Let us first look at creating posts using the editor.
Composing a post is almost child’s play. Just write whatever you want in the text area. If you go beyond the character limit for some networks like Twitter, the tool warns you that the text for Twitter will be truncated. You can then adjust your writing for individual networks accordingly.
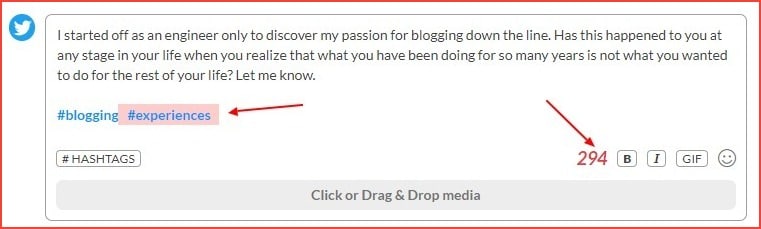
Publer allows users to insert GIFs and emojis from its library or even add media like images and videos from an external source (local drive or URLs). You can add videos up to 1 GB in size and 20 minutes long. Also, since networks like LinkedIn do not support GIFs, if you add a GIF to your posts, the tool will warn you to disable it on LinkedIn.
Before posting, you can also preview your post to check how your post will display on each network on desktop and mobile. The previews are 99% accurate, as claimed by the Publer team, and I have to agree on this.
Now, let us go through each of the options available in the post composition dashboard.
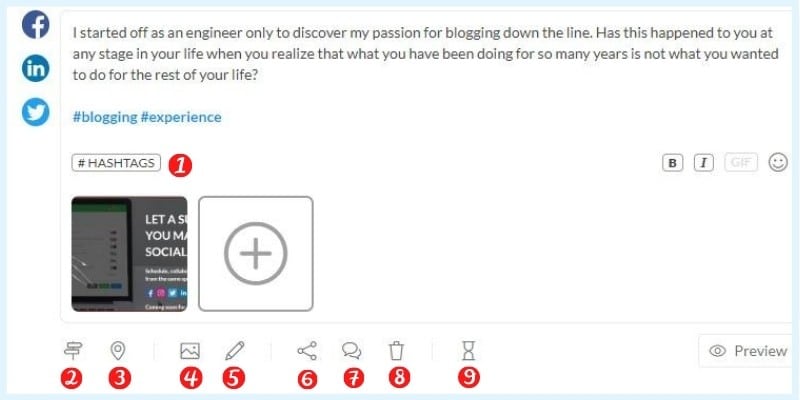
1.Hashtags
Hashtags can be considered as the life of any social media post. Not only do they help discover the right audience but, used intelligently, they can help you appear in the trending results of the day.
You can add hashtags to your posts in a variety of ways. Either you can create your hashtags manually for every post or use a shortcode to insert saved hashtags for specific social accounts. Remember, you learned that you could create shortcodes for hashtags in the account settings? Now is the time to use these shortcodes.
But wait, there’s more. You can simply click on the #HASHTAGS button to see a list of suggested hashtags and select the best match for your post. Yes, Publer has a built-in hashtags suggestion tool.
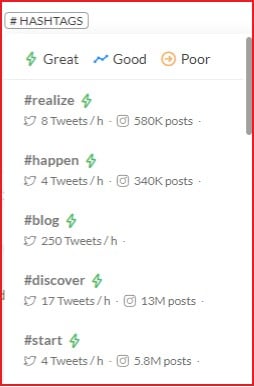
The hashtags are grouped into 3 categories: Great, Good, and Poor depending on their popularity. The number of tweets/hour is also listed below each hashtag so you can insert the most popular ones in your post. I feel this Publer feature is brilliant.
2. Customize post for each network
If you click on the signpost symbol, you can customize the post for each selected network. As I mentioned above, LinkedIn does not allow GIFs, so you will want to remove them before posting on LinkedIn. Similarly, Twitter has a limit of 280 characters per tweet, so you would want to post shorter messages there.
3. Add your location
You can easily add your location to get more clicks as Publer claims that messages with locations result in 79% more engagement. This works well for Twitter and Facebook but not for LinkedIn and Pinterest since these networks do not allow location sharing in public posts.
4. Media options
Publer offers extensive media customization features. By clicking on the Media Options button, a pop-up appears. You can now add watermark to image(s) for every network. Additionally, you can post images to the chosen albums on Facebook and Instagram. In the case of Pinterest, you can select the board to which the pin should be added.
5. Add signatures
Remember, I informed you that you can create and save signatures for each network in the Account Settings page? You can now add a signature to your post for each network by clicking on the Signature button (pencil icon).
6. Auto share content
Do you wish to amplify your reach and extend the life of your social media messages? The answer lies in re-sharing your messages on different networks. You can compose one message and re-share on other networks.
This is what the Auto Share feature in Publer accomplishes. Clicking on the Auto Share button pops open the sharing tab.
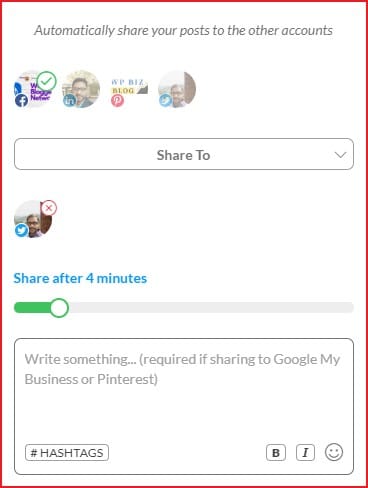
Now you can share your message on other networks. For example, if you have selected the Facebook account, you can share the message on other networks like Twitter, LinkedIn, Instagram, etc.
Another cool feature is that you can introduce delays between the original post and the re-shares. This feature helps extend the average life of a message. Suppose that you publish a message in your Facebook group at 2 PM, then you can share the same message on Twitter at 6 PM or even the next day.
Finally, you can add some content and hashtags to the shared message to increase its reach.
7. Follow-up comment
Follow-up comments are an excellent way to get the conversation going on your social posts. They also help to increase your reach since networks like LinkedIn restrict the reach of messages that contain outbound links. So what’s the solution? Add the outbound link to the first comment instead of within the post. Pro marketers like Noah Kagan of App Sumo fame use this strategy regularly in their posts.
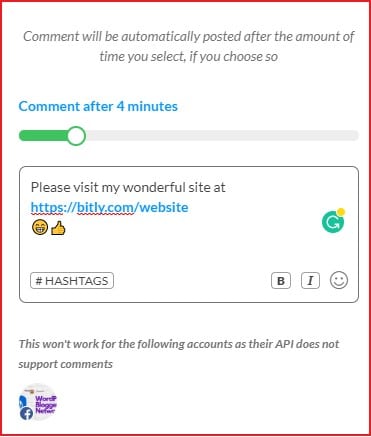
Thankfully, Publer allows users to add a follow-up comment at the post creation stage itself. All you need to do is click the Follow-up Comment button (share icon).
The tool displays the networks on which follow up comments cannot be posted due to API limitations. As with the Auto Share feature, you can set a delay between the post and the follow-up comment, or you can post the follow-up comment instantly before some other user posts a comment on your message.
8. Auto delete posts
This feature allows you to delete a post after a pre-determined time. Although it’s hard to understand why you would want to delete your social media posts, it is a handy feature if you wish to share time-sensitive information like special offers or discount coupons. To set the auto-delete time, just click the Delete button and set the deletion time.
9. Set delay between accounts
If you’re posting the same message across multiple networks, you might want to set a delay between the networks. Works just like the auto-share feature that I described earlier but for posts instead of re-shares.
I have described all the options available while creating posts, now I want to explain two alternative ways of creating posts in Publer.
CSV Upload
Publer allows users to upload a CSV file containing the post message, title, scheduled date, URLs (if any), images (optional), and video links (optional). This feature is useful for scheduling bulk messages. Once you have uploaded the messages, you can insert hashtags, and further, customize them for individual networks using the options that I described earlier.
The uploaded CSV file does not have a separate column for hashtags, but you add hashtags to your messages under the Message column in the CSV file. Also, there is no option to create and schedule messages for different networks using a single CSV file.
Hopefully, this feature will be added in the future updates to Publer.
Post from RSS
Creating posts from your blog’s RSS feed is an excellent way to drive traffic to your blog. Click on the RSS button to open the RSS feed tab.
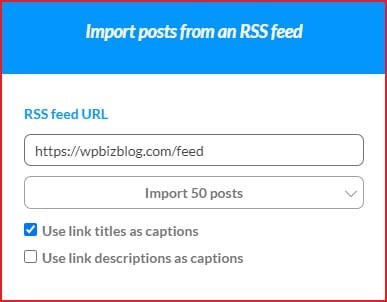
Enter the RSS feed URL. If your blog runs on WordPress, then your RSS feed URL would be www.yoursite.com/feed.
You can choose to import all posts or import up to 5, 10, 25, or 50 posts. You can also use your post titles as captions and even use your meta description as captions.
Most probably, you would want to stick to using the post title as captions since meta descriptions will be too long for use as captions.
Once you have imported your feed, you can customize and schedule each blog post individually for every network.
Now let’s turn our attention to the feature you might be most interested in.
Schedule Posts in Publer
Posts scheduling is any social media management tool’s core feature since it saves us so much time and effort in managing our social media campaigns.
It can be argued that a tool that lacks in its scheduling features is not worth investing in.
So, I was quite apprehensive before signing up for Publer since I didn’t know what to expect on this front.
But I was pleasantly surprised.
There are 4 ways to schedule posts in Publer.
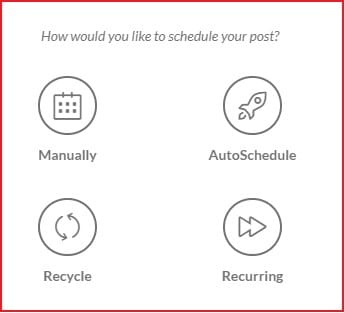
1. Manually schedule posts
This is self-explanatory. You can choose to manually select the date and time on which your posts will be published to the selected social media accounts.
2. AutoSchedule posts
To use the AutoSchedule feature, you will first need to set up a posting schedule for individual accounts on the settings page. I have already explained how to configure a posting schedule in the section on Account Settings. Once you have your posting schedule ready, Publer will post to the selected networks automatically on the next available time slot as per your posting schedule.
3. Recycle posts
The post recycle feature is super helpful to post your messages multiple times on different social networks except for Twitter since Twitter does not allow recycling tweets using API.
You might be wondering why you should post the same message multiple times? The reason is that the average lifespan of social media posts is between 15 minutes to a few hours. So, even if your post is quite engaging, it may not reach your target audience. Recycling increases the chances of your post, reaching the target audience over a period of time.
Once you choose the Recycle posts option, a pop up appears.
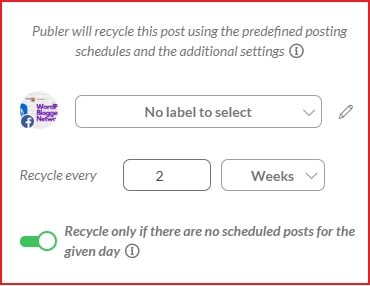
There are two important options available. You can select the recycling frequency, that is, when do you want the post to be recycled. It can vary from one week to a few years. Let’s say you select 2 weeks as the recycling frequency.
Now, after every 2 weeks, Publer will automatically post the same message to your selected accounts as per your posting schedule. You can also direct Publer to recycle posts only if there are no scheduled posts in the queue for the given day for individual accounts.
So, if there is already a separate post scheduled for Facebook after 2 weeks, then Publer will not send out your recycled post.
Notice that there is no option available here to stop Recycling after a chosen period. If you want to pause or delete your recycled posts, you will need to visit the Posts page and select Recycling from the drop-down and then choose to either pause or cancel the Recycling.
4. Recurring posts
Let us now look at the final scheduling feature in Publer, which is recurring posts. The recurring posts feature is similar to post Recycling but with some differences.
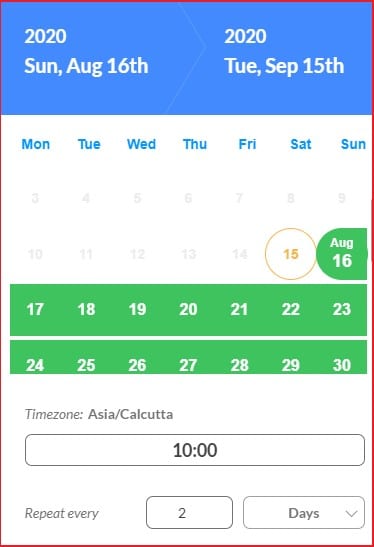
You first need to select the recurring frequency. Let’s say that you want your post to be posted every 2 days. After this, you need to choose the duration for which this task should continue. I have selected 30 days as you can see in the above screenshot. Next, you can set the post publishing time. I have set it to 10 AM in this example.
Now, Publer will publish the scheduled post on 16th August (the start of the schedule) at 10 AM and re-publish it every two days till the end of the task duration, which is 15th September.
Note that unlike in Recycling that follows a set posting schedule, Publer will publish your recurring post at the exact time with the chosen frequency till the end of the task date.
The Recurring feature is useful if you want to target your audience at the same time every few days or months. If you’re running a time-sensitive promotion on your website that you wish to highlight frequently, then the recurring posts will be super handy.
Publer also sends you email alerts once any scheduled post fails to publish for some reason or when your scheduled queue is empty. Quite thoughtful.
I have explained the post creation and scheduling process in detail. You will realize that not only are the options extensive, but the features are quite powerful and allow complete control over your social media management tasks.
Let’s now turn our attention to the Posts page.
Posts Page
This page lists all the following types of posts: Scheduled, Posted, Failed, Drafts, Recycling, and Recurring.

You can switch between two views: List view and Calendar view. The calendar view lets you see all the posts (scheduled, posted, etc.) day wise, week wise, and month wise.
Also, you can reuse any type of post by selecting the posts. I found this feature quite useful for posting my most important messages over and over again.
I have already mentioned earlier that you can pause or delete your recycling posts from this page.
Social Media Analytics in Publer
Publer is primarily a social media management tool. But I was happily surprised to experience its Analytics and Engagement feature.
You can see all your followers and likes across all networks like Facebook, Twitter, etc. on the Analytics dashboard. You can also view stats and growth for individual networks. It also shows the increase in followers and engagement from 7 days up to 30 days.
Look at the screencast below to see the powerful analytics reporting in Publer.
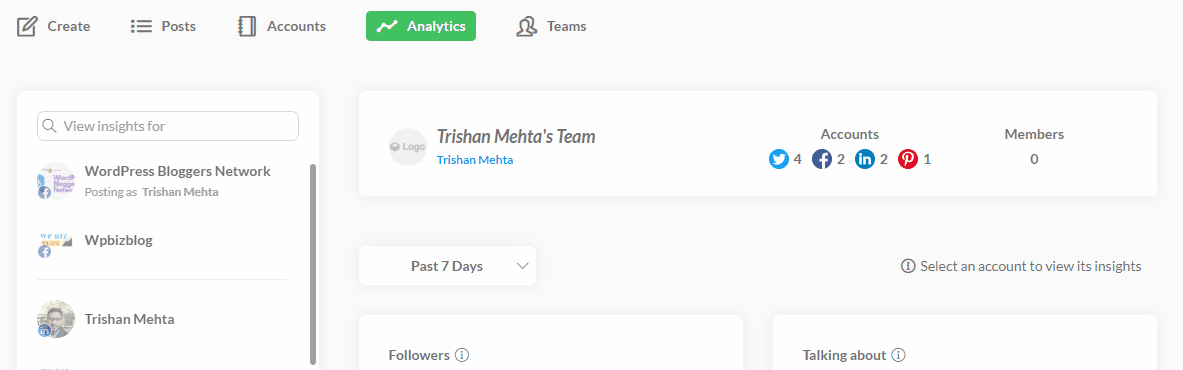
Presently, stats for the following 6 attributes are displayed on this page:
- Followers
- Talking about
- Post reach
- Post engagement
- Link clicks
- Video views
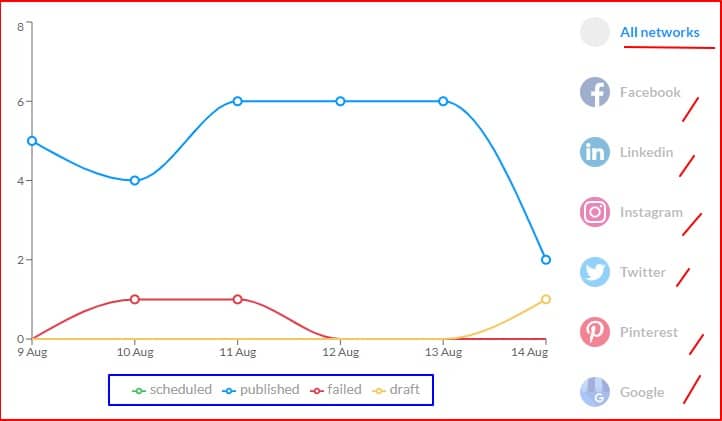
You can also see your published, scheduled, failed, and draft stats across all networks in a beautiful graphical display. This information is useful for checking out your network-specific publishing activity.
Finally, the post insights feature lets you check out the engagement on your individual posts.
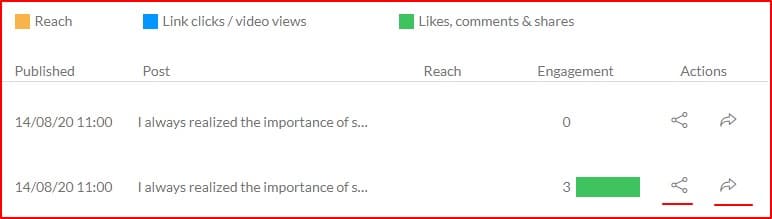
There are two useful action buttons beside every post: Share and Go to post. Using the share button, you can re-share your best performing posts on other networks.
While the Go to post button takes you to the social network page where your post was published.
There is also a column for displaying the post reach, but at the moment, it is not showing any data.
To sum up, I would rate the integrated analytics feature in Publer as excellent when compared with Buffer that sells publishing and analytics plans separately.
Adding team members
You can easily add team members to your Publer account from the Team page. Members need to be added for individual social accounts and are not added for all accounts by default. You can assign an Admin or Editor role to each member.
The difference between Admin and Editor roles lies in the posting access granted. Admin members are allowed full posting access for every social account that is assigned to them.
While members with Editor roles can be granted either full posting access or their posting privileges can be set to “require posting approval” so that either you or other admin members can review the post before publishing.
Further, the team members can be allowed to post either as themselves or as the owner. I would prefer posting as an owner to maintain brand consistency across all channels.
Publer Pricing
With so many features packed in a single tool, you must be wondering whether Publer is a pocket-friendly alternative to popular tools like Hootsuite and Buffer?
The good news is that it is. Even better, Publer offers a free plan with 5 social accounts and 50 scheduled posts (10 per account) without any charge. So, if you plan to use it daily and do not manage more than 5 accounts, you can stick to the free plan for as long as you like.
Paid plans start at $10 per month. They include features like Additional team members, Analytics, Unlimited Scheduling, Unlimited drafts, Bulk Scheduling, Image watermarking, Signatures, Post Callbacks, Recurring, and Recycling posts Videos and GIFs, and access to the Publer affiliate program.
Check out Publer plans
How does Publer compare to Hootsuite and Buffer?
Hootsuite offers a free plan but with only 3 social profiles and 30 scheduled posts. It provides unlimited scheduling on all of its paid plans that start at $15 per month (Professional plan). But there is no option to add team members on the Professional plan. Also, there is no mention of advanced features like recycling posts, recurring posts, first comment, signatures, etc.
But you get access to a social inbox to receive messages from all your social profiles. You can then respond to your contacts from your social inbox itself. Additionally, you get access to Hootsuite analytics on the paid plans.
Hootsuite is targeted more towards business owners that deploy social media ads to gain more engagement. At the same time, Publer is perfect for individuals and small teams that wish to engage with their audience in-house.
Buffer used to offer a free plan some time back, but they have recently discontinued this plan. Now, their paid plans start at $15 per month that allows 8 social profiles and just 100 scheduled posts at any given time. If you want to add more social accounts and need additional scheduled posts, you will have to upgrade to the Premium plan costing $65 per month.
Additionally, Buffer does not provide analytics on its Publishing plans. If you want social media analytics, you will have to purchase a separate plan starting at $35 per month.
Clearly, Buffer is targeted towards medium and large business users since it is highly improbable that individuals or small business owners would shell out $50 to $100 per month on a social media management tool.
Publer review summary
Before using Publer, I had almost given up on social media to build the WPBizBlog brand and drive traffic to it.
But when I experienced all the features of Publer first-hand, I quickly realized that it solved my biggest roadblock in using social media: lack of time.
Now I can create and schedule posts across multiple networks from a central place. I can even add the first comment to my posts to drive engagements. Further, I can add videos and funny cat GIFs to my posts and view all the reactions without leaving Publer. And do so much more.
My followers have again started picking up. The Facebook group is witnessing new signups, and I have gained a good readership on LinkedIn.
All in all, I consider Publer as my best investment this year. You might have heard of the Marketing Rule of 7 that states that a prospect needs to engage with your brand at least 7 times before making a purchase from you.
Publer makes reaching out on 7 different channels a child’s play. The rest depends on your ability to enhance readership and engagement.
The post Publer Review: The Best Alternative to Hootsuite and Buffer? appeared first on WPBizBlog.