Setup & Configuration of WebsitePanel with Exchange Hosting
Many a times you can find situations when you want to include your current mail server with WebsitePanel. Some of us worked one of those prerequisites and properly integrated the particular Exchange Server with WebsitePanel.
Quick review about the process:
Moving further in this practice in this practice considering that a WebsitePanel is already installed in your environment and also you are having an obvious idea in regards to the current version of your Exchange Server and the WebsitePanel. At first, import all your current exchange users and also emails towards the hosting system in the WebsitePanel. Switching ahead in this integration process would likely need following details:
- WebsitePanel admin access
- Exchange server admin access
- Remote Desktop Admin access of your server
- List of all the users which you want to migrate in WebsitePanel
The WebsitePanel setup with Exchange Server requires comparatively much lesser time than importing of any data. Depending on the requirement and the amount of data to be imported you can estimate an ETA for the integration.
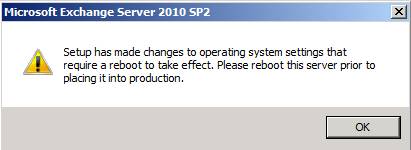
The WebsitePanel setup with Exchange Server would also require one/two reboot of the server. After reboot the server must be restarted at the specified time. Try to login in the mail server via RDP. Finally, at the end confirm whether the integration was successful or not by creating a testing exchange mailbox with a username and password and verify at your end.
Let’s take a deep summary associated with Exchange Server along with the steps to put together as well as its integration with the WebsitePanel.
Microsoft Exchange Server Overview:
Microsoft Exchange Server developed by Microsoft is the server side of a client–server, collaborative application product. It is part of the Microsoft Servers line of server products and is generally used by enterprises using Microsoft infrastructure products. Exchange’s major features consist of electronic mail, calendaring, contacts and tasks; support for mobile and web-based access to information; and support for data storage.
Microsoft Exchange Server is an email server software which is usually found in corporations running Microsoft Windows Server. In addition to e-mail Exchange Servers also provide centralized company address books, shared calendars and web browser access. For more details you can also visitMicrosoft Exchange Server product page.
Exchange Server 2010 sp2 installation steps:
Prerequisites:
Step 1: Download & install “Microsoft Filter Pack” (64Bit version).

Step 2: In the next step go to the start menu, click on All Programs > Accessories > Windows Powershell. Open the Windows Powershell Console and Right Click – Run as administrator, and run the command Import-Module ServerManager.
After running this command, for a typical installation with Client Access, HUB transport, and Mailbox Servers run the following commands:
Add-WindowsFeature NET-Framework ,RSAT-ADDS, Web-Server, Web-Basic-Auth, Web-Windows-Auth, Web-Metabase, Web-Net-Ext, Web-Lgcy-Mgmt-Console, WAS-Process-Model, RSAT-Web-Server, Web-ISAPI-Ext ,Web-Digest-Auth, Web-Dyn-Compression, NET-HTTP-Activation, Web-Asp-Net, Web-Client-Auth, Web-Dir-Browsing, Web-Http-Errors, Web-Http-Logging, Web-Http-Redirect, Web-Http-Tracing, Web-ISAPI-Filter, Web-Request-Monitor, Web-Static-Content, Web-WMI, RPC-Over-HTTP-Proxy

And then Restart.
Step 3: Reboot the server.
The prerequisites must have been installed successfully.
Installation steps
Step 1: Initially open the command prompt “Browse the Command Prompt in the setup location” And run the following command:
setup /PrepareLegacyExchangePermissions or setup /pl
This command is for preparing the legacy(Exchange 2003) server permissions.
Before running this command verify your Domain Function Leveland Forest Functional levelin Windows Server 2003 is in native mode and your Exchange 2003 is in native mode.
Otherwise it will not allow to install exchange 2010.

Step 2: Preparing the outline:
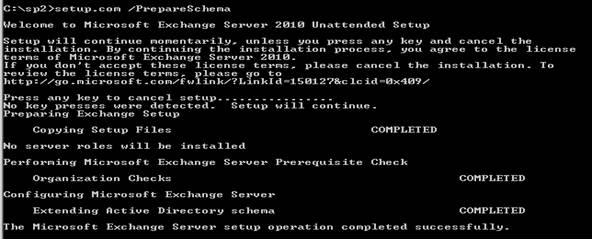
Setup.com /PrepareSchema
Step 3: Next step would be preparation of active directory.
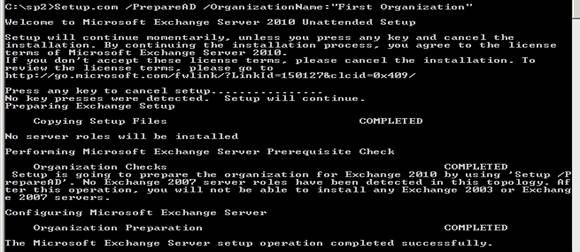
Setup.com /prepared /OrganizationName:<Organization Name>
For example your organization name is “First Organization”
Than fire the following command,
Setup.com /prepareAD /OrganizationName: ”First Organization”
This step can be skipped if you have Exchange server already installed in your organization.
If you want to change your organization name then use the following command.
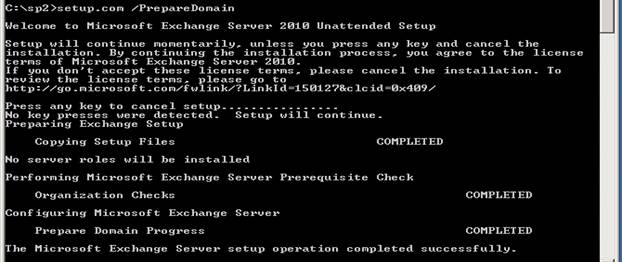
Step 4: Now its time to prepare the domains. Use the following command if you have a single domain
Setup.com /Preparedomain
Or if you are having multiple domains
Setup.com /Preparealldomains
Step 5: Beginning with the Setup
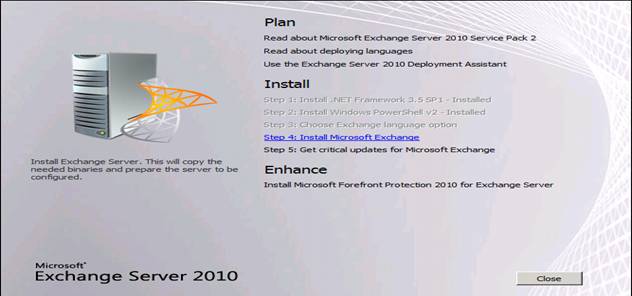
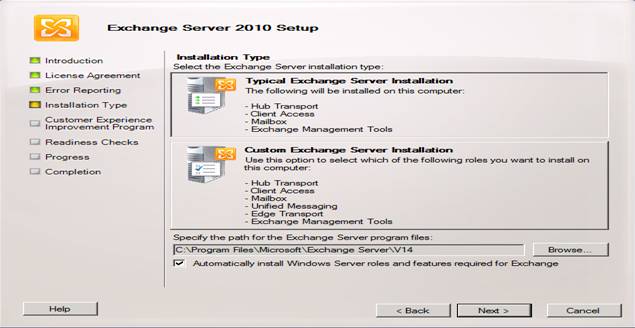
Step 6: Choose typical to install HUB transport,CAS, and mailbox.
Check on Automatically install Windows Server roles and features required for Exchange.
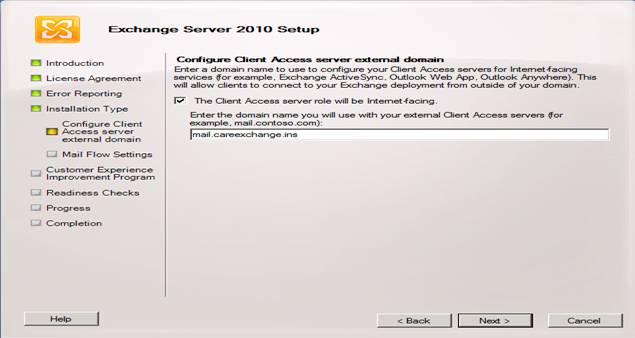
Step 7: If it is your internet-facing server then, specify the external domain name.
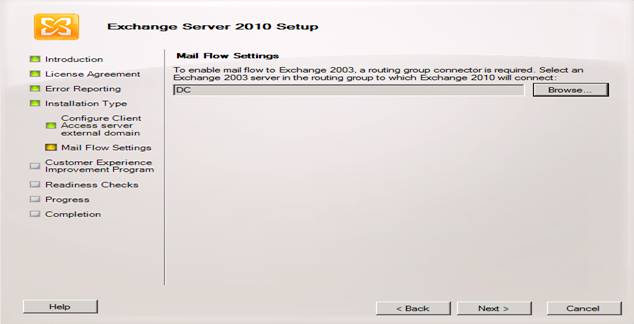
Step 8: If Exchange 2003 already exists in your environment, then you will get this option to configure mail flow between these Servers.
Step 9:
Wait while the Setup runs.
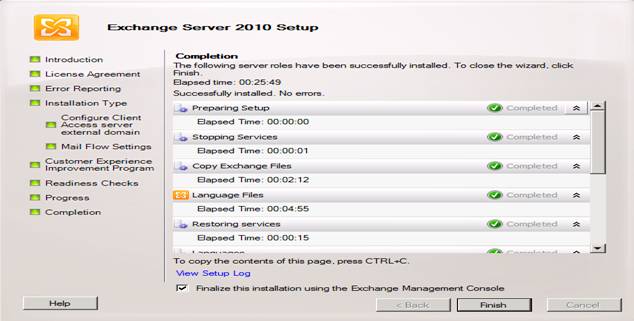
Step 10: Than after reboot your server.
Finally, the Exchange Server is successfully installed.
Now, let us move towards integration of Exchange Server with WebsitePanel.
Integration of Exchange server with WebsitePanel:
Prerequisites: The prerequisites would include:
- Control Panel Server:The server component of the control panel deployed on at least one CAS(Client Access Server). In case if there are multiple CAS Servers available, an additional server component can be implemented and can be considered as redundant server within the server configuration. It is necessary that both server deployments use the same AD(Active Directory) Account for their applications pools and are having the same password defined for the communication with the enterprise server component. The AD Account used must be a member of the Domain Admins and Organization Management Groups.
- Exchange 2010 SP2 CAS:The Client Access Role is deployed on the server where the server components are positioned.
- Exchange 2010 SP2 MBX:The service as such depends on the availability of a Database Availability Group (DAG).
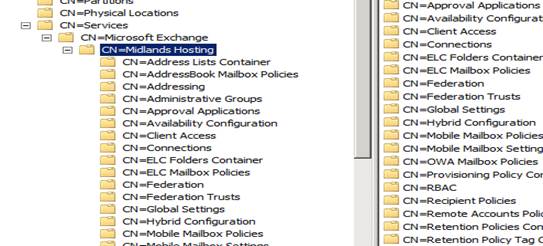
While provisioning a mailbox your directories from the constructed DAG will likely be queried along with an array of your databases is going to take position. - Exchange 2010 SP2 Database Upgrade (from v1.2.6 to v2.0):When upgrading from WebsitePanel v1.2.6 to v2.0 it is necessary to update the location of where the ABMP (Address Book Mailbox Policies) path can be found, this information is stored within the WebsitePanel Database. If this path is not correct new organizations will not be created. This script should be applied directly after an upgrade from 1.2.1.6 to the latest 2.0 release. If you are performing a manual update, then it should be applied after running update_db.sql. Download the script file here organizationupdate-2.0.sqlThe default location of the ABMP depends upon the values that were used when Exchange 2010 SP2 was installed.The default location is:
CN=AddressBook Mailbox Policy, CN=First Organization, CN=MICROSOFT EXCHANGE, CN=SERVICES, CN=CONFIGURATION, DC=DOMAIN, DC=COMNote: Here “First Organization” is just an example. It may not be correct on your server.In the given example below we have a CN with the name Midlands Hosting.
Hosted Exchange Solution Pre-Deployment Tasks:
This task includes the following steps:
Step 1: Deploying Hosted Organization module
This would further include following steps:
a) Creating Root Organizational Unit:
This Organization Unit will be parent for customer’s Organization Units.
- Open Active Directory Users and Computers (ADUC) and create a new Organizational Unit (OU) where hosted organization’s sub-OUs will be located, e.g. “WSP Hosting”. Be careful here that it will be difficult to change it later so choose it carefully.
b) Setting ACL for Root Organizational Unit:
- Open the property pages of the root hosting OU and go to Security tab. If in case you do not see Security tab go to View > Advanced Features in ADUC. Press Advanced button and uncheck “Allow inheritable permissions from parent…”. Press Copy, OK and Yes in next dialog boxes.
- Remove permissions of the Pre-Windows 2000 Compatible Access.
- Click Advanced tab again and sort permissions by name.
- Find Authenticated Users. You will find more than one string connected to Authenticated User. It depends on ADaware software deployed in your system. Here edit only string connected to Authenticated Users that is applied to this Object only and open the string. Leave only “List contents” permission for Authenticated Users.
Step 2: Modifying Address List Containers
For Exchange 2010 SP2
WebsitePanel is flexible with Exchange 2010 SP2 Hosting Module which includes a new feature called Address Book Policy to segment Global Address Books securely. You must be running WebsitePanel 1.2.1 in order to use this functionality.
In Order to Enable it you must edit the web.config on the WebsitePanel Server running on your Exchange 2010 SP2 Mailbox Server and set the following keys to “True”
<add key=”WebsitePanel.Exchange.CreateQuery BaseDN” value=”true” />
<add key=”WebsitePanel.Exchange.enableS P2p” value=”true” />
Step 3: Basic Exchange system checks
- Verify whether the Send and Receive Connectors settings allow you to send and receive e-mail to/from outside.
- Check that Default Address Policy exists and applied. We do not recommend using additional E-mail Address Policies on WSP environment. Although WSP Exchange solution will work with Exchange environment where more than one E-mail Address Policy exists. But this could lead to some issues when performing some changes, migrations, etc. So it would be better to have only “Default Policy” created by Exchange Setup and do not change it.
- Check Public Folders if any default Public Folders database exist. Note here that Public Folder Database will not be automatically installed if you choose NO in Client settings page when first Exchange Mailbox Server was installed. In this case you should create new Storage Group with Public Folder Database in it manually.
WebsitePanel Implementation for Exchange Server Hosting Mode
In order to integrate Exchange Server with WebsitePanel, you need to install the WebsitePanel Server component on the Server with Exchange Server 2010 SP2 running. Refer to the WebsitePanel Implementation document on how to install WSP Server component.
- Once the WSP Server is installed move back to the WSP Portal and login under the serveradmin account.
- In the Home Page, create a customer that will be using Exchange in the Hosted mode.
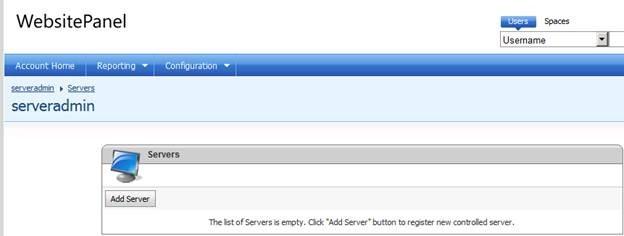
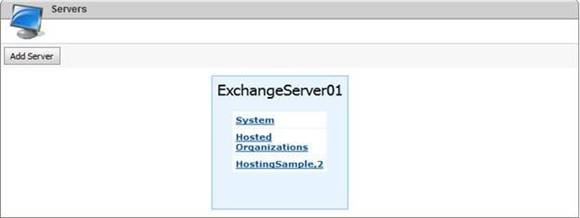
- In the Home Page, go to Configuration > Servers and click on the Add Server button.
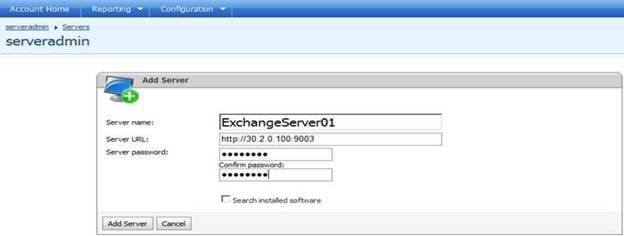
- Now here provide the required information where the Server URL/Port should be the URL/Port of the Server with Exchange Server 2010 SP2. Check the Search installed software option. Then click Add Server button to create the New Server.
- Once the Server is added, click on the new server and provide the necessary details in the following settings:a. Connection Settings
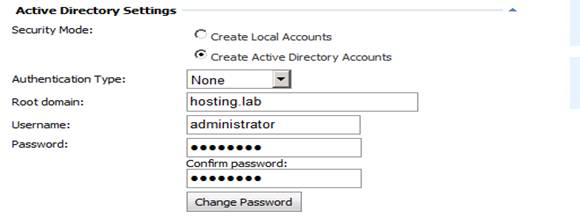
b. Active Directory SettingsActive directory settings of the Root Domain. You need to mention here the fully qualified domain name of the domain where the user objects will reside in e.g. hosting.locali. Set Security Mode to Create AD Accounts
ii.Set Authentication Mode to NoneSave the changes before proceeding.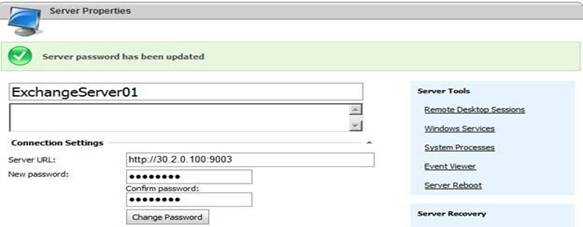
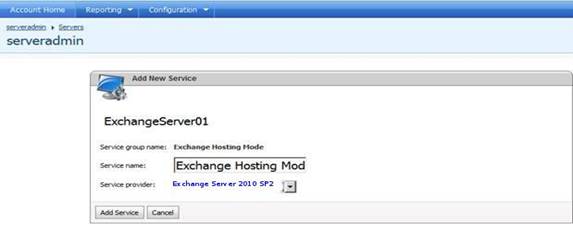
- On the server properties page, go to Services> Exchange Hosting Mode section and click ADD.
- Enter a Service Name, and select the Service Provider to Exchange Server 2010 SP2. Click Add Service.
- In the next step in the Exchange Hosting Mode Service Properties Page, provide aa. Name – HostingSample, 2b. Set an Organization Template and provide a Program ID and an Offer ID.
Save Changes.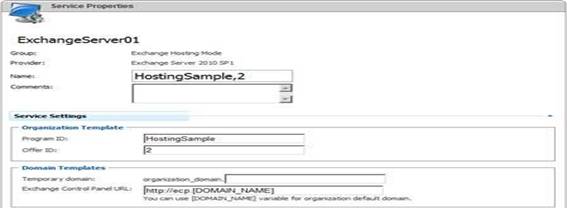
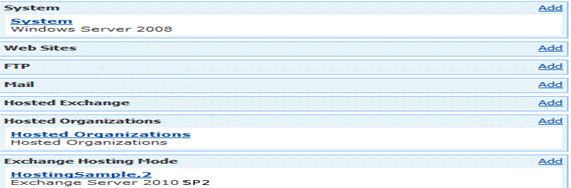
- Now the Hosting Service will be created on the specified server.
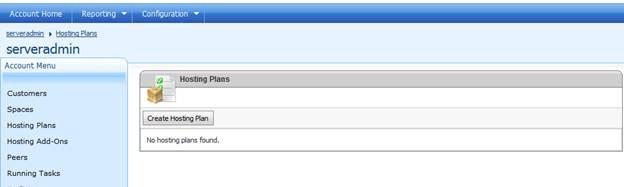
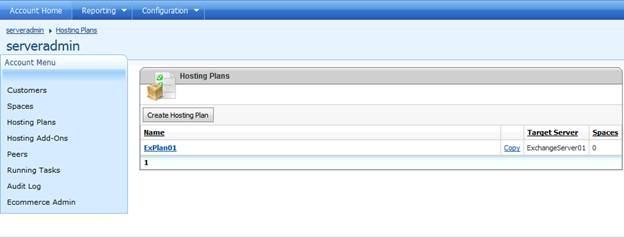
- Go back to the Home Page, go to Hosting Plans and click on the Create Hosting Planbutton.
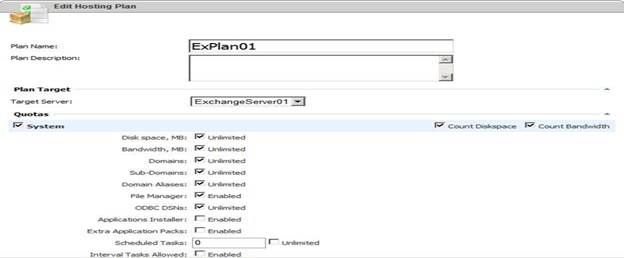
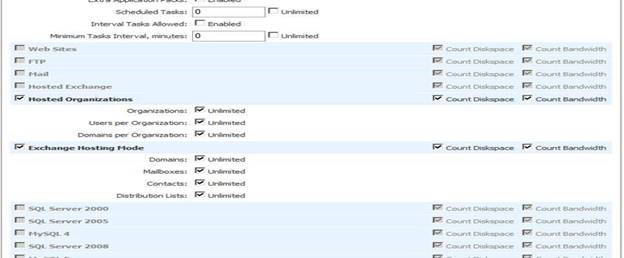
- On the Edit Hosting Plan page, Name the Plan, and provide the Plan Target. Select the required services and assign the Quotas for them as required. (System, Exchange Hosting Mode)
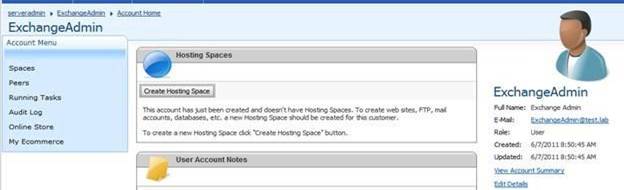
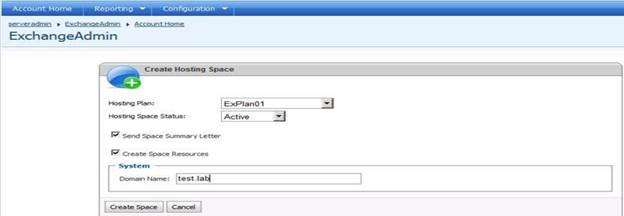
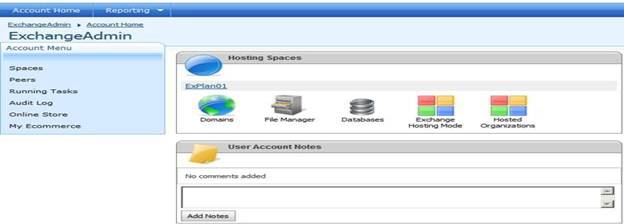
- Go to Account Menu > Spaces and click on the Create Hosting Spacebutton.
- On the Create Hosting Space page, provide the required fields as per the requirement.
- After hosting space is created, click Hosting Space link to access it and see left menu for available services there.
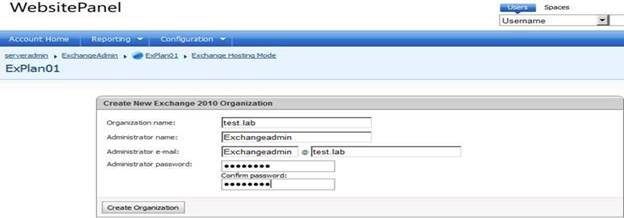
- Click on Exchange Hosting Mode menu item and Create New Exchange 2010 Organization page will open.
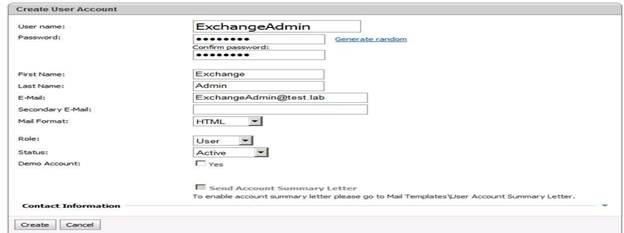
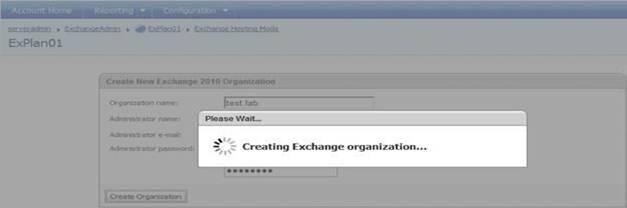
- On the Create Organization page, Provide the Organization name (domain name) and the Administrator fields required. These administrator fields will be used to login to the Exchange Server Mailbox and for Managing purposes of the other settings inside the organization. At last, click on Create Organization button.
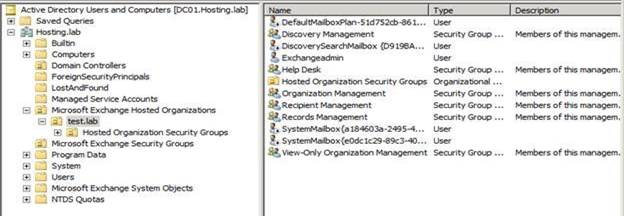
- Check out the newly created organization inside the ADUC › Microsoft Exchange Hosted Organizations OU.All the organization groups, Users and other Sub OUs will be created under this main OU.
- The customer can then access this by logging into the WSP Portal using his account and on the Homepage he will be able to view the existing Hosting Space or He can create his own
New Hosting Space.
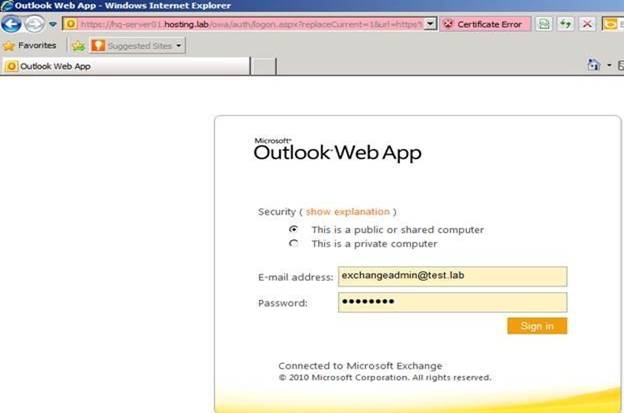
- To access the mailbox and to modify the Organization Settings and other Exchange Server settings, the administrator can use the OWA or the Outlook 2010 using the administrator account of that specific organization.

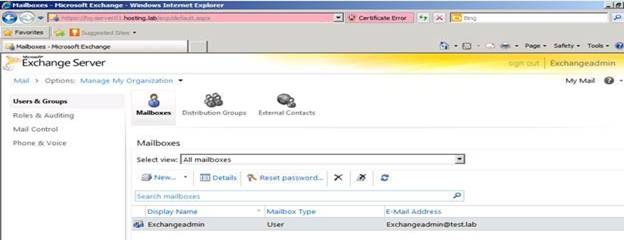
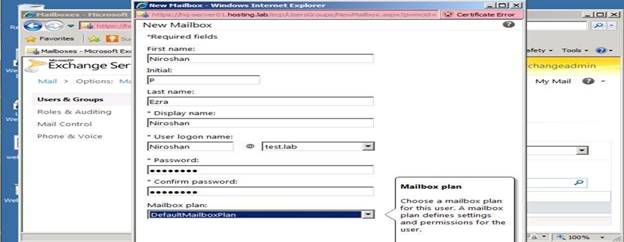
- Once logged in, the Administrator can Create New mailboxes, Distribution Groups, Add Roles and Auditing Settings, Control Mail and even configure Phone and Voice options.

Finally, you have successfully completed the Integration of Exchange Server 2010 SP2 with WebsitePanel 2.0.
Reference the given link for more details:
http://www.websitepanel.net/documentation/deployment-guide/exchange-2010-sp2/
Conclusion:
There’s actually far more in this but we’re through with what we emerged here to accomplish. That’s how you do a straight installation of Exchange Server 2010 SP2 and successfully integrate it with WebsitePanel. Lets hope you learned a whole lot with this write-up and also when we look forward to have you ever again the next time.
After these steps of migration are successfully completed, the exact estimated time can be calculated.