The process of creating a replica of your website is known as website cloning. By using this clone, you can create blueprints, perform updates, test compatibility, and more before implementing the changes on your website. By this method, you can safely implement any changes to your live website. In this tutorial, we are going to check How to Manually Clone a WordPress Website.
Why Do You Need to Clone Your Website?
Every power user of WordPress has access to create the exact copy of your website. This feature is most helpful for web agencies that have several websites across multiple WordPress hosting providers. Whenever an issue occurs on your live website, you can create a clone and try the fixes in that copy until you get a resolution. So, it is easy to implement the correct resolution on your live website.
If you want to update a theme in a website without breaking any service, then you can follow the below steps:
- First, take the clone of your website.
- Update the theme on the clone.
- Do all the necessary testing.
- Then, either remove the previous version or make this clone website as the original version of your website.
The scenarios when you need to create a clone for your website are:
1) To Perform Compatibility Test
You can perform the compatibility testing on your website to check if all the components are working as expected and also if the website codebase is capable of running on software and hardware infrastructure. While performing the compatibility test, you need to make some changes to your website. So, we suggest you perform these tests on a cloned or staging website instead of the live website. Similarly, perform all the processes that can affect your website on the clone, such as code change, implement themes and plugin updates, installation of untested themes, and more.
2) Transfer of Your Website to New Server
The transfer of a website from one hosting provider to another seems to be easy. But it is always essential you create a clone of your website along with the backup of website files and databases before the transfer. If the website gets broken after the transfer, you can use the clone of your website to recover.
3) To Create a Blueprint
The website builders use blueprints to create their website. These blueprints are stored in a shared location to speed up the development process, and these setups include code-level customization, plugins and themes configuration, and more.
4) To Back up Your Website
You can also use the cloning process to help make a backup (web files and database) of your website and store that in an offsite location. We can use this cloned website stored in offsite locations during disaster recovery. You can use different WordPress plugins to create a clone of your website.
Clone a WordPress Website
You can clone your WordPress website using multiple methods. But in this knowledge base, we discuss how to clone a WordPress website manually.
Clone a WordPress Website Manually
The manual process of cloning your WordPress website includes the following steps:
Compress WordPress Files
First, you need to clone your website is to compress all the files and folders in your public_html directory. For the same, follow the below steps:
Log in to your cPanel as a root user.
Navigate to the ‘File Manager’ and select the ‘public_html’ directory of your WordPress installation.
Then, select all the files and right-click to select the ‘Compress’ option.
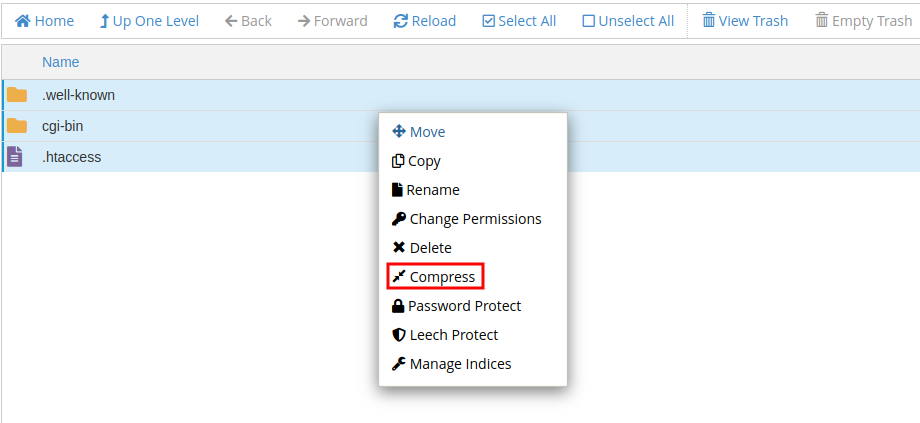
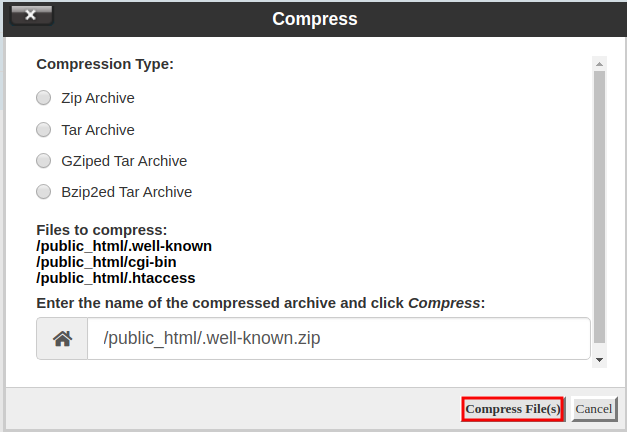
Then, select the compress file type and enter the name of the compressed archive.
Click the ‘Compress File(s)’ button.
Upload the Compressed File
After the download, you can upload the compressed file to the new hosting location via FTP or SSH. The SSH is faster than the FTP upload. To upload the compressed file to the new location, follow the below process.
Log in to the new hosting location via SSH as a root user.
Switch to the folder in which you want to upload a copy of your WordPress website.
Make sure that the folder is empty. If it is not empty, save all the essential files and folders to a safe location and then run the following command to empty the folder.
# rm -rf *
Then download and unzip the generated zip file.
# wget </URL/of/the/Zip/File> # unzip <filename>.zip
Replace the </URL/of/the/Zip/File> and <filename> flags in the above commands with the actual URL of the website zip file and name of the file, respectively.
Database Migration
All the web files got uploaded to the new location. After that, we need to import the database to the new location. To export the database from the current location, and then import it to the new location, follow the below process.
- Log in to the database manager (phpMyADmin) and select the database.
- Navigate to the ‘Export’ option and download the ‘.sql’ file.
- Then, log in to the new database manager and click the ‘Create Database’ button.
- Navigate to the ‘Import’ option.
- Click ‘Choose File’ and upload the downloaded ‘.sql’ file.
Update the wp-config.php
Next, you need to update the wp-config.php file to make sure that the WordPress installation on the new location gets connected with the new database. Go to the ‘public_html’ folder and open the ‘wp-config.php’ file. Then, enter the new database credentials.
Conclusion
Website cloning is the process of creating an exact duplicate of your website. By using this clone, you can create blueprints, perform updates, test compatibility, and more before implementing the changes on your website. We hope this knowledge base was helpful to you. Please comment below for any questions or queries. If you are an InterServer customer, please reach out to our support team for further help.
The post How to Manually Clone WordPress Website? appeared first on Interserver Tips.