Gitweb is the free and easy alternative to GitHub for anyone looking
for a simple way to view and share git repositories online. You don’t
get all the attractive features like easy HTTP cloning, actions, and
metrics, but you get a minimalist web front end for displaying your
git repositories; and for many use cases that’s plenty. You can
customize the look and feel of your Gitweb installation with CSS, if
you want, and it’s easy to configure Gitweb on the NGINX web server in
Debian.
- Key Features
- Installing Dependencies: Gitweb, NGINX, and FastCGI
- Set Up Ngnix Configuration
In order to follow along with this article you will need to have a
basic understanding of how to interact with a command prompt to do the
following:
- Install programs like Gitweb and FastCGI
- Install, stop, start, and restart services like NGINX
- Edit files on the command line
Key Features
- Web front end
- Visualize all of your git projects in one neat web
interface, making your git progress easy to see and share with others - Find exactly what you’re looking for
- Search through commits,
commit authors, or actual content with recursivegrepand regex
search queries - Visual git diff
- See and share exactly what changed on a recent commit
- Project snapshots
- Download a zipped archive of your project from
any point in its history - Open raw files
- View a file blob or the raw file itself right in
your web browser
Installing Dependencies: Gitweb, NGINX, and FastCGI
By default your cloud VPS server comes with the Apache web server
installed. This will conflict with Ngnix, so I’d recommend stopping
the apache2 service:
sudo service apache2 stop
You could also remove apache2 entirely:
apt remove apache2
If you haven’t already, make sure to install the git version control
system; even if you have git installed locally you will need to have
it installed on the server as well:
apt install git
Moving along, you will also want to install the Gitweb application
itself:
apt install gitweb
Then install FastCGI:
apt install fcgiwrap
Finally, make sure to install the NGINX web server:
apt install nginx
Set Up Ngnix Configuration
The configuration below allows you to use any domain or subdomain you
want to serve your Gitweb installation from. Of course, you must
first make sure that you have your DNS configured properly. If you
already have a website on your primary domain (example.com), you can
use a CNAME to create a subdomain (git.example.com, for example).
server { listen 80; #replace "example.com" below with your domain (or subdomain) server_name example.com; location /index.cgi { root /usr/share/gitweb/; include fastcgi_params; gzip off; fastcgi_param SCRIPT_NAME $uri; fastcgi_param GITWEB_CONFIG /etc/gitweb.conf; fastcgi_pass unix:/var/run/fcgiwrap.socket; } location / { root /usr/share/gitweb/; index index.cgi; }
}
Now, make sure to reload your NGINX configuration:
sudo service nginx restart
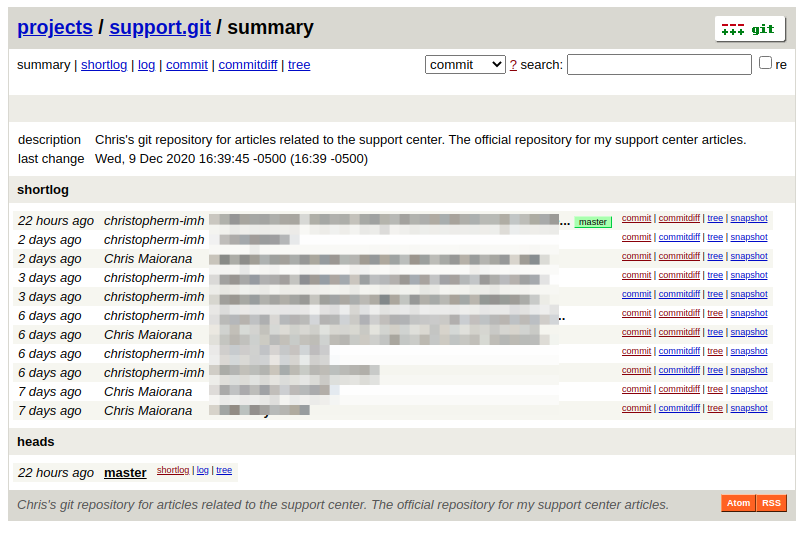
Now when you reload the page, you should see the Gitweb interface with
a “No projects found” warning. If you have not set up remote Git
repositories yet, you can set up your bare git repos in the
/var/lib/git directory, which is the default location Gitweb checks
for repos. You can customize this directory location with the Gitweb
configuration file: /etc/gitweb.conf.
For further reading, check out some of the other git-related content
from the Support Center:
- Git fundamentals (complete guide)
- How to create your own git server