While there are lots of browsers to choose from, Google Chrome leads the way. While the ethics and ramifications of this is a debate for another day, it doesn’t stop the browser from having problems. Of course, this is the case for every web browser, but in Chrome’s case, the ERR_CONNECTION_REFUSED error is somewhat unique.
This is because you won’t see this error in any other browser than Google’s. However, the problem is one that every browser will encounter – just under a different name. The way to fix it is through checking software and hardware, looking at (and clearing caches), and maybe a complete reinstall of Chrome itself.
For this post, we’re going to look at how you’ll fix the ERR_CONNECTION_REFUSED error and get your browsing experience back to normal. First, let’s talk about why the error will appear.
Why the ERR_CONNECTION_REFUSED Error Affects Google Chrome (And Not Other Browsers)
The internet is a complex beast, but with a simple underlying principle: One computer connects to another to serve files between them. We talk about the concept in part elsewhere on the blog. There are two sides to this:
- The client-side system is the end user’s computer (for the purposes of this explanation).
- The server-side computer is where a website’s files live.
When one can’t talk to the other, you’ll see an error. In this case, the ERR_CONNECTION_REFUSED error means that the server-side machine refuses the request to connect to a site from the client-side.
While logic seems to put the burden on the web server here, the issue could be the client-side setup. As such, you’ll have work to do regardless of whether you’re browsing or ‘serving’.
Also, it’s worth noting that while the ERR_CONNECTION_REFUSED error is unique to Chrome, the issue itself isn’t. Every browser can have this issue, although each will call it something different. Regardless, you’ll want to fix the problem, and the good news is we know how!
5 Ways to Fix the ERR_CONNECTION_REFUSED Error in Google Chrome
There can be lots of ways to fix the ERR_CONNECTION_REFUSED error, but it’s better to tackle a few different scenarios in groups. This is what we’re going to do here: There are five methods that cover the following areas:
- Look at simple, straightforward basic issues that might cause the ERR_CONNECTION_REFUSED error.
- Check over your browser and Domain Name Server (DNS) caches for issues.
- Take a look at your computer’s proxy settings, and make a potential change.
- Change the DNS server for your computer to stop the error.
- Work within your browser to clear out any old extensions, and reinstall Google Chrome if necessary.
As with any error-based troubleshooting, your first task is to make sure your fundamental software and hardware works, so we’ll start there.
1. Check Over the Site’s Status and Some Basic Concerns
Let’s get the basic checks out of the way first of all. The ERR_CONNECTION_REFUSED error can happen due to a number of issues along the chain of connection:
- The site could be down, owing to a server issue.
- The router you use to browse the web might need a restart.
- Your antivirus and/or firewall might block the connection your browser needs to contact the server.
As such, there are a number of initial checks and balances you need to make before you wade into fixes for the error. Our first piece of advice is to come back to the site at a later date, and check that it’s the only one down for you. Downdetector is one of many sites that can provide this information at a glance:

Of course, you will want to restart your router too, and disable anything that might block connections, at least on a temporary basis. Once you rule out these elements, you can move onto bigger fish.
2. Clear Out the Browser and DNS Caches
For the unaware, a cache stores data you use on a regular basis. It’s a fundamental and essential aspect of a fast website, and also helps your browser and apps run quick too.
Because of this, your browser will have a cache, and your computer will have a DNS cache too. If the latter is new to you, it’s something we broach in another article on the blog. For regular DNS addresses you access, the cache can store and serve them. If something goes wrong, you might need to clear both of these caches out.
We’ll take a look at how to do this, starting with the browser.
Deleting the Browser Cache
Clearing the browser cache is something we cover in our post on how to fix the 500 internal server error. However, in Chrome (and it’s derivative browsers) it’s simple.
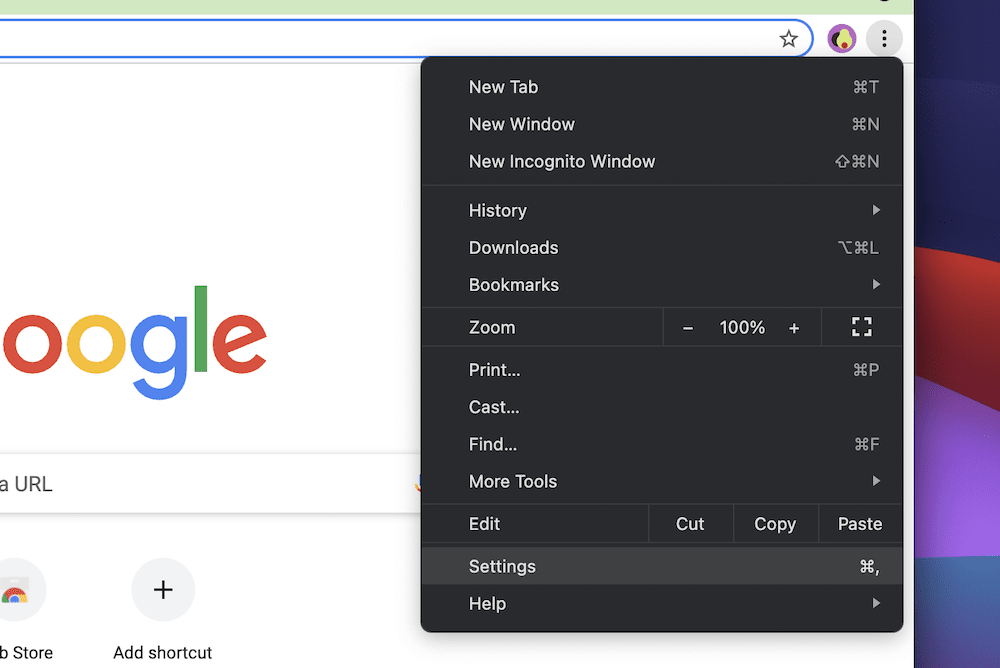
First, open your Chrome settings:
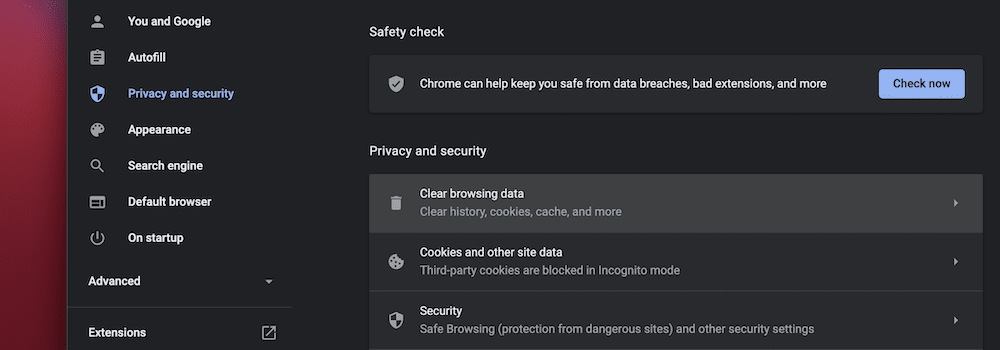
Next, go to the Privacy and Security section, then click on Clear Browsing Data:
You’ll want to make sure you set the Time Range field to All Time. Next, untick the Browsing history option unless that’s something you want to do too.
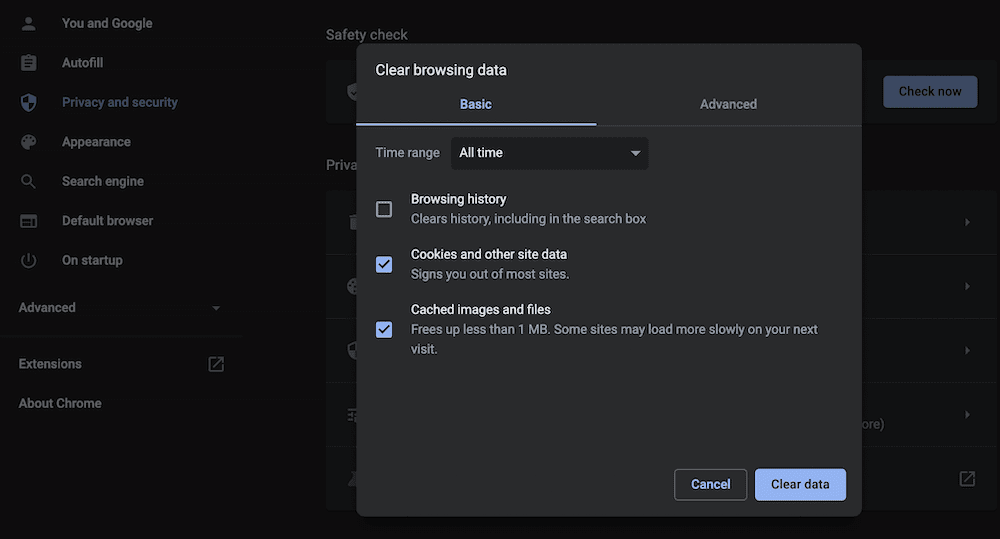
Once you click the Clear data button, Google Chrome will work it’s magic. From here, check for the ERR_CONNECTION_REFUSED error to see if it goes away.
Flushing the DNS Cache
The good news is that you can flush the DNS cache on both Windows and Mac systems. However, there’s a slight difference in the way you do so. For macOS, you’ll want to open a new Terminal window using Spotlight, or from within the Applications > Utilities folder.
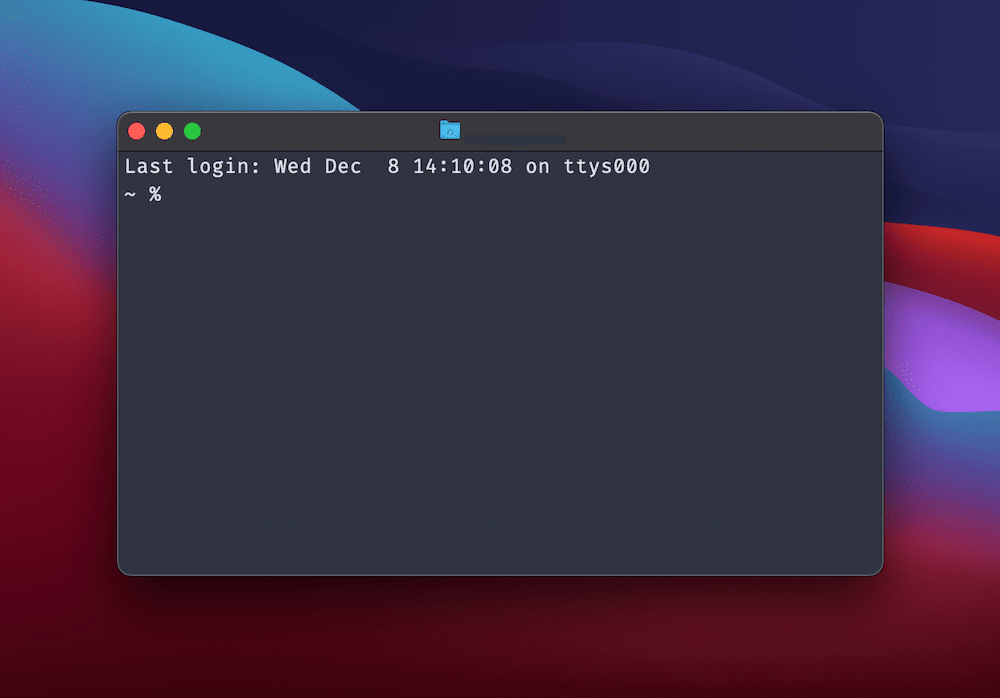
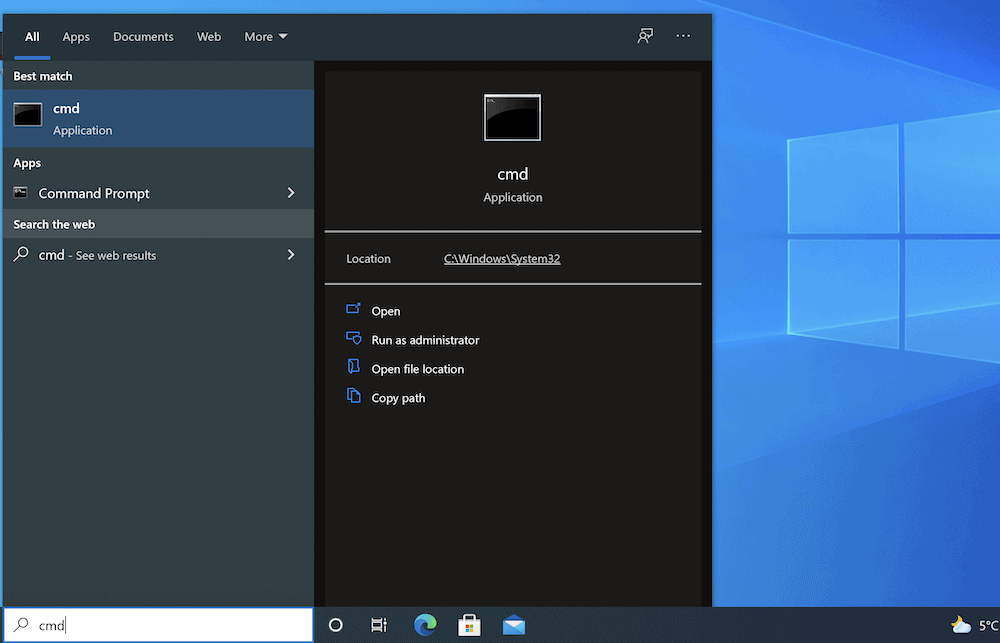
From here, type dscacheutil -flushcache and press Enter to flush the cache. On Windows, you’ll want to open a Command Prompt instance using your favorite method. If this is your first time, you can search for it in Windows using “cmd” in the search bar:
Once it’s open, type in the following two commands, and run each one:
ipconfig/flushdns ipconfig /registerdnsYou’ll see a success message for each one, at which point you can see if the ERR_CONNECTION_REFUSED error disappears.
3. Check Your Computer’s Proxy Settings
Lots of users tend to use a proxy server as a means to be more secure online. This hides your IP address and acts as kind of a conduit between your browser and the net at large. It will also filter out other data, such as caching.
A proxy server acts in the same way (at least in a connective sense) as a cache, which means it can also cause the ERR_CONNECTION_REFUSED error. This can be for a few reasons, but the short story here is that if the server can’t verify, validate, or otherwise understand the IP address you use, it can bring down the rest of the chain.
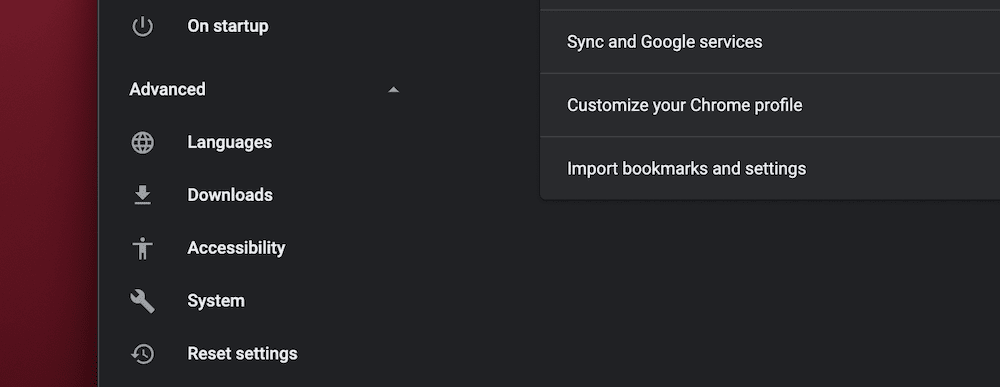
While you’d often use your computer’s tools to work with proxy settings, Google Chrome has a dedicated section to handle this. To start, head to Chrome’s Settings screen, then open up the Advanced section on the left-hand side. Here, choose the System option:
Once you click the Open your computer’s proxy settings link, this will do as you’d expect regardless of whether you’re on Windows or Mac. In fact, macOS brings you to the right screen straight away.
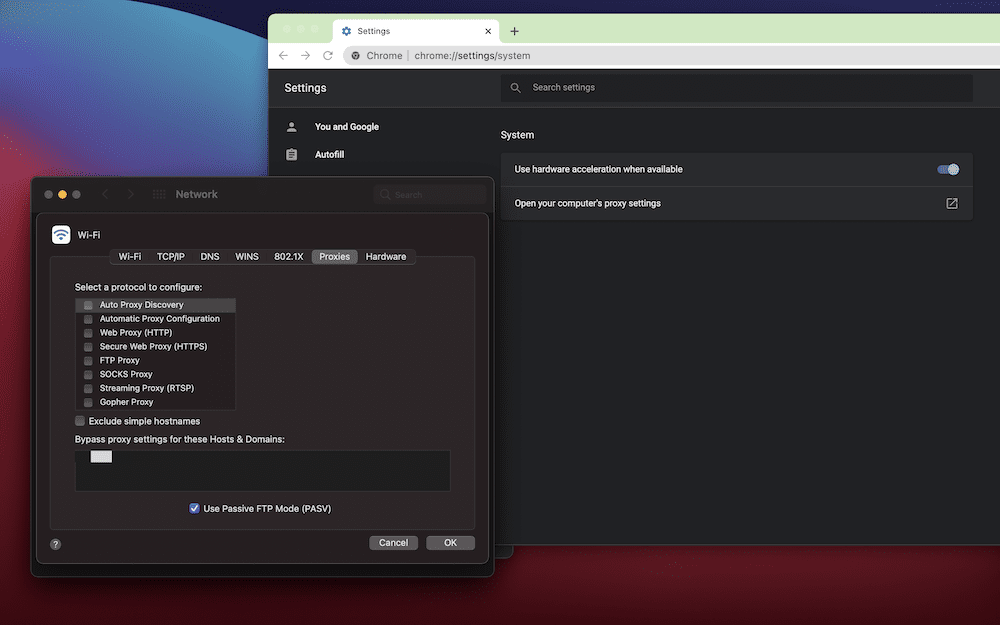
Here, untick everything in the Select a protocol to configure box, then save your changes and test for the ERR_CONNECTION_REFUSED error.
For Windows, you’ll also want to access the Settings > Advanced > System option, then choose Open your computer’s proxy settings. This will bring up the Proxy screen, and here you’ll choose to turn off the Use a proxy server switch:
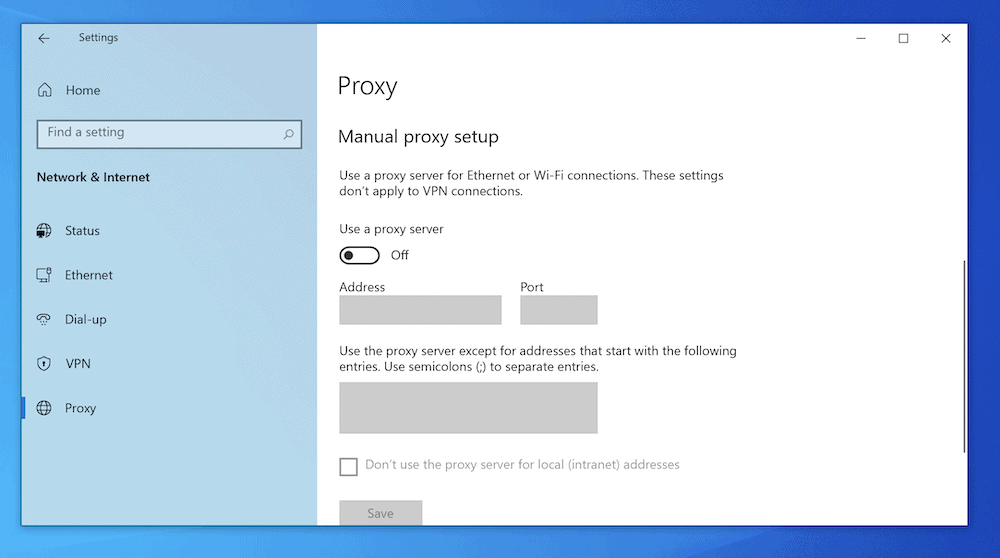
Once you save your changes, you can test again for the ERR_CONNECTION_REFUSED error.
4. Change Your DNS Server
Because the DNS can be a factor for the ERR_CONNECTION_REFUSED error, you might want to consider changing the DNS address associated with your computer. There are different processes for this on both Windows and Mac.
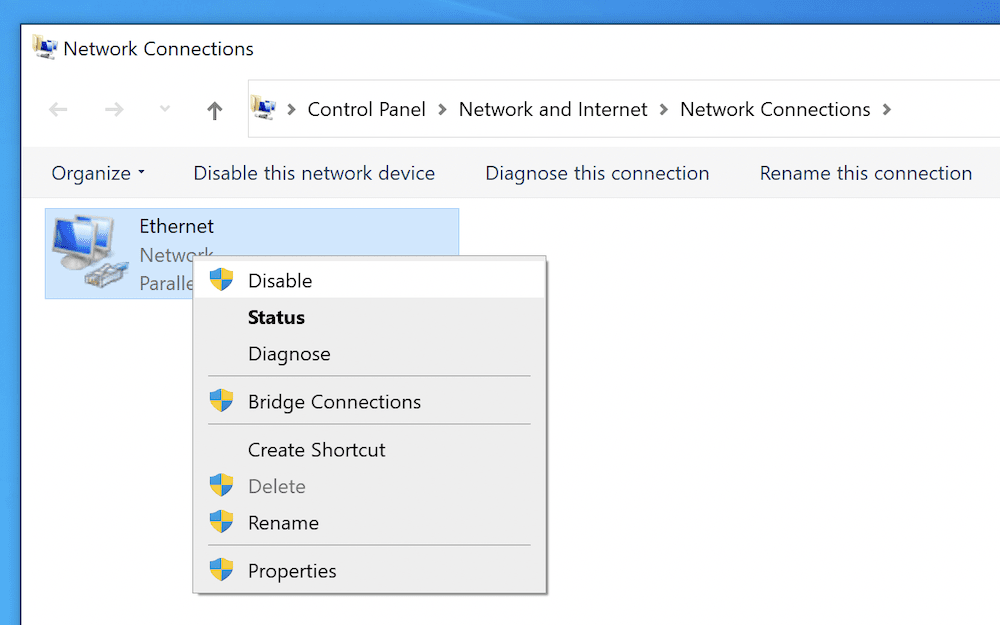
For Windows, head to the Network Connections screen, which you can find through the Windows Search Bar:

Here, right-click your primary internet adapter (for example, your Wi-Fi), and choose Properties:
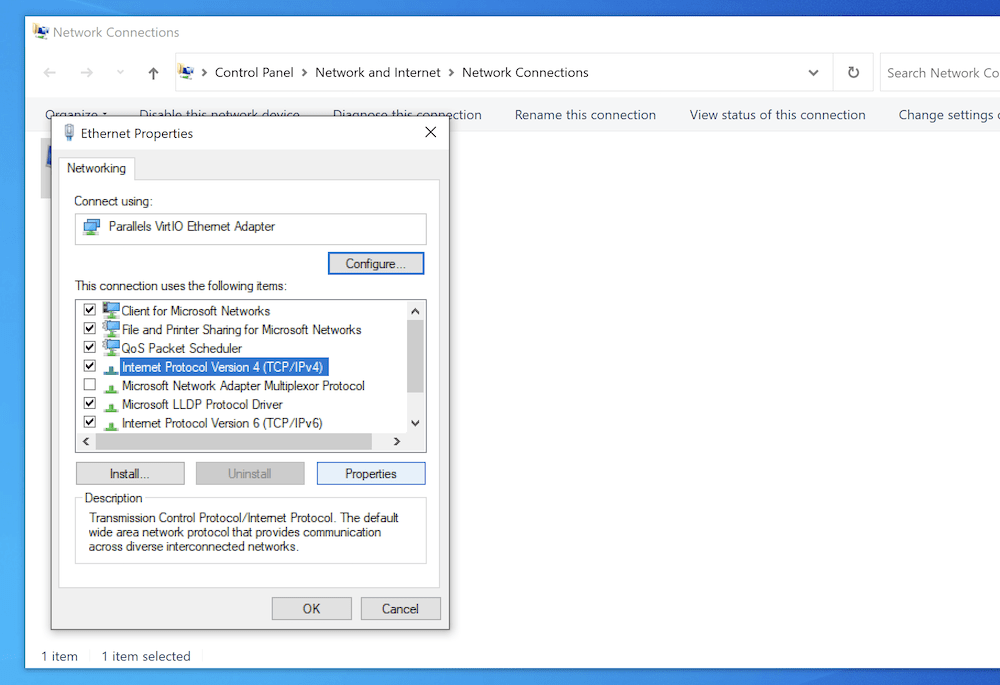
You’ll see a list of protocols on the Networking tab. Select Internet Protocol Version 4 (TCP/IPv4), then choose the Properties button:
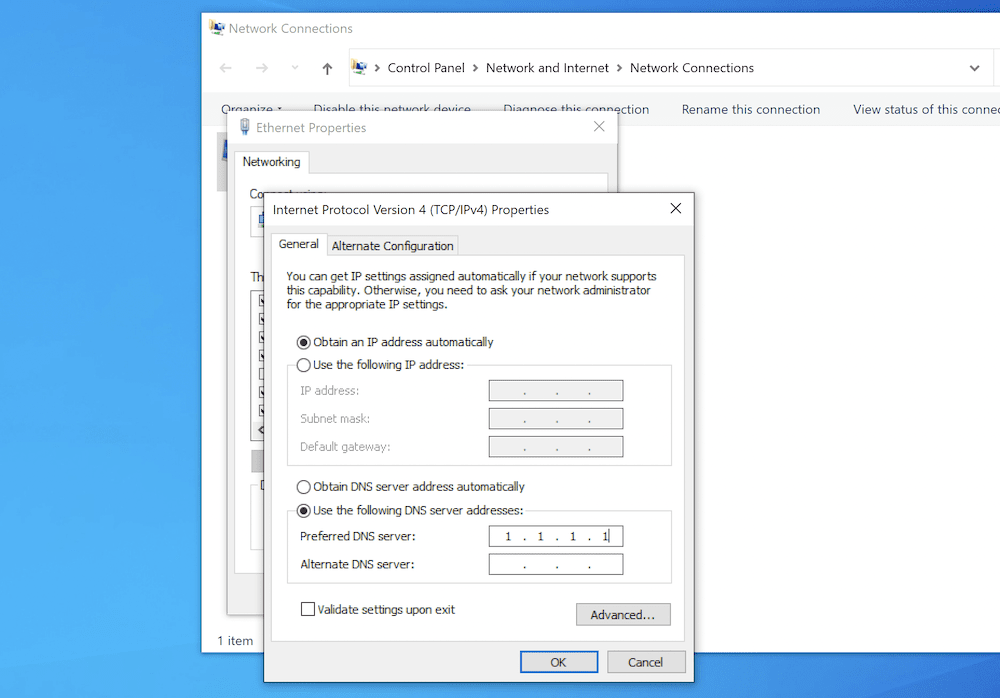
This will bring you to the General tab, and you should select the Use the following DNS server addresses radio button. Once you click the option, enter a new DNS address into the relevant field:
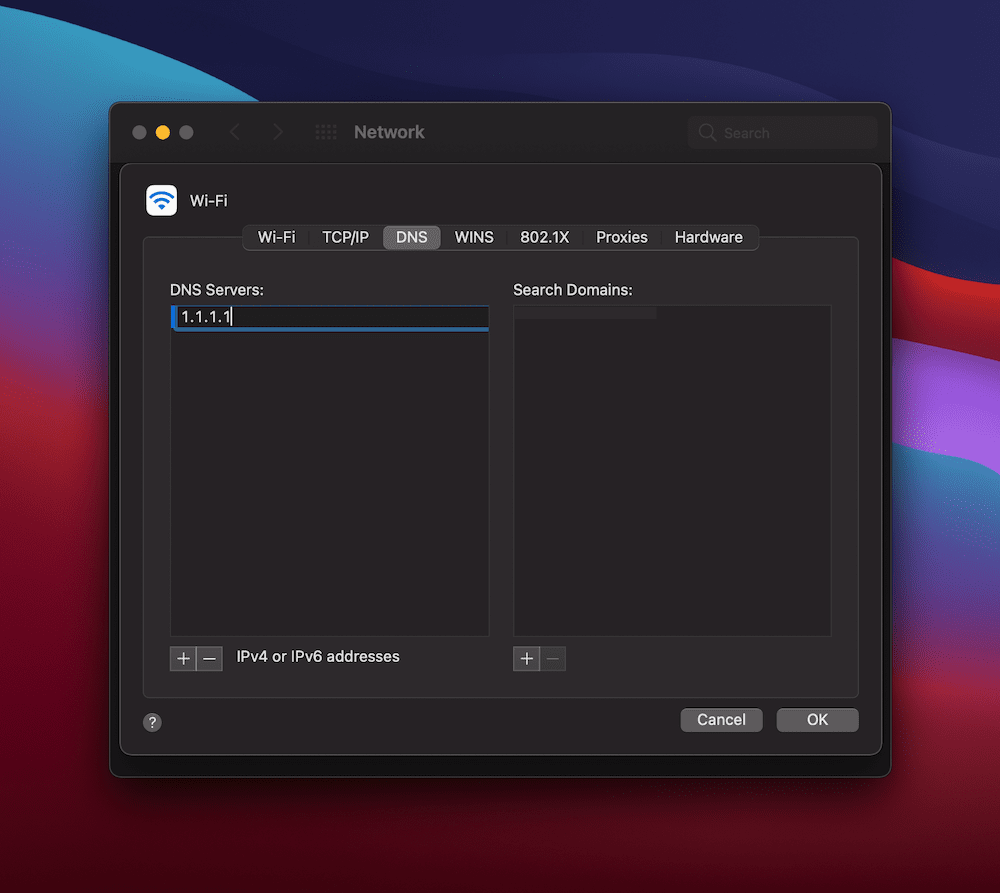
For macOS, navigate to the System Preferences > Network screen, then click the Advanced button. Next, choose the DNS tab along the top. The left-hand side will show a list of DNS servers. You can either add a new one using the Plus icon, or click to change a current one. Either way, you can then add your new DNS server address:
In both cases, click to confirm your changes, then refresh your browser and test for the ERR_CONNECTION_REFUSED error.
5. Disable Any Out of Date Chrome Extensions (And Maybe Reinstall Google Chrome)
Much like WordPress, a browser is extendible through the use of add-ons or plugins. These can offer simple and suitable ways to add security, password managers, and more to your browser. However, the more you install, the greater the risk that you’ll encounter an error. The ERR_CONNECTION_REFUSED error is one that an incompatible extension will ‘unlock’.
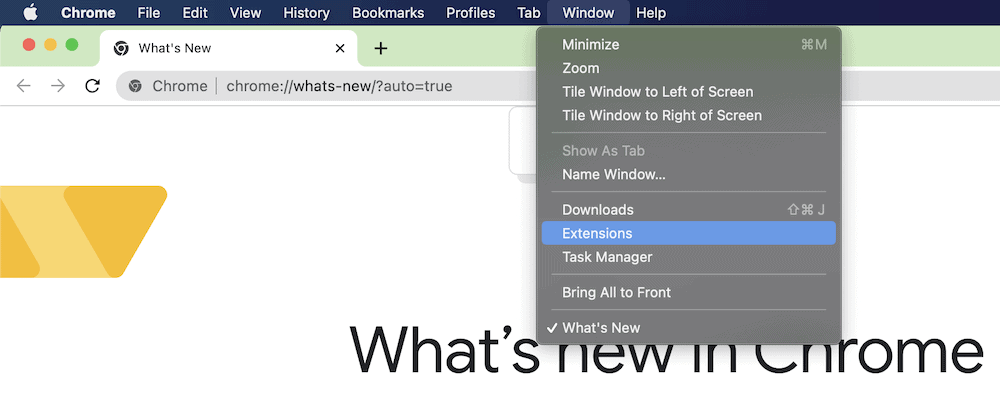
To find out your list of current extensions, head to the Extensions link within Chrome – it should be in the toolbar for both Windows and Mac:
When you’re here, you’ll see a blocks of extensions, with the ability to view more details, toggle them on and off, and remove them altogether:
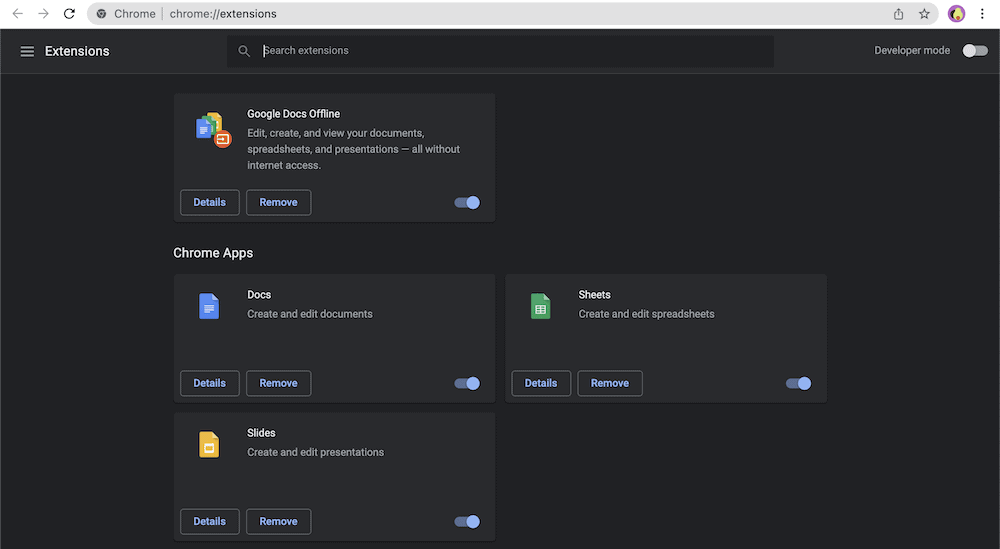
While we can’t advise you on whether you should remove a particular extensions, we can give you some pointers on how to assess them:
If there has been no update to an extension for longer than six months, we’d disable it at least on a temporary basis. Once you know that it’s not a cause for concern, you can re-enable it.
Consider whether the functionality serves your browsing experience. If it doesn’t you can bin it.
With the extensions you have left, you can go through and toggle each one at a time to find out if one is the cause of the ERR_CONNECTION_REFUSED error. As a last resort, you might want to delete and reinstall Chrome altogether, as this will give you a clean slate to work from (at least in theory).
Wrapping Up
If you use the internet, prepare for errors. This isn’t to say that using the web is unstable, but that there are lots of points in the chain that can falter. When it comes to the ERR_CONNECTION_REFUSED error, it’s likely that the client-side computer is at fault.
To solve this, you can look at a number of fixes. For example, you can clear your browser and DNS caches. What’s more, you could even check and change your proxy settings or DNS server address. If nothing helps you to solve the issue, you might want to consider deleting old extensions within Chrome, and reinstalling the browser if worst comes to worst.
Is the ERR_CONNECTION_REFUSED error one you have trouble with, and if so, which of these fixes helps you? Share your thoughts with us in the comments section below!