Are you looking for a way to embed Google Maps in WordPress? It’s a good skill to have – using a map is an awesome visual tool that allows you to quickly communicate a whole variety of information.
If you’re a business, you can use it to show prospective customers where you’re located. Or, if you’re a blogger, you can use it to showcase spots for your readers to check out.
But you can only do those things if you know how to add Google Maps to WordPress. To help you do that, I’m going to show you two different methods:
- How to add Google Maps to WordPress without a plugin
- How to add Google Maps to WordPress using the most popular free WordPress plugin
Then, at the end, I’ll recommend a few more plugin options that offer some different tweaks that might fit your needs better.
Sound good? Let’s dig in!
How To Embed Google Maps In WordPress Without A Plugin
I’m going to start off with a quick guide on how to add Google Maps in WordPress without a plugin.
This method is good if you just want to embed a single location marker or set of directions. Or, you can also use Google My Maps to create your own custom map with a lot more functionality. Later on, I’ll show you a plugin that can help you do something similar from right inside your Google dashboard.
But for now, let’s stick to the manual method!
Here’s how to use Google Maps in WordPress au naturel (no plugin).
Step 1: Create The Map That You Want To Embed (2 Options)
Below, I’ll go through the two options for creating the map that you embed. With both options, you’ll get an embed code that you’ll use in the next step.
1.A: Use A Standard Google Maps Embed
If you just want to embed a standard Google Maps map that you see at the regular Google Maps website, all you need to do is:
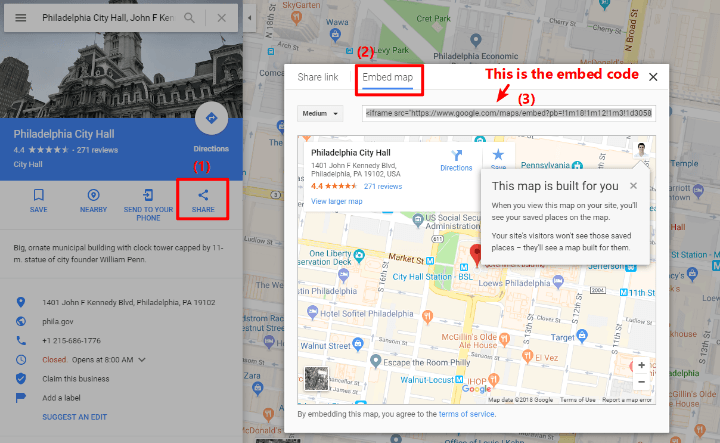
- Open the map (or directions) you want to embed using the regular Google Maps interface
- Click on Share
- Select Embed map
- Copy the embed code (you’ll use this in the next step)
1.B: Use Google My Maps To Create Your Map
If you want to create a more advanced map with things like:
- Multiple location markers
- Custom notes that you add
- Your own colors
Then you can use Google My Maps instead of the regular Google Maps interface.
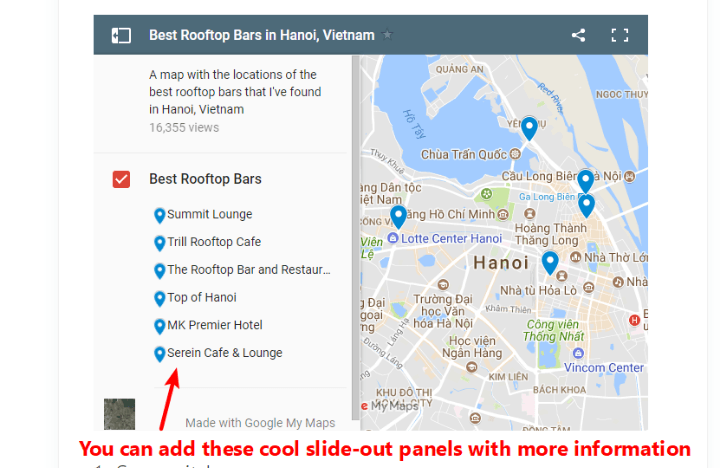
This is the tool that I used to create a map of rooftop bars in Hanoi on my travel site (you can see it in action here):
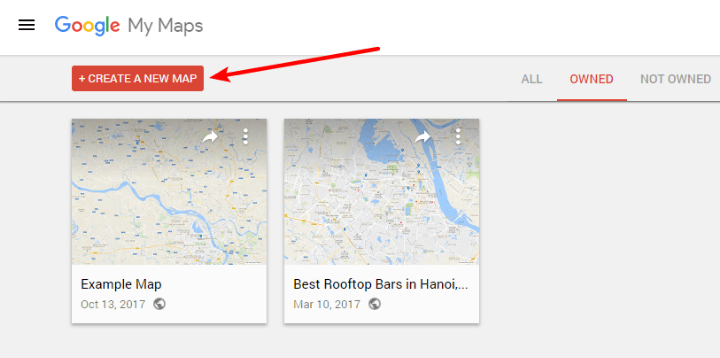
To use Google My Maps, click on the Create A New Map button after signing in:
Then, build your map with the interface (this video has a good tutorial on the various interface options if you need help).
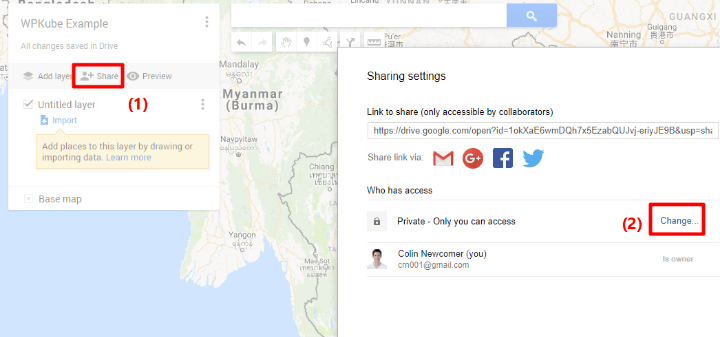
Once you’ve built your map, click Share and then, next to Private – Only you can access, click the Change button:
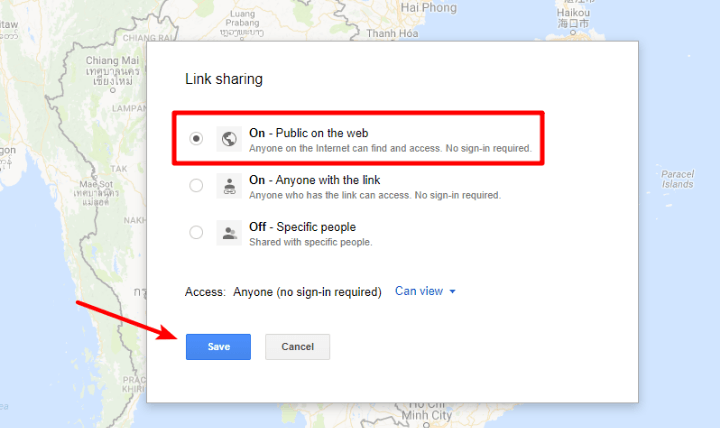
Then, choose On – Public on the web and click Save:
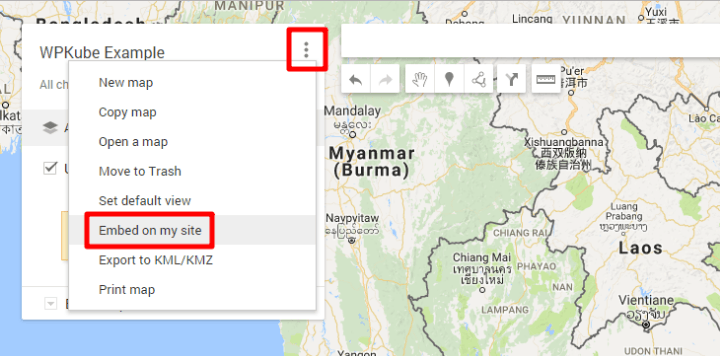
Once you’ve made your map public, click on the three dots button and choose Embed on my site:
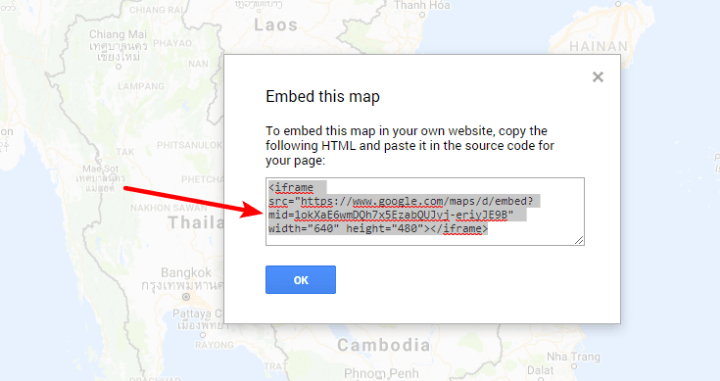
Then, copy the embed code because you’ll need it in the next step:
Step 2: Add Embed Code To Your WordPress Site
Now that you have your embed code, either from the regular Google Maps interface or Google My Maps, edit the post or page where you want to embed your map.
Then, choose the Text tab in the WordPress editor and paste in the embed code:
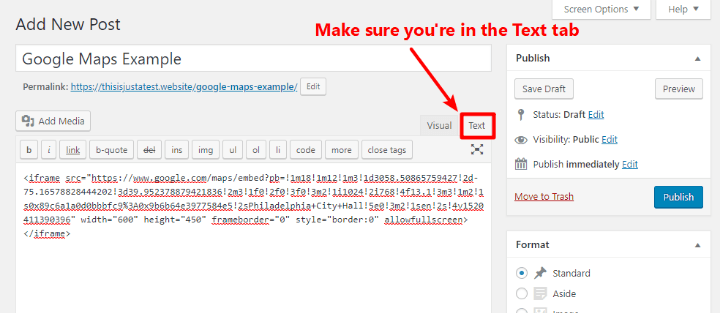
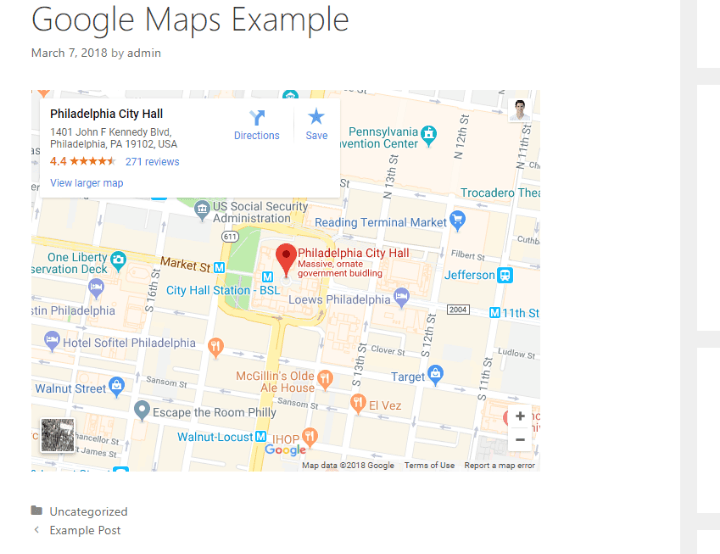
And that’s it! When you publish or update your post, you should see your Google Maps embed right there:
How To Create Custom Google Maps Embeds With A WordPress Plugin
The above methods are fine for basic Google Maps embeds. But sometimes you want to get a little more creative. In that case, you might want to turn to a Google Maps plugin.
Google Maps plugins are cool because, in addition to letting you create your own custom Google Maps, they also let you do WordPress-specific things like:
- Display posts or custom post types on your map via custom fields
- Create a filterable store locator
And because these plugins use shortcodes instead of iframes (like the manual Google Maps embed code), they’re a bit more user-friendly (that is, you won’t have to use the Text tab in the WordPress editor).
I’ll show you a tutorial using the most popular free Google Maps plugin – WP Google Maps.
To get started with this tutorial, make sure that you have WP Google Maps installed and activated.
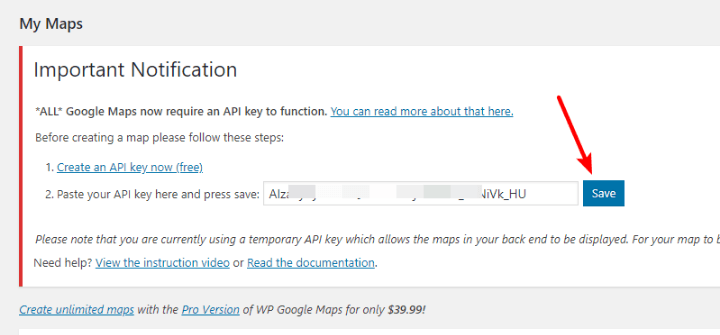
Step 1: Create And Enter Google Maps API Key
No matter which Google Maps plugin you use, this is always going to be the first step because Google requires you to get something called an “API Key” to work with Google Maps.
Basically, this free API Key allows your chosen plugin to connect to the Google Maps service to help you create a map.
To create your API key, you can watch the plugin’s detailed instructions video.
Once you get your API key, plug it into the box and click Save:
Step 2: Edit My first map
The free version of this plugin only lets you create one custom map. So to make your first map, you’ll need to click Edit under My first map:

That will launch you into the editor interface.
Step 3: Configure Basic Settings
At the top of the map editor interface, you’ll see a number of different tabs. These tabs allow you to configure basic settings about your map:
- General Settings – height, width, alignment, and map type (e.g. roadmap vs satellite)
- Themes – lets you choose from 9 included map themes. These basically change the styling of your map.
- Directions – unfortunately, you can only use directions in the Pro version.
- Store Locator – this cool feature lets your visitors search for the store that’s nearest to them, which is helpful if you’re running a business with physical locations.
- Advanced Settings – lets you enable traffic data and other features, though many are only available in the Pro version.
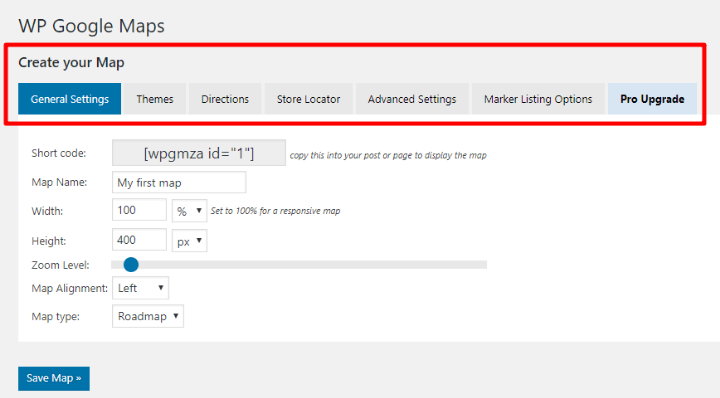
Once you’ve configured those settings, you’re ready to actually work on your map itself.
Step 4: Add Markers And Other Map Elements
Below the basic settings, you can start adding elements to your map using the five different tabs.
To add a marker, you can either:
- Search for a location in the box
- Right-click anywhere on the map to drop a marker at that specific location
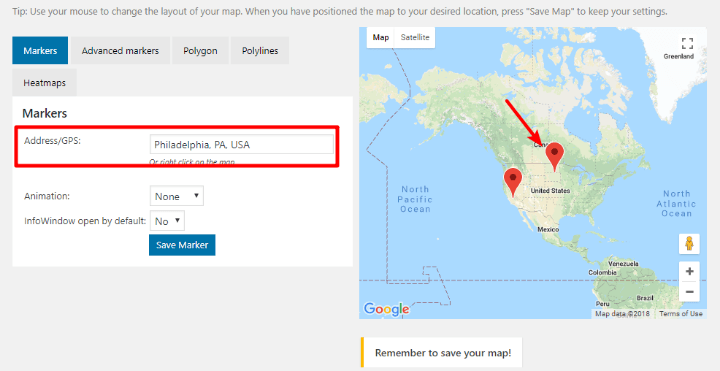
Once you save your marker, it will show up on the map and you can add another one.
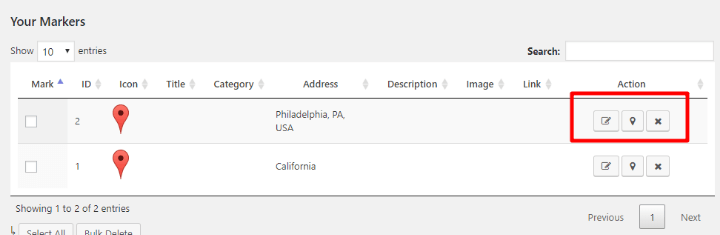
You can also view a full list of your markers and edit existing markers in the Your Markers section:
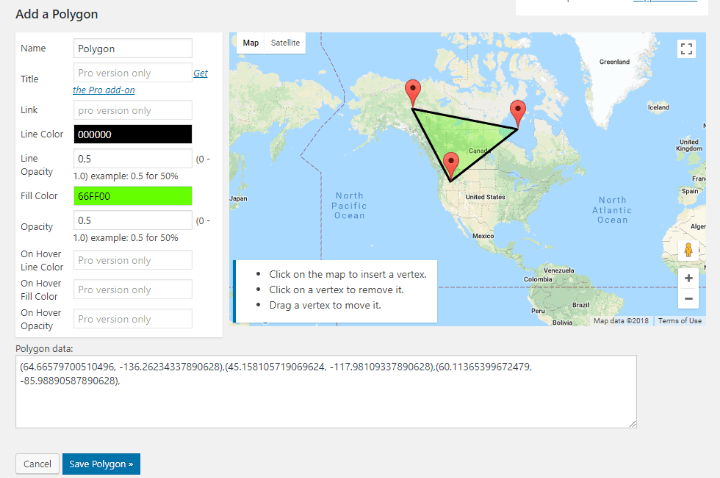
In the Polygon and Polylines tab, you can launch an interface that lets you create a more complicated set of shapes:
Once you finish adding map elements, make sure to click Save Map.
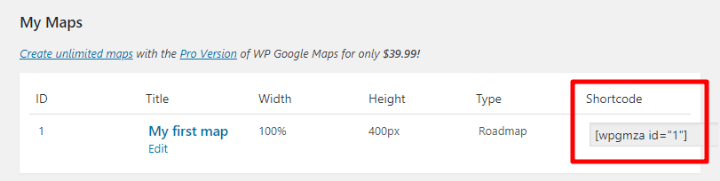
Step 5: Embed Your Map Using The Shortcode
Once you’ve saved your map:
- Click on Maps in your WordPress dashboard sidebar
- Copy the shortcode for your map
- Add the shortcode wherever you want your map to appear
Other Quality Google Maps Plugins For WordPress
While the WP Google Maps plugin above is by far the most popular WordPress Google Maps plugin, most of the coolest features are locked behind the Pro version, which is a bit unfortunate.
If you’re looking for other options, here are some good ones:
- WP Google Map Plugin – lets you assign your own marker icons even in the free version. The Pro version lets you display posts/custom post types on your maps via custom fields.
- Google Maps Widget – a nice lightweight solution that makes it easy to quickly get up and running with a map.
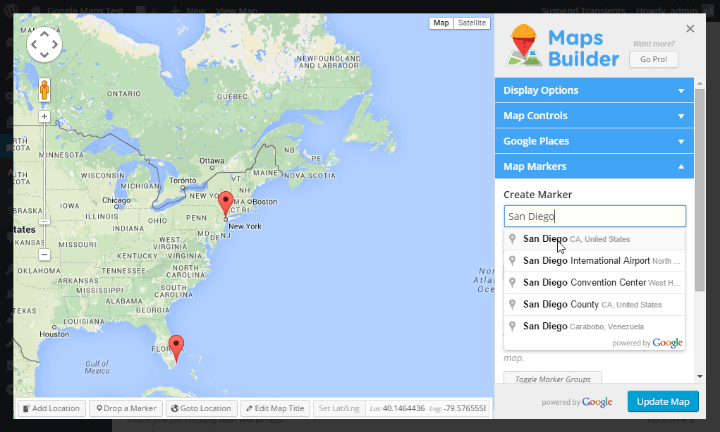
- Maps Builder – I think this one has the most user-friendly map builder, and the Post Mashup feature in the Pro version lets you automatically populate a map based on posts on your site.
For example, here’s a look at the full-screen maps creator interface from the Maps Builder plugin:
All these plugins are fairly similar. So once you figure out how to create your API key and understand the basic interface, you should be able to quickly pick up a new plugin.
Final Thoughts On Google Maps And WordPress
If you just want to create a basic Google Maps embed and don’t need to link it to any WordPress-specific functionality – like a store locator or your actual posts – then I think your best bet is to use the manual method.
Between the regular Google Maps interface and Google My Maps, you have a good deal of flexibility for creating maps. Then, you can embed them anywhere using the iframe code.
If you do need WordPress-specific functionality, or if you just prefer to work from within your WordPress dashboard, then all of the plugins that I listed are quality options. To choose between them, consider these facts:
- Each plugin offers a different set of free features (in comparison to the Pro version), so you might be able to find one that does what you need for free.
- Some plugins are better suited for store locators, while others are better for displaying posts on maps.
Finally, some WordPress themes and plugins include built-in maps functionality. For example, the Consulting theme includes an easy way to display a location on a map. And many WordPress page builders also include dedicated maps modules.