Want to know how to edit the WordPress footer in your website? Hop in.
Footers are the bottommost part of your website. Or as we like to call it, your website’s summary. Footers are usually packed with important links on your website, information about website admins, and copyright texts as well.
Through the words below, we plan to tell you how to edit your website’s footer using different methods. We will also tell you how to edit the copyright text like ‘Powered by WordPress’. And, we will talk about how plugins make editing footers easy. So let’s get into it.
A. What is the Footer in WordPress? (Introduction)
Footer in WordPress is simply the bottom of your website or the foot of your webpage. Normally, the footer on your website is designed to appear on all the pages. And it contains one of the most important chunks of information about your site, business, and products.
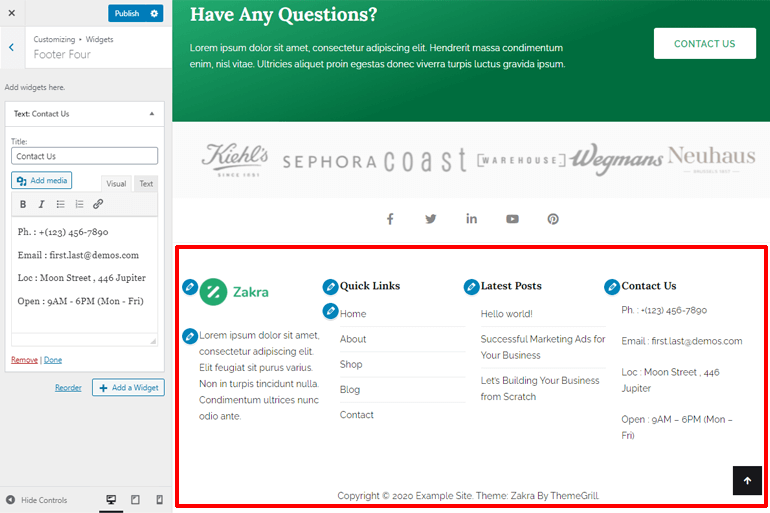
For example, the screenshot below is the footer area of our blog. You can see this part for real once you get to the bottom this page.
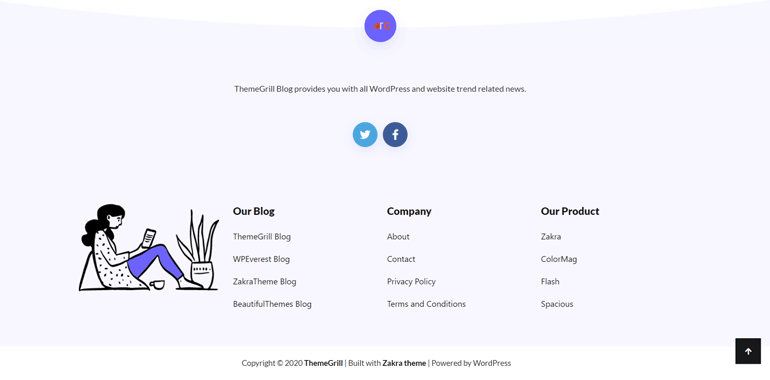
If you carefully plan a footer while building your website, then you can increase your visitor’s experience significantly. In fact, it’s the best place on your site to hold certain types of important information.
That’s because it appears on every page on your site. And your users can easily access content on the footer, regardless of which page they are on.
Most commonly, the footer area has links to your social media profiles, copyright information, details of who maintains your site, and what other things you do. Plus, it can have links to your best products, services, or content.
In a nutshell, it’s a very important part of your site. It has a great role in making your website engaging, attractive, and successful. So, you need an impressive and unique footer.
B. Why Edit Your WordPress Header? (Explained)
But as a matter of fact, footer design in WordPress depends on the design your active theme provides. Meaning, all the websites using a theme can have a similar type of footer. If you want to have a unique design, then having a similar footer with other websites isn’t a good idea.
But luckily, most high-quality WordPress themes like ColorMag, Zakra, Flash, etc. offer easy options to customize your footer area.

Using those footer editing options, you can edit your WordPress footer, give it your own style, and build a custom footer. As part of t
Next, you may also want to remove default copyright text from WordPress saying ‘Powered by WordPress’ in your footer. Instead, you can add your own copyright information in that area.
In a nutshell, customizing your website footer helps in making a unique brand identity for your business.
With that said, now let’s go ahead and see how to edit and customize the footer in WordPress.
C. How to Edit the Footer in WordPress? (Step by Step)
As we stated above, footer design in WordPress relies on the active WordPress theme installed on your website. Hence, the first step to creating a beautiful website with a beautiful footer is to choose a WordPress theme with plenty of footer design options.
For example, with powerful themes like ColorMag, Zakra, Flash, etc., you can easily edit and modify your WordPress footer. And, you can do all the editing with the WordPress customizer. So, you don’t need to touch any code.
Alternatively, you can also use WordPress footer plugins to edit and enhance your footer. For example, we have included a tutorial on the Elementor – Header Footer and Blocks Template plugin and the Social Icons plugin in this post.
Yet another method, you can also customize your footer by coding. But it’s not recommended if you’re a non-tech-savvy person.
In conclusion, we’ll show you 3 different methods to edit and customize the WordPress footer as given below.
- Customizing WordPress Footer from Live Customizer using Widgets
- Editing Footer Using a Footer Plugin
- Editing Your Theme’s Code to Customize Footer
Now, let’s get started with method 1, customizing your WordPress footer with live customizer, using the popular Zakra WordPress theme.
1. Editing your Footer With WordPress Customizer
As mentioned above, the amount of customization you can put into your footer depends on the theme you are using.
So for this case, we’ll show you how to edit and customize your WordPress footer using the Zakra theme. It gives more options for customizing the footer.
But before we start, let’s talk about different areas of the footer. Looking at how most themes allow customization, the footer can be divided into two major areas:
- The main area of the footer or the widget area
- The footer bottom bar
The main area or the widget area of the footer usually contains menus, images, texts that help with navigation, contact, information about products, etc. The bottom bar often contains the copyright text.
To edit the main area of the WordPress footer, you need to have items in it. And the easiest and best way to add items in the footer is through WordPress widgets. WordPress widgets are blocks of content that you can add to certain locations on your website.
Adding a widget to your footer follows the same process in every theme. What differs from theme to theme is how much you can customize its appearance. Zakra theme provides you customization options for every element in your footer. Let’s customize our footer while we explore those options.
i) Adding Widgets to Your Footer
There are two ways you can add widgets to your website.
- Through the dashboard
- Using WordPress customizer
Since we are talking about the customizer here, let’s first look at how to add widgets to your footer using WordPress Customizer.
Begin by logging in to WordPress Dashboard. Then, go to Appearance>> Customize.
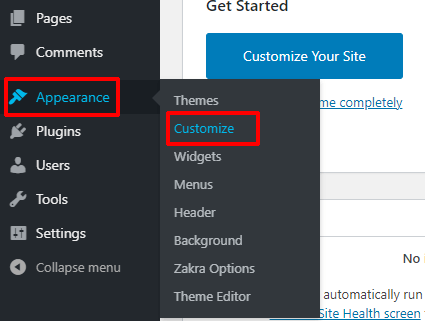
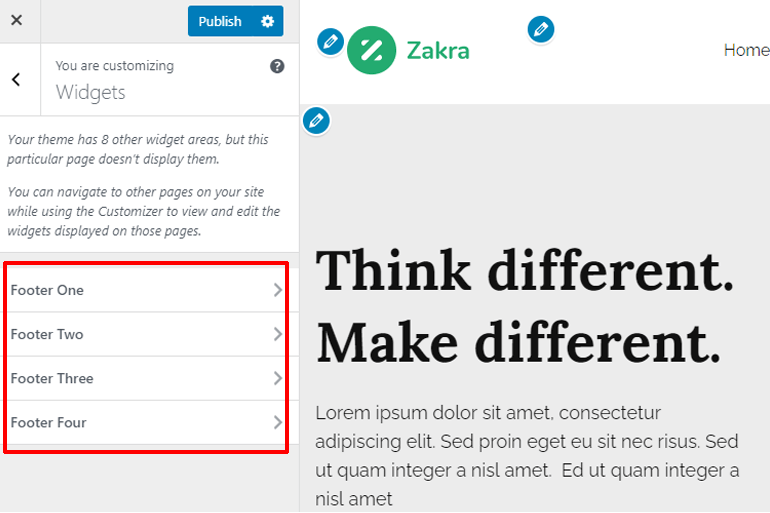
After that, click on the Widgets tab on the Customizer Menu on your left.
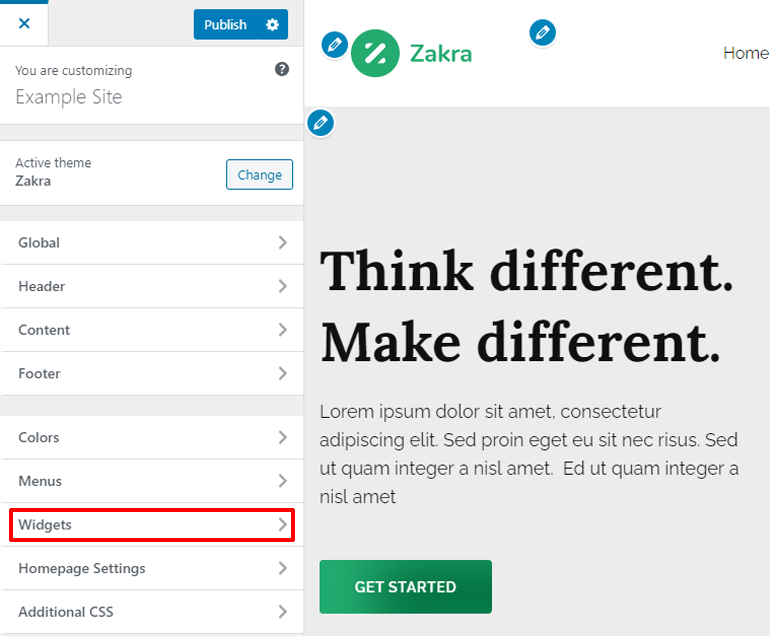
At this point, you should see different locations on your page where you can add widgets. Click on a location you want your Widgets to be. And remember, you can only see the widget areas of the particular page you are editing on your customizer. If you can’t see the widget area you need, navigate to the page that has those widget areas.
Now click on the Add a Widget button.
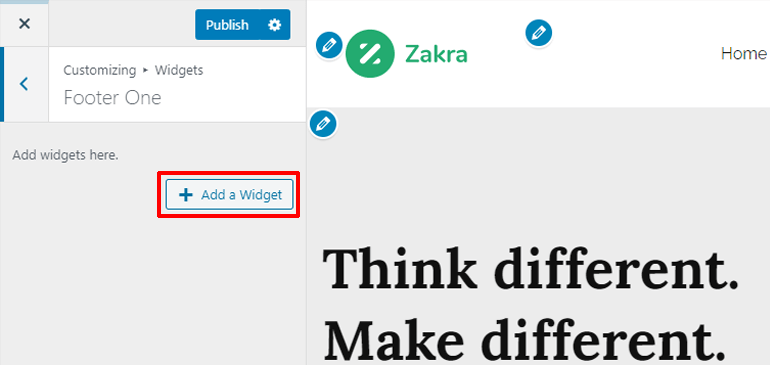
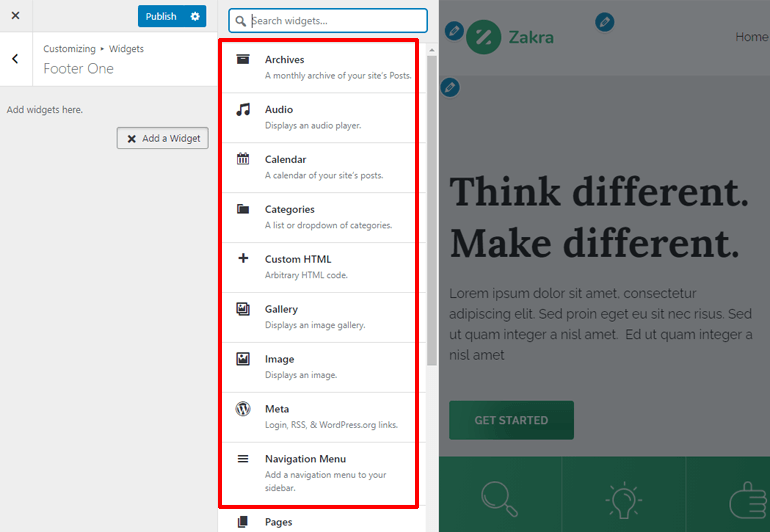
As soon as you click on it, a list of different widgets will slide to the right. Click on a Widget you want to add. And there, your widget is here.
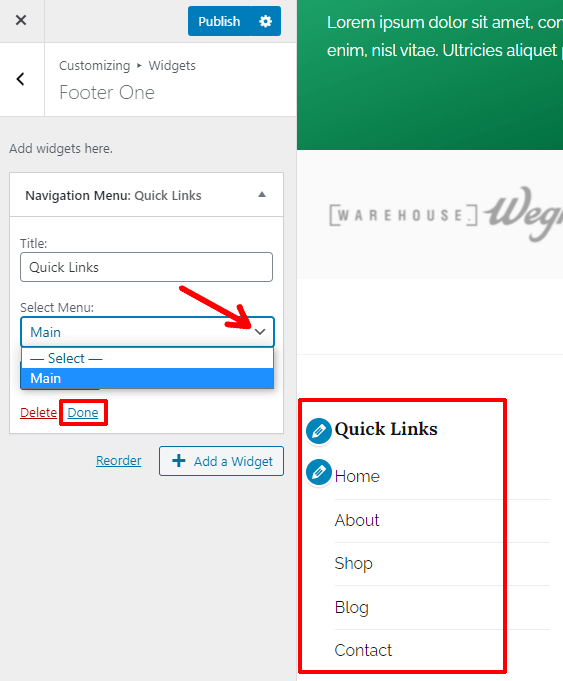
Most widgets involve an extra step. For example, if you choose the Navigation menu widgets, then you will have to specify the Title and select the menu. Then, simply hit Done to save your widget. And notice that as soon as you select a widget, your menu will show up on the preview section.
And that’s how you add items to your footer. You can add almost anything, from pages to posts, images to galleries, menus to the comments section, anything in your footer.
Scroll down to the footer area in your preview to see the widgets you added in action.
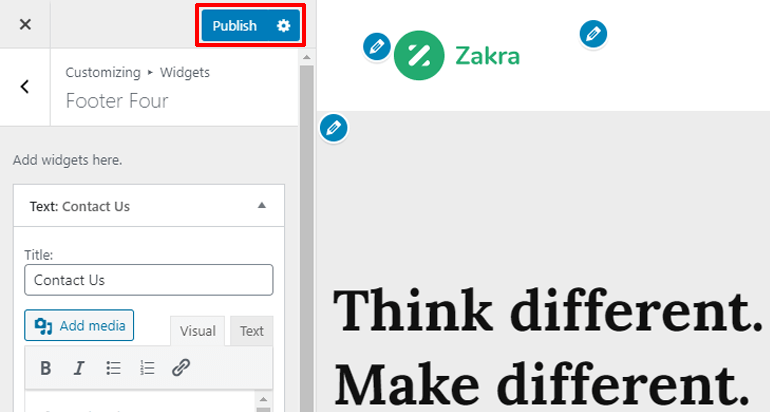
Finally, hit the Publish button to save your widgets in your footer.
Using the WordPress Customizer to add widgets is easy. But you won’t find all the locations in your widgets tab from the customizer. The WordPress Customizer only shows the widget areas of the page that you’re on. To see the widget area that’s on another page, you’ll have to navigate to that page.
The footer is on all pages of your website. So no need to worry about that here. But if you want to see all the widgets and widget areas in one place, then the WordPress Dashboard is the one you should use.
If you want to add widgets through the WordPress dashboard:
First, Go to Appearance>> Widgets.

Welcome to the Widgets Window of your website’s dashboard. This is where your widgets reside. On your left are the Available Widgets and on your right are the places these widgets can go to, the widget areas.
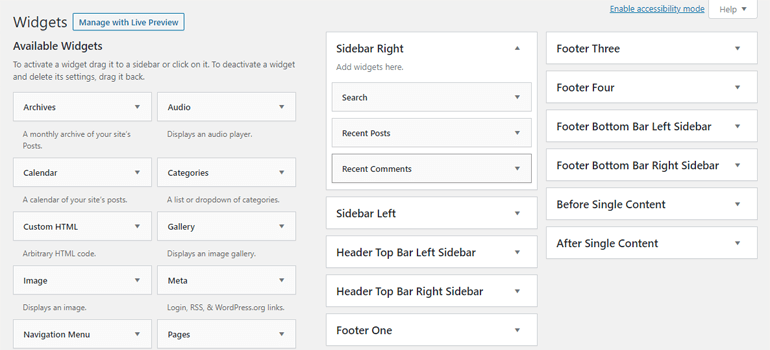
To put a widget somewhere in your page or site, simply drag the widget from left to right, where the name of the location is specified.
For instance, If you wanted to put a menu in your footer, then you would simply drag the image widget Navigation Menu from the left to the Footer location on the right. Then, add the menu you want and you’re done.
Note: Zakra theme has more than one footer area specified. So feel free to check them out.
This is how you can add widgets to your footer. The only drawback here is that you can’t tell whether the widget has been applied or see it being applied.
ii) How to Remove the Footer Widget
We now know how to add a footer widget. But what if we wanted to delete it? We’ll tell you how.
Go to the WordPress Live Customizer by clicking on the Manage with Live Preview button on your Widgets window. Or go to Appearance>>Customize>>Widgets.
On the customization panel on your left, you will see the names of different locations. If the widget area is not on this page, then navigate to the page where the widget area is. Then, click on the widget area where your widget is.
This will bring to you the list of widgets on that widget area. Simply click on the Widget, and then on the Remove or the Delete button on its panel.
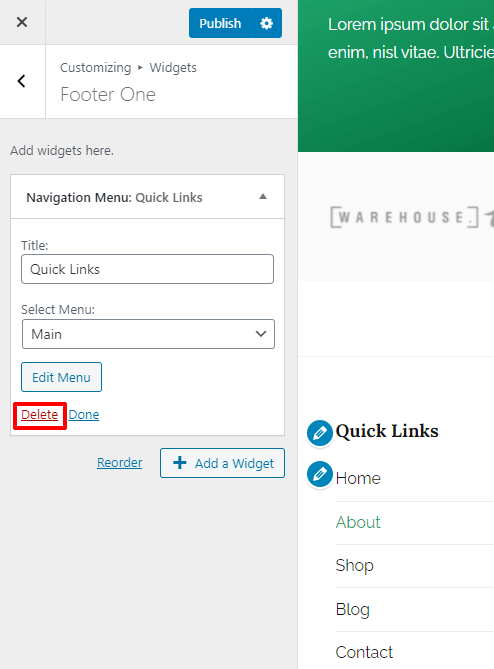
Your widget is gone. Don’t forget to hit the Publish button to save your changes.
If you don’t know which page your widget area was, you can delete the widget from the dashboard.
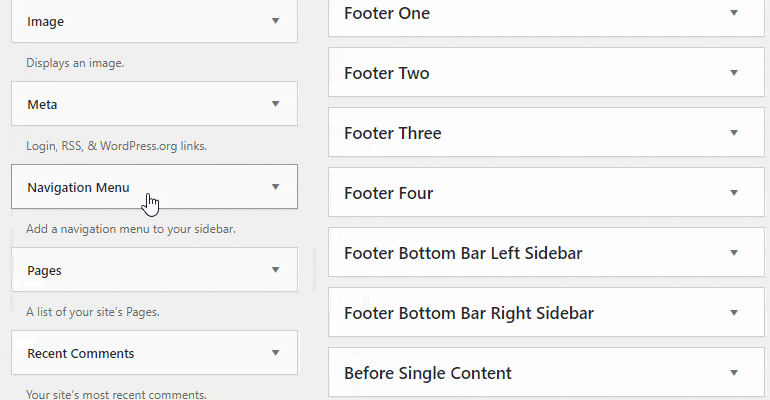
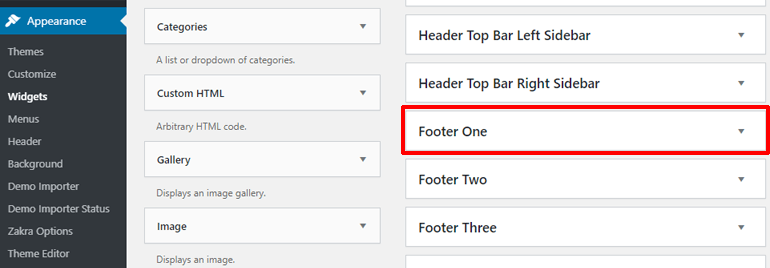
First, go to your Widgets Window. Simply click on Appearance>>Widgets for this. There are different locations specified on your right. Click on the location of the footer where your widget is located. For example, if you had your widget in the location Footer one, click on it.
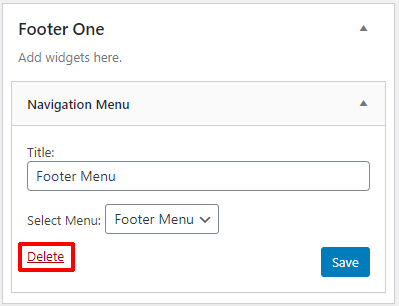
This will bring the list of widgets in that area. Now click on the widget you want to remove. You will see its panel showing up.
Then, click on the Delete button to delete the widget.
Your widget has now disappeared.
iii) Editing the Footer Widgets
Now that you have added widgets to your footer, it is now time to edit your footer through the WordPress Customizer.
Editing your footer widgets means changing their layout, background color, text color, link color, etc. This customization of your footer’s appearance is going to depend on your theme as well. So, pick a good theme and get started. For this article, we have used the Zakra theme and will be explaining things with reference to this theme.
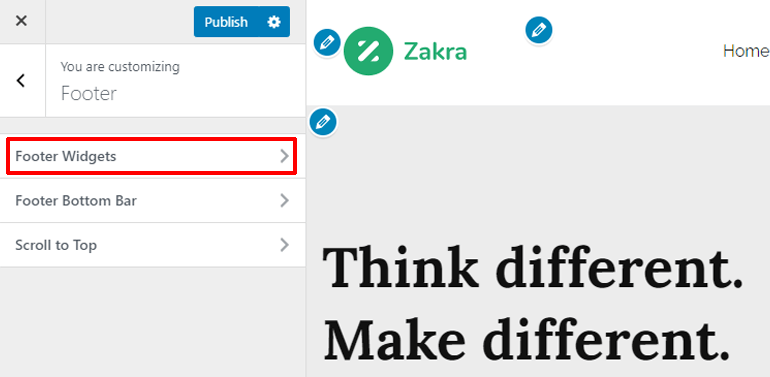
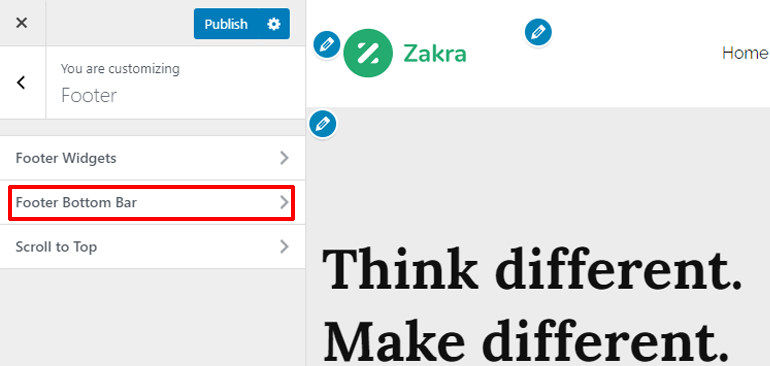
To begin editing your footer, go to Appearance >> Customize. After that click on the Footer tab on your customizer menu.
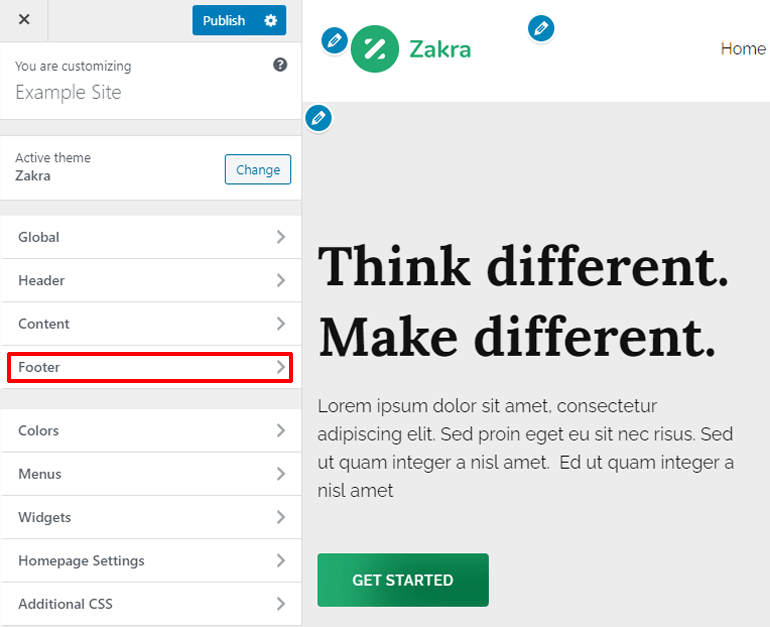
Inside the footer tab, you will see three different options:
- Footer Widgets
- Footer Bottom Bar
- Scroll to top.
If you’re using any other theme, then you should at least see two of the options, most likely Footer Widgets, and Footer Bottom Bar.
Click on the Footer Widgets tab.
Inside the Footer Widget tab, you will see lots of options to customize your footer. There are widget styles, options to enable or disable widgets, widget titles, full width, expanded background, and many more. Let’s explore these.
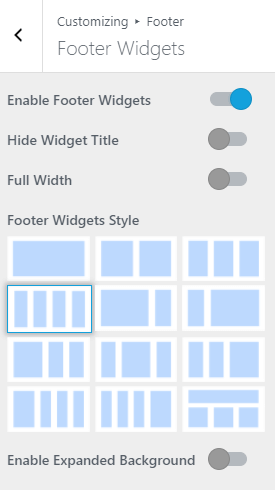
The first three options are toggle buttons:
- Enable Footer Widgets
- Hide Widget Title
- Full Width
Simply toggle these options on and off to show or hide footer widgets and their titles. Toggling the full-width button on will let the widgets use all the width in your footer, from the left corner to the right corner. If you toggle it off, then the widgets will be contained inside a certain width of the footer.
The next option you’ll find is the footer widget style.
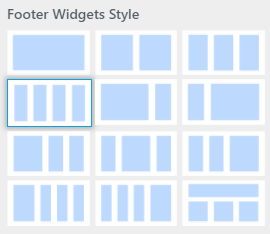
Depending on what and how many widgets you use, you want to use different styling options. There are a dozen styles to choose from here.
The next option is the Enable Expanded Background toggle button. Toggling this button on will make your widgets area background cover the whole footer, including the footer bottom bar. To make sure this happens, reduce the background of the footer bottom bar. This, we will show in the Footer Bottom Bar section of this article.
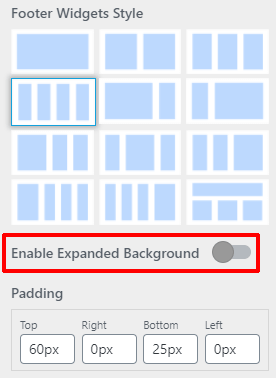
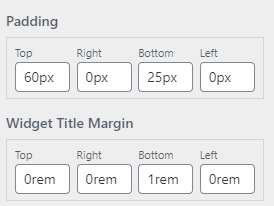
After that is the Padding option. Changing the padding here will change how much space will be left before or after your widgets.
And, You can change the Widget Title Margin to separate the widget titles from other items.
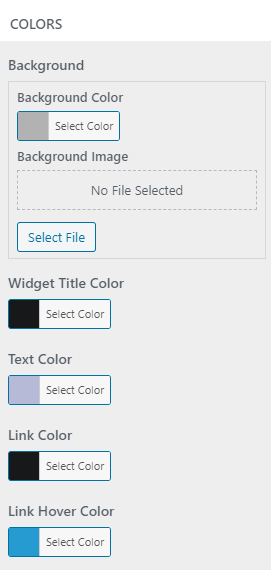
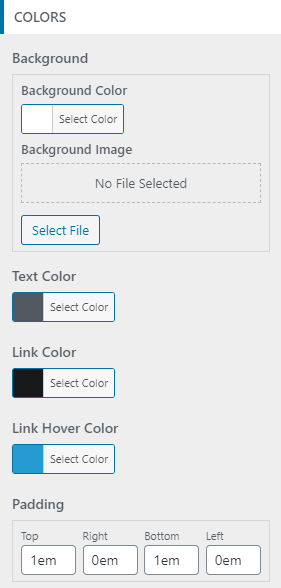
The section after that is for the color and background image. Here, you can change the color for each of the elements in your footer including, Background, widget title, text, link, and link hover.
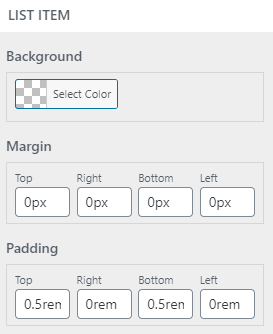
The next section you’ll find is for List Items. When you’re using menus in your footer, this option lets you select the background color, margin, padding, item color, and borders for your menu items. Explore and change the values here to give your list items the desired look.
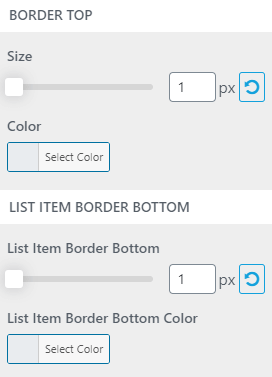
Finally, the last section is for borders. You will find options to change your footer’s top border and the border between your list items. You can also select the color of your border for the top of your footer and for the list items.
And that’s how to edit the widgets of your footer. With a good theme with tons of customization options, you can get the best for your website’s footer.
iv) Editing the Footer Bottom Bar of Your Website
The footer bottom bar is the bottom-most part of your footer and website. Usually, this part of your website contains copyright text or branding text.
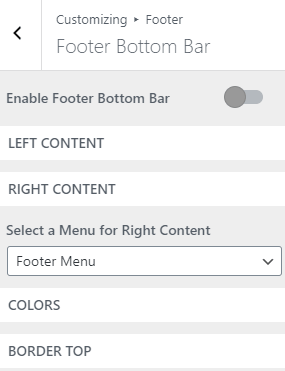
To begin editing your footer bottom bar, go to Appearance >> Customize >> Footer. Then, click on the Footer Bottom Bar tab.
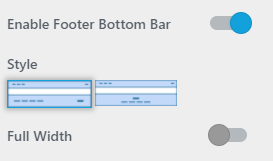
Inside the Footer Bottom Bar tab, you will see different options for editing. The first one is the toggle button to enable or disable the footer bottom bar. If you enable the footer bottom bar, then you will see more options.
The next option you’ll see after enabling your footer bottom bar is the style of the footer bottom bar. You can choose your desired style for the footer here.
Below that is the Full-Width toggle button. Enabling this will let your Footer bottom bar use the full width of your website.
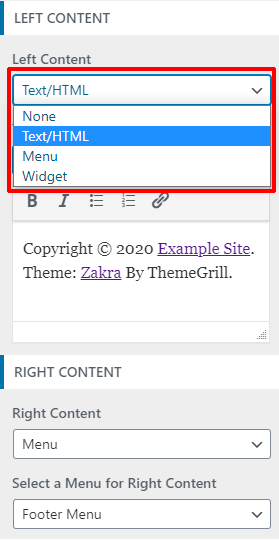
Also, using the Zakra theme, you can have two different content areas in your footer bottom bar. In the customizer, they are named, left content and right content.
Under the left content section, you’ll be able to choose what stays on the left of your footer bottom bar. You can either keep a menu, widget, or a text/HTML. The same goes for the right content.
After the sections for left and the right content, you’ll see a section for colors and background images. You can choose your color for link, text, link hover, and background from here.
If you reduce the transparency of your background color here, then you’ll be able to make use of the Enable Expanded Background option in the Footer Widgets tab, as mentioned above.
You can also change padding here, to separate the footer bottom bar on your website from other parts like Footer Widgets Area.
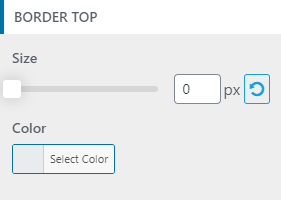
The final section is for the border of Footer Bottom Bar. You can change the size and color of your footer bottom bar’s border here.
These were the options to make your footer bottom bar look awesome.
v) Editing the WordPress Branding Text
By default, the branding or copyright text of WordPress will be ‘Powered By WordPress’. While Installing themes, most themes will change this and put something else, like Theme by the theme company.
You can change this from the Footer Bottom Bar tab. By default, the left content on the Zakra theme is set to Text/HTML. And the text inside is the copyright text.
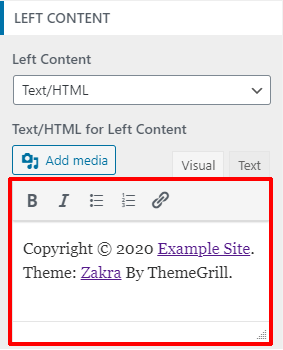
You can change this text to your liking. This will change the copyright text of your footer bottom bar. This method will apply to most themes. So you’ll be able to change the copyright text easily.
Don’t forget to hit the Publish button to save your changes.
2. Editing Your Footer With Plugins
Choosing a good theme with tons of customization options will be enough to make your footer look awesome. But if you wanted to choose a simple theme and still get a beautiful footer, then you can use a plugin like the Elementor- Header, Footer, and Blocks Template.
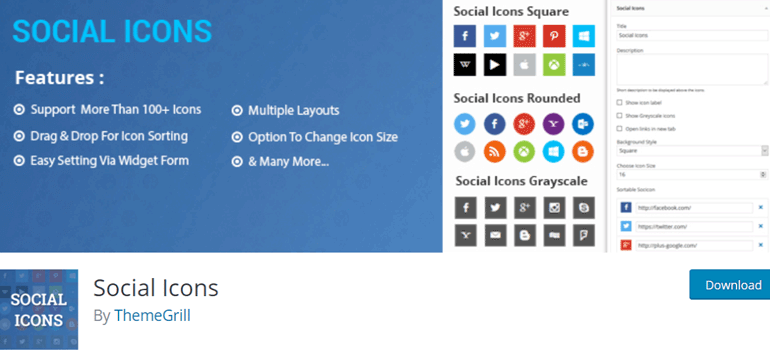
And, if you want to use a plugin that lets you add social icons to your footer, then you can use the Social Icons plugin. In this section, we’ll show you how to use a plugin to edit your footer, and add social icons to it using these 2 plugins:
- Elementor- Header, Footer, and Blocks Template
- Social Icons
i) Edit Your Footer Using ‘Elementor – Header, Footer and Blocks Template’
The Elementor – Header, Footer, and Blocks Template is a powerful plugin to edit your footer.
But it’s more of an Elementor add-on. So, you need to have the Elementor page builder plugin installed before you can use this plugin. But, if you already have Elementor installed, you can skip that install the second plugin.
And before we start, let’s talk about what theme we should use. Since Zakra already has plenty of options to edit the footer, let’s go with the default Twenty Twenty theme this time.
Installing Elementor Page Builder Plugin
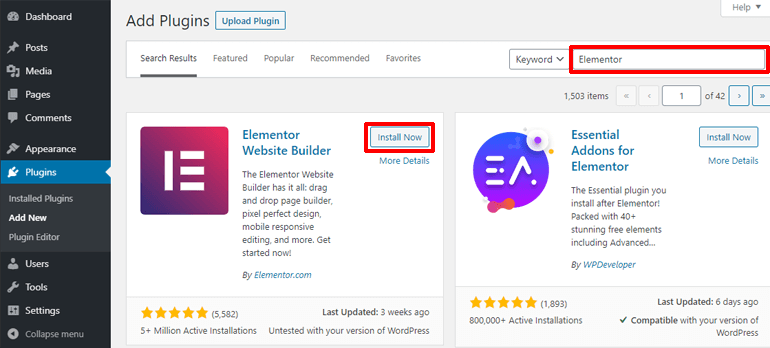
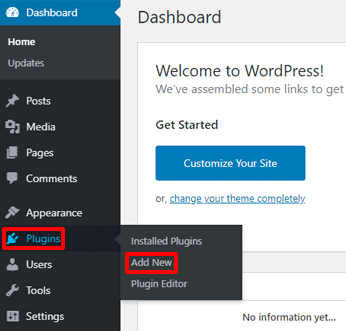
To install the Elementor page builder plugin, head over to Plugins >> Add New.
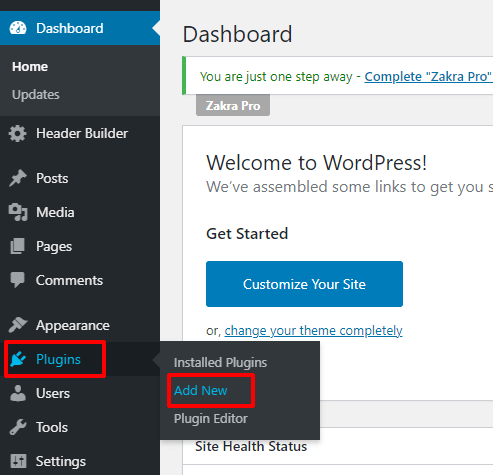
On the search bar, type Elementor. This will display the Elementor page builder plugin and other related plugins. Click on Install on the Elementor page builder plugin’s pane.
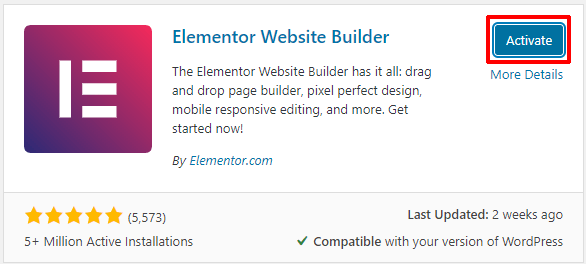
Once installed, click on Activate to activate the Elementor page builder plugin.
You have successfully installed and activated the Elementor page builder plugin. Now you can follow the same steps to install the Elementor – Header Footer and Blocks Template Plugin.
Using Elementor – Header Footer and Blocks Template Plugin
You can follow the same process to install the ‘Elementor – Header, Footer, and Blocks Template‘ plugin. If you need any help with installing, updating, or anything related, then you can refer to our article on ‘how to install a WordPress plugin?’.
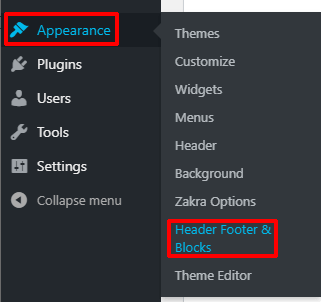
After you’re done installing and activating these plugins, you’ll see an Elementor tab created on the WordPress dashboard. And, inside the appearance tab’s menu, a new tab named Header Footer and Blocks.
To begin editing the footer with the Elementor – Header, Footer and Blocks Template plugin, go to Appearance >> Header Footer and Blocks.
You’ll be taken to the plugin’s window. There are two sections here: All Templates and Theme Support. The All templates section shows the templates you’ve created with this plugin.
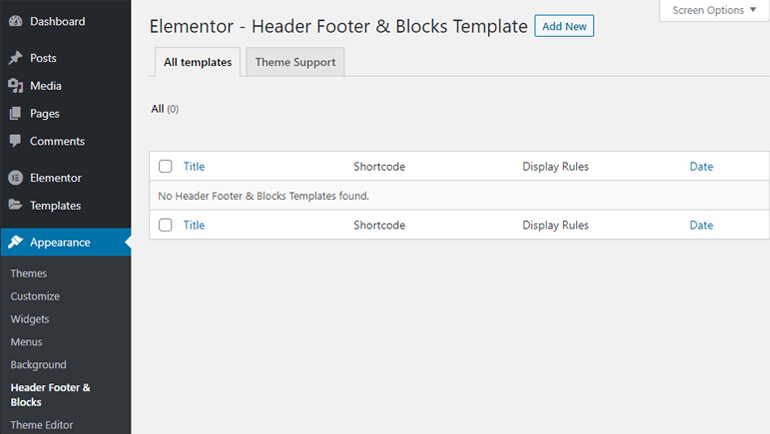
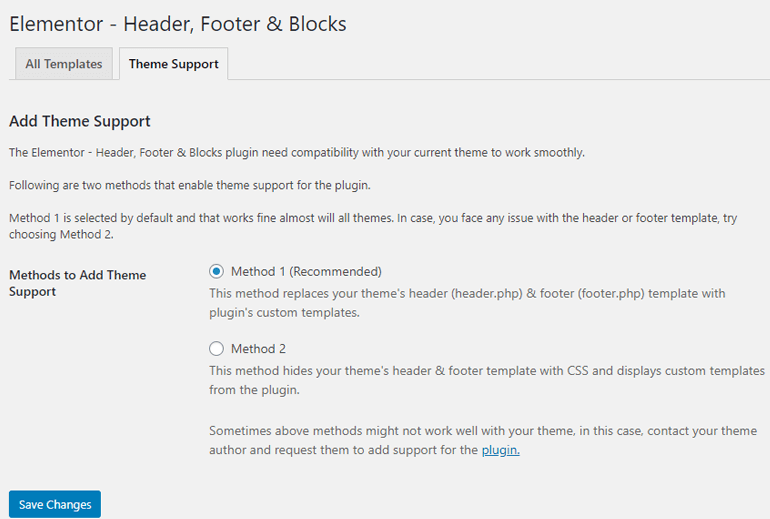
The Theme Support section shows the methods with which you create those templates. Method 1 replaces your theme’s header or footer file. While method 2 hides it. Although method 1 is recommended, you may not be comfortable with replacing your theme’s files. So pick a method as you see fit.
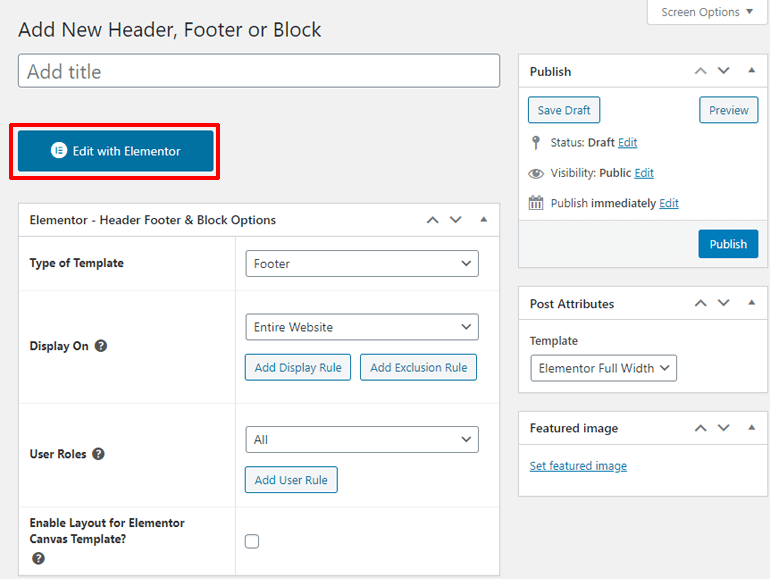
After that, click on the Add New button on the top. The button only appears when you’re in the All templates section.

This will take you to the template editor of the plugin. Select a title for your template on the title bar. And select the type of template from the radio button below.
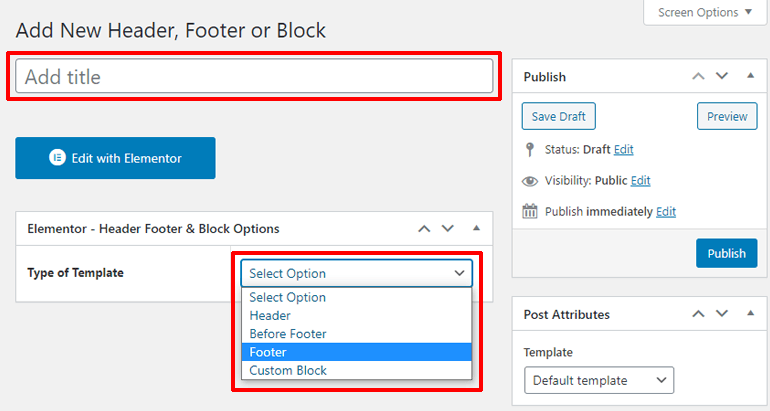
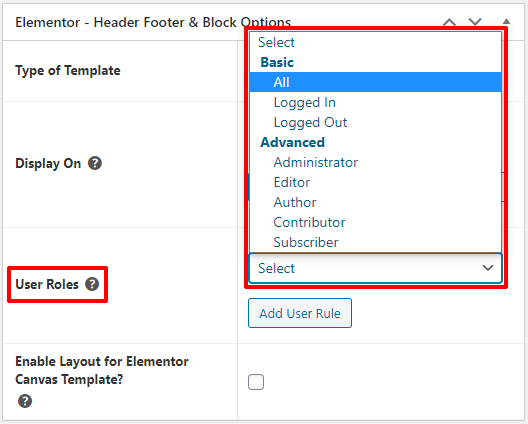
Set the type of the template to Footer, since we are going to create a footer. After you set the type, you’ll see other options. Set the Display on option to Entire Website. We want to display our footer on all pages.
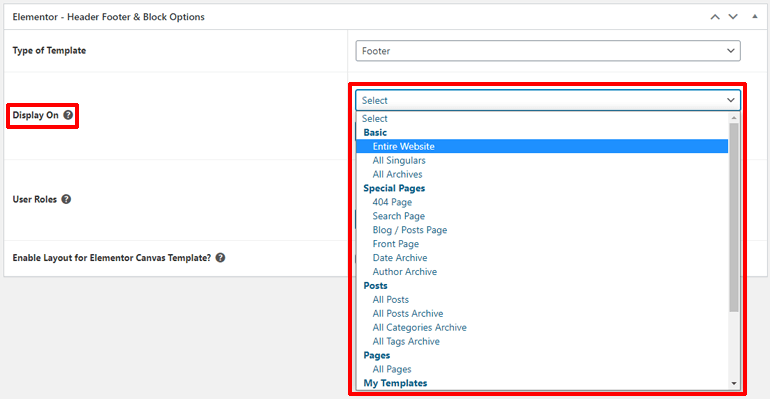
The next option is for user roles. Set it to all, since we want everyone to see our footer. You can also add multiple display rules and user roles.
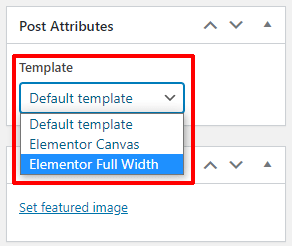
Once you’re done, check out the post attribute option on the right. It’s set to the default template. On the default template, you’ll be able to see only what you’re editing. If you change it to Elementor Full Width, then you’ll be able to see the whole page while you edit your footer.
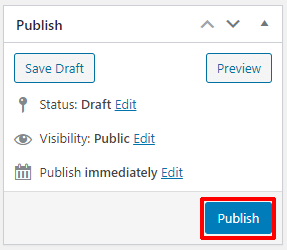
After you’re done with all of this, hit the publish button on the right pane to save these attributes.
You have now created a template with this plugin. To start editing it, click on the Edit with Elementor button.
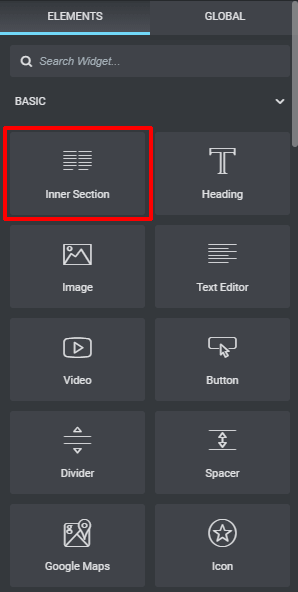
We are on the free version of Elementor. That means we only have access to basic widgets of Elementor. There are 10 of them. Just drag and drop the widget from left to right to put it in your footer.
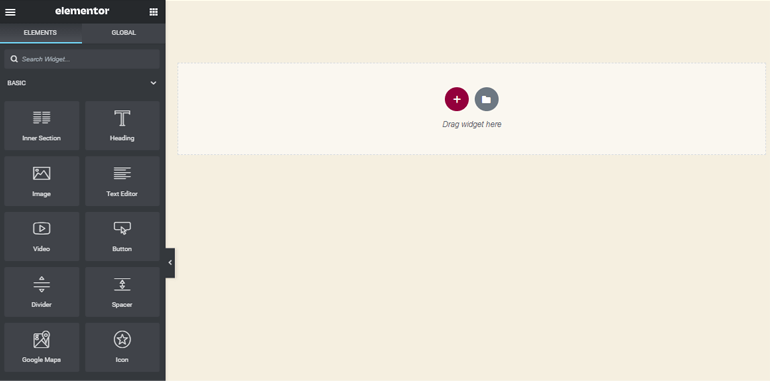
This way, you’ll be able to add one widget per row. To be able to add two of the widget at the same row, you first need to drop the Inner Section widget, and then add the others.
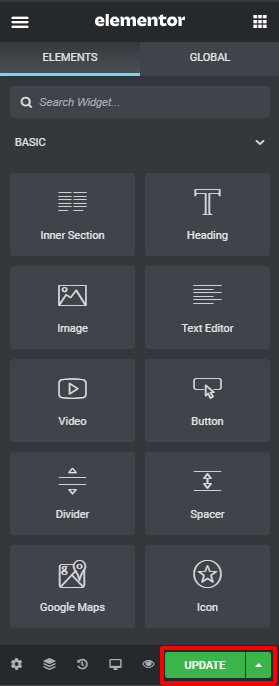
After you’re done creating and editing your footer, simply hit the Update button on the bottom left to save your footer.
Congratulations, you have successfully created a footer with Elementor and the Elementor – Header, Footer and Blocks Template.
Limitations of the Plugin
We praise the Elementor – Header, Footer, and Blocks Template plugin for what it can do. But there are things it can’t. For example, you can only have two columns in one row of your footer. While we saw for ourselves that the Zakra theme gives you four.
The next thing we found about the plugin is that with the default Twenty Twenty theme, the footer is shown below the footer bottom bar of the theme. That is not an appropriate place for the footer. However, this shouldn’t be a problem if you’re just any other theme.
ii) Using Social Icons Plugin to Enhance Your Footer
All this time, we talked about how powerful, productive, and informative a footer can be. But what if you could do more? Say, integrate social follow icons in your footer? This would allow visitors to visit your social media profiles and pages and follow.
To do this, we are going to use the Social Icons plugin. This plugin creates a widget called social icons on your website. You can then just drag and drop this widget to any widget area on your site to add it. Yes, not just the footer, anywhere on your site.
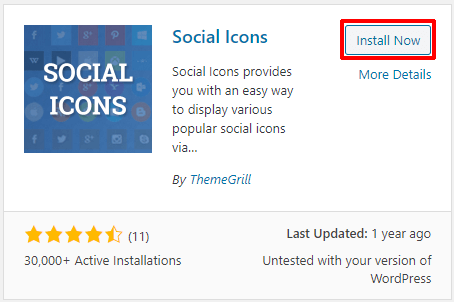
First, go to Plugins >> Add New.
Then, on the search bar type Social Icons ThemeGrill. Then, on the Social Icons plugin’s pane, click on install.
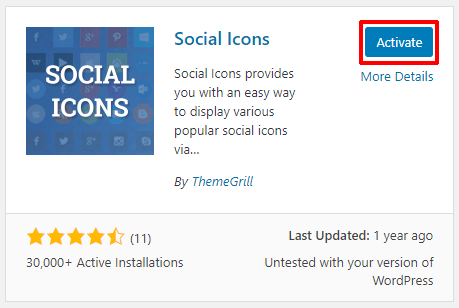
After you’ve installed it, click on Activate.
Once you’ve activated this plugin, 75% of your work is done, seriously. Now go to Appearance >> Widgets. You will find a new widget named ‘Social Icons‘.
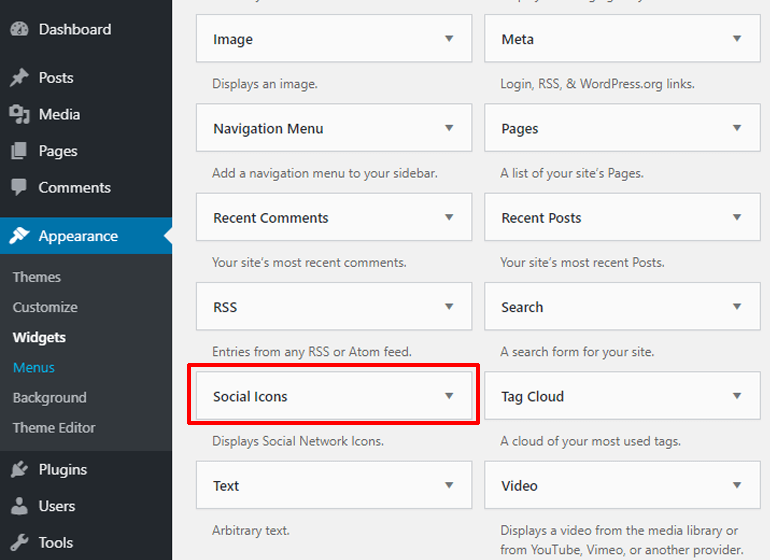
To put it in the footer, just drag it from the left and drop it on the ‘footer‘ widget area on the right.
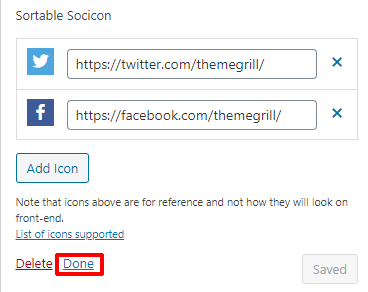
After you drop it, you’ll see different options for its customization. You can choose background style, padding, icon size, and also, add icons.
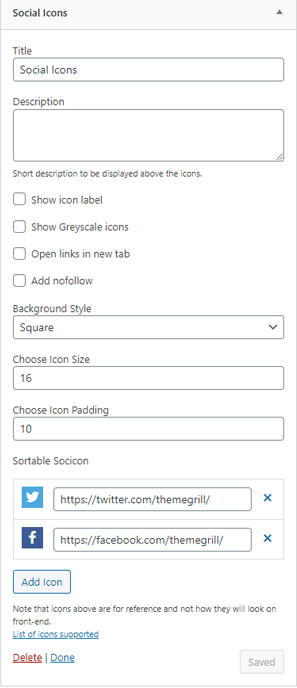
Once you’ve added icons and made your customizations, click on the Done button to save your widget.
Hooray! You have created a social icons section on your footer.
3. Editing Your Footer With Theme Editor
For non-developers or even developers, the above method will be enough for customization of the WordPress Footer. But if you believe you can do more with codes, then WordPress allows and helps that too.
Disclaimer: This method is for developers ONLY!***
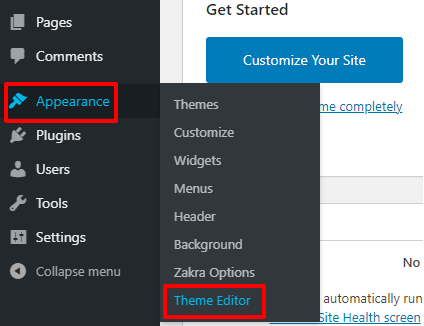
To edit your footer with Theme Editor, go to Appearance>>Theme Editor.
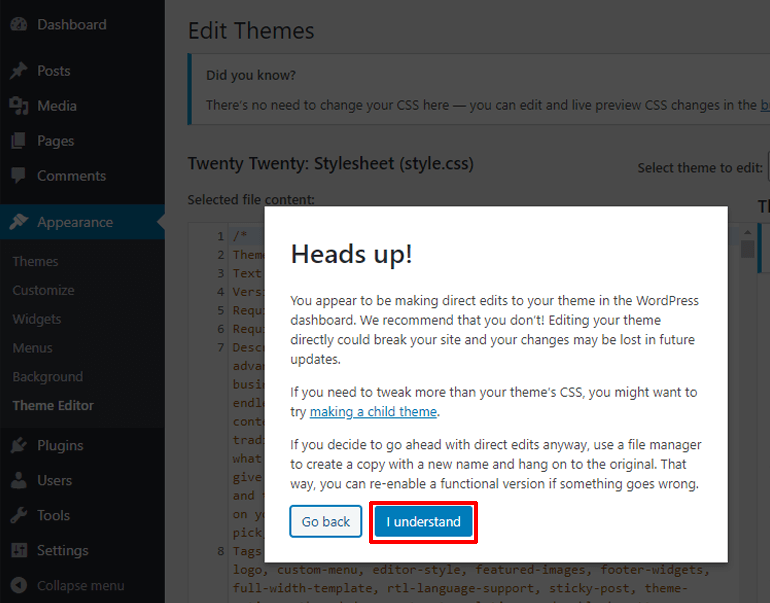
If you’re going to the theme editor section for the first time, then WordPress will give you a heads up. This heads up is for non-developers so that they don’t mess the code up. Click on I understand only if you’re an experienced developer!***
At this point, you will be able to see the lines of code that shape your website’s appearance. On the right is the list of files for your theme editor.
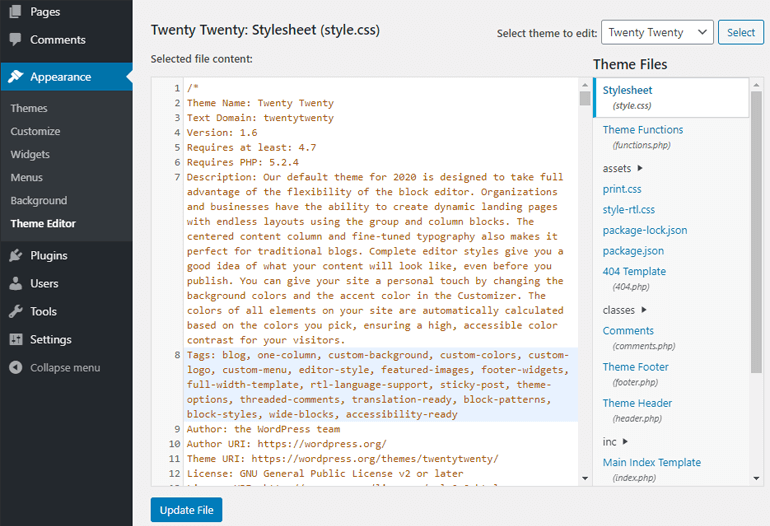
Find a file that says footer.php and click on it.
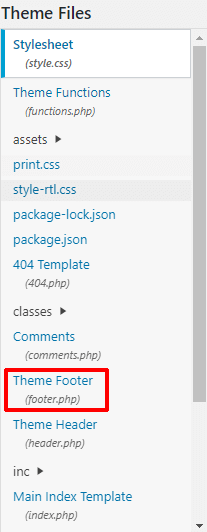
You can edit this file to edit your Footer’s appearance.
After you’re done editing, click on the Update File button to update your code.
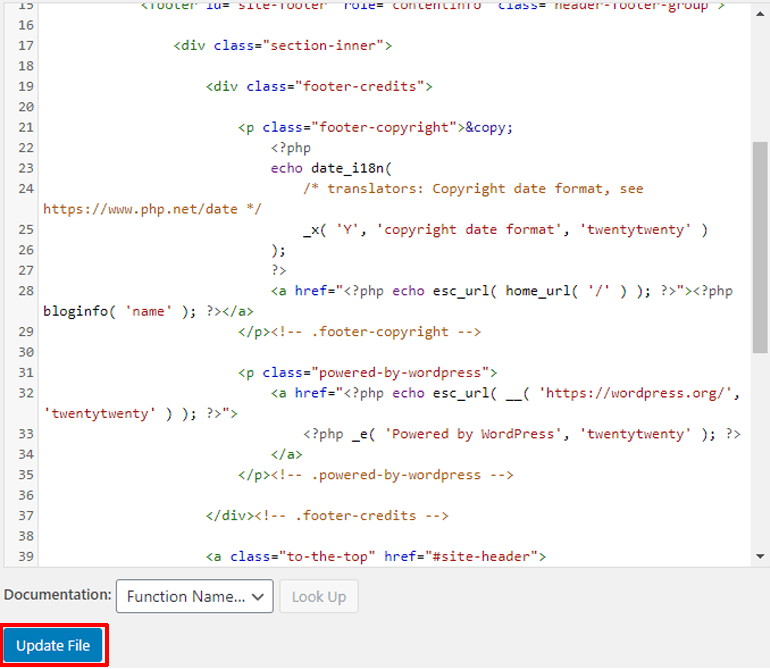
Your footer is now updated. Go check it out.
Wrapping Up
New visitors may not do so more often, but visitors that come back to your site, often look for an impressive footer to navigate to a specific part of your site. They may also look for a footer to know about the website, its owners, or your business and products.
Your footer is responsible for providing visitors with some important information about your website and your business. And it needs to be awesome. Now, we hope that you’ll be able to create great footers on your site.
The most simple way is to choose a feature-rich theme like Zakra, ColorMag, or Flash. These themes have tons of options to customize your entire site including footers and headers.
For changing header style, check our article on how to edit header in the WordPress guide. Also, check our handpicked list of best WordPress themes and best WordPress plugins.
Hope you liked what you read on how to edit your footer in WordPress. If you did, then please show some love and share this article.
The post How to Edit Footer in WordPress? (Beginner’s Guide) appeared first on ThemeGrill Blog.