BuddyPress is a free, open-source social networking software package. It is also known as a social network in a box. BuddyPress is a WordPress plugin that helps to transform any platform into a social network platform. It allows companies, schools, colleges, or other niche communities to start their communication tool or social network. The integral functional elements of WordPress engines, such as themes, widgets, and plugins, can inherit and extend BuddyPress. That means you can mix-match the features offered by these plugins, themes, and widgets to customize the social network.
In this knowledgebase, you learn the steps to install BuddyPress in WordPress and to build a social website with this BuddyPress plugin.
Steps to Build a Social Website using BuddyPress
To build a social networking website for your organization using the WordPress plugin BuddyPress, follow the below steps:
1) Install a WordPress Theme
- Log in to WordPress as an admin user.
- Go to the ‘Appearance’ tab and open the ‘Themes’ page.
- Then, select a social network theme from the list. In this knowledge base, we are using ‘Quest’ as the WordPress theme.
- Click the ‘Install’ button to install the theme.
- After the installation, click the ‘Activate’ button to activate the theme on your website.
To know more about how to install a theme in WordPress, refer to https://www.interserver.net/tips/kb/how-to-install-a-theme-on-your-wordpress-blog/.
2) Install the BuddyPress Plugin
To install the BuddyPress plugin to your WordPress platform, follow the below steps:
- Log in to the WordPress dashboard as an admin/root user.
- Navigate to the ‘Plugins’ section and click the ‘Add New’ option.
- Then, search for BuddyPress in the search bar at the right-side corner of the page.
- After locating the plugin, click the ‘Install Now’ button.
- After the installation, click the ‘Activate’ button to activate the plugin on the website.
To know more about how to install a plugin in WordPress, refer to https://www.interserver.net/tips/kb/how-to-install-plugins-in-wordpress/.
3) Configure BuddyPress to Work with the Plugin
After the installation of both BuddyPress plugin and theme, we need to make sure that the BuddyPress plugin can work with the installed theme. For the same, we need to configure the BuddyPress plugin. To configure the plugin to work with the installed Quest theme, follow the below process.
Log in to the WordPress dashboard as an admin user.
Navigate to the ‘Plugins’ section and select the ‘Installed Plugins’ option.
Select ‘BuddyPress’ from the list and click the ‘Settings’ option.
![]()
Then, configure the BuddyPress plugin by using the following process.
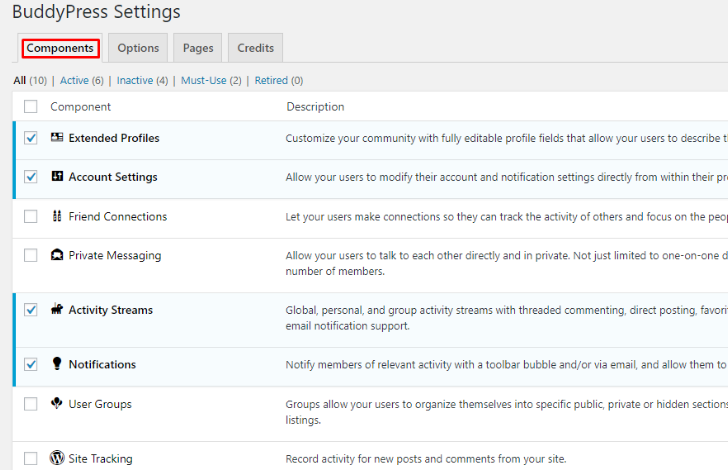
Go to the ‘Components’ tab in the BuddyPress settings page. On this page, the site administrator can enable or disable actions that impact the communication between the users in the social network.
Extended Profiles: When this action gets enabled, one can add custom fields to the user profile.
Account Settings: Enabling this action can help the user to change their account and notifications from the profile screen directly.
Friend Connections: This action helps the user to send friend requests to other users in the network.
Private Messaging: Enabling this action helps the user to send private messages to other users or groups.
Activity Streams: Enabling this action helps users to view the other user’s activities, such as comments, threads, mentions, favoriting, and direct posting.
Notification: Enabling this action allows users to receive notifications, such as private messages, friend requests, and more.
Site Tracking: This action allows us to view the activity records related to new comments and posts.
User Groups: This action allows users to create private, public, or hidden groups.
The options tab of the BuddyPress settings page helps the user to allow or disallow actions from a registered user.

Next, in the ‘Pages’ tab, you can set these three labels: Members, Activity, and User groups.
Create the registration and account activate pages and then add these pages in the ‘Registration’ section of the ‘Pages’ tab. After that, click the ‘Save Settings’ button.
Please note that, if you could not see this option, navigate to the ‘Settings’ option, and click the ‘General’ option. Then, select the checkbox next to the ‘Anyone can register’ option.
4) Use BuddyPress With the Theme
- Navigate to the ‘Appearance’ tab and select the ‘Menus’ option.
- Then, click ‘Screen Options’ from the top right-side corner.
- Mark ‘BuddyPress’ and again click ‘Screen Options’.
5) Create a Menu for the Navigation Bar
If your website already has a menu bar, delete the same before starting this process.
- Click the ‘Create a new menu’ option on the Menus page.
- Enter the menu name as ‘BuddyPress’ and click the ‘Create Menu’ button.
- Select all the log-in and log-out menus from the list.
- Then, select the theme location and click the ‘Save Menu’ button.
- After that, remove the default widgets, and configure a new widget according to your needs.
- Then, add the created BuddyPress widgets to the sidebar
6) Enable user Registrations on Website
To make the registration process public, follow the below steps:
Navigate to the ‘Settings’ tab in the left-side menu bar and select the ‘General’ option.
Then, select the checkbox next to the ‘Anyone can register’ option.
7) Setting Up the Homepage
To set up a static homepage for your website, refer to https://www.interserver.net/tips/kb/how-to-add-a-static-front-page-to-your-wordpress-blog/.
Now, you have successfully built a social website using the WordPress BuddyPress plugin. We hope that this knowledge base was helpful to you. Please comment below for any questions or queries. If you are an InterServer customer, please reach out to our support team for further help.
The post Build a Social Website Using the WordPress BuddyPress Plugin appeared first on Interserver Tips.