One of the components that the VMware vCenter Server Appliance (VCSA) is missing, is the ability to automatically backup. In VCSA 6.5, VMware has introduced a backup feature within the appliance admin portal, however what do we do with VCSA 6 ?
Within the VMware KB 2091961 it states “Use of image-based backup and restore is the only solution supported for performing a full, secondary appliance restore” (in my case I’m using Veeam Backup and Replication), the vPostgres database creates almost real-time logs and that in the event of a disaster, you will just need to restore the VCSA virtual machine and vPostgress will replay up to the most recent log file. This will allow you to restore the entire virtual machine as well as the vPostgress Database.
This link points to the VMware documentation on the requirements for backing up VMware vCenter Server 6
However what if you want to also backup the database and have the ability to restore it to the same appliance the backup was taken from ? Maybe you don’t need to spend the time to restore a full image, maybe you just need a restore of the database which could potentially reduce downtime.
Backing up the VMware VCSA vPostgress Database with a script
I had a requirement to backup the vPostgress database within VCSA and copy the backup file to a cifs share. So I wrote a custom script that you can upload to the VCSA appliance that will do the following:
Create a backup_results.txt file (this is where we will store the results of the backup, i.e. successful or failed)
- Backup the VCSA database
- Rename the backup_results.txt and VCSA backup file to append today’s date
- Mount a cifs share
- Copy the backup_results.txt and VCSA backup file to the cifs share
- Unmount the cifs share
- Delete backup files on the VCSA older than 3 days
Pre-Requisites for backing up VMware VCSA vPostgress Database
Before we start we need to download the backup script files from VMware – KB 2091961 and download my linux script from my GitHub page
Once we have the files downloaded to your pc (2091961_linux_backup_restore.zip, go ahead and unzip this file), you will then have a script file for backup, restore and my linux script file:
- backup_lin.py
- restore_lin.py
- vcsa6-backups.sh
Uploading Files to VMware VCSA
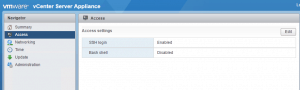
Next, we’ll need to make sure we have SSH enabled on our VCSA as we’ll be using WinSCP to upload the script files. To enable SSH login to the VCSA admin site https://<vcsa_ip>:5480 click on Access. If your SSH login is enabled you don’t need to do anything. Otherwise, click on Edit and enable SSH login.
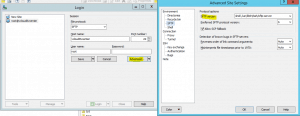
Open up WinSCP and create an SFTP connection to your VCSA appliance. Before you click ok on the new connection, click the advanced button and under Environment select SFTP. In the field SFTP Server enter in:
shell /usr/lib64/ssh/sftp-server
Click ok and then proceed to login to the VCSA.
Upload the backup_lin.py, restore_lin.py and vcsa6-backups.sh files to /tmp on the VCSA
The VMware VCSA Shell
We can now close WinSCP and open up a Putty SSH session to your VCSA appliance. Within the putty window, login to your VCSA and then type “shell.set –enabled True” – this will enable the shell. On the next line type “shell”
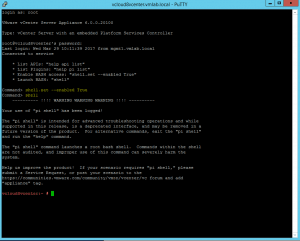 Once we’re in the shell, we’ll type the following commands:
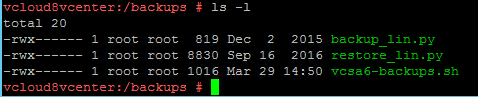
- mkdir /backups (Creates a backup folder)
- mv /tmp/backup_lin.py /backups (move script file to the backups directory)
- mv /tmp/restore_lin.py /backups (move script file to the backups directory)
- mv /tmp/vcsa6-backups.sh /backups (move script file to the backups directory)
- chmod 700 /backups/backup_lin.py (Give file execute permission)
- chmod 700 /backups/restore_lin.py (Give file execute permission)
- chmod 700 /backups/vcsa6-backups.sh (Give file execute permission)
Now if we list the /backups directory we should see the script files in green:
The VMware VCSA backup script
Below is the contents of the vcsa6-backups.sh script file. The lines that you will need to change to suit your environment are:
Line 18 Change the following values:
- username=vcloud8backup (your cifs server username)
- password=’p@ssw0rd’ (your cifs server password)
- //192.168.1.4/vcloud8vcenter-backups (your cifs server and share path)
#Purpose = Backup VMware VCSA Database #Created on 28-3-2017 #Author = David Rodriguez #Version 1.0 #Create Results File date &> /backups/backup_results.txt #Create Backup File python /backups/backup_lin.py -f /backups/vcsa_backup_VCDB.bak >> backup_results.txt 2>&1 #Rename Files mv /backups/backup_results.txt /backups/backup_results_$(date +"%d-%m-%y").txt mv /backups/vcsa_backup_VCDB.bak /backups/vcsa_backup_VCDB_$(date +"%d-%m-%y").bak >> backup_results_$(date +"%d-%m-%y").txt 2>&1 #Mount cifs share mkdir /mnt/cifs-backups >> backup_results_$(date +"%d-%m-%y").txt 2>&1 mount -t cifs -o username=vcloud8backup,password='p@ssw0rd' //192.168.1.4/vcloud8vcenter-backups /mnt/cifs-backups >> backup_results_$(date +"%d-%m-%y").txt 2>&1 #Copy Files cp -v /backups/backup_results_$(date +"%d-%m-%y").txt /mnt/cifs-backups >> backup_results_$(date +"%d-%m-%y").txt 2>&1 cp -v /backups/vcsa_backup_VCDB_$(date +"%d-%m-%y").bak /mnt/cifs-backups >> backup_results_$(date +"%d-%m-%y").txt 2>&1 #Unmount Cifs Share umount /mnt/cifs-backups rm -rf /mnt/cifs-backups #Remove Backup File find /backups/ -name '*.txt' -mtime +3 -exec rm {} ; find /backups/ -name '*.bak' -mtime +3 -exec rm {} ;
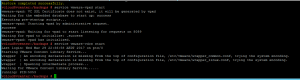
To execute the script type in:
./vcsa6-backups.sh
After the script executes type in ls -l, which will list the contents of the directory. Within the directory you can see the backup file as well as the results file.
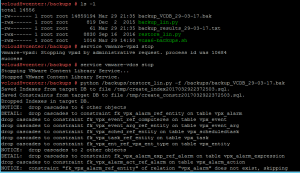
Type in cat backup_results_29-03-17.txt to display the backup results.

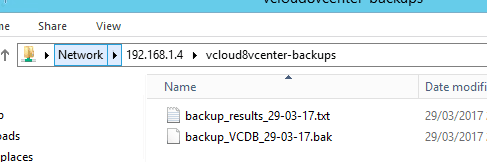
Now i’ll have a look at my cifs share to check that the backup file as well as the text file copied over successfully
Restoring VMware VCSA
You can restore the VMware VCSA by simply restoring a full image backup with your backup software of choice
OR
To restore the VMware VCSA Database only:
- The database must be restored to the same VCSA appliance as to which the backup was taken.
- Ensure your VCSA is powered on and enter into the shell once again.
- Use WinSCP to upload the latest backup file into the /backups directory.
- Within the VCSA shell type the following:
- service vmware-vpxd stop
- service vmware-vdcs stop
- We’ll use the restore script to restore the vPostgress database:
- python /backups/restore_lin.py -f /backups/backup_VCDB_29-03-17.bak
Once the restore process has finished, you can go ahead and start the services:
- service vmware-vpxd start
- service vmware-vdcs start
The post Backup VMware VCSA vPostgress Database to cifs share appeared first on SYSADMINTUTORIALS IT TECHNOLOGY BLOG.