Trust us when we say that you don’t want a free-for-all on your WordPress website. An open server and file hierarchy is like blood to a shark for malicious users. Of course, your server is (in most cases) safe and sound. Meanwhile, WordPress’ file permissions take care of the folders and files within.
In fact, every file hosted on the web has a handful of set permissions. This helps keep them at arms length from anyone not permitted to use them. This also includes other servers too. You manage them using one of a few different tools. The good news is you will likely have a Secure File Transfer Protocol (SFTP) client or a file manager in your hosting control panel. As such, you can manage your own file permissions.
In this post, we’re going to look at WordPress’ file permissions. We’ll explain what the numbers mean, which permissions are right for certain files and folders, and also how to change them. First, lets dig into what file permissions are.
What File Permissions Are
In a practical sense, anyone using the internet can access every file, folder, and asset on any server in existence. It’s possible through the various connections and protocols that make up the world wide web. Though, in reality, this isn’t the case. There are lots of files we can’t get at, and for good reason.
File permissions govern who (or what) can access other servers and the files within. You see them everywhere without realizing it in lots of cases. Lots of the client error HTTP status codes around the 400–499 range deal with ‘forbidden’ and unauthorized access. 401 Unauthorized, 403 Forbidden, and 451 Unavailable For Legal Reasons all restrict permissions on either the server, or the files themselves.
You’ll often find that file permissions display as three-digit numbers, or a string of letters and characters. It’s rare you’ll see only the explicit values named. While it’s important to understand what these mean, we’ll talk more about the format and how to read file permission numbers later on.
Why We Need File Permissions
By now, it should be obvious why we need file permissions at a core level. Though, to reiterate, they protect servers, files, and folders from unwanted access. Though, this isn’t just related to malicious users, although that’s a valid and important aspect.
There are lots more reasons closer to home for why file permissions are necessary:
- Users with access to the server, but with a user role that’s too powerful, could wreak havoc on a server through one slip.
- Those same users (now with the right roles and permissions) gain protection from hackers thanks to the set file permissions.
This is just two of many, but the concept is clear: file permissions help everyone to stay safe, whether that’s from malicious users, lax user role management, and from the users themselves.
How to Read File Permissions
Now we get to the fun stuff: learning how to read file permissions. There are two blocks for every file permission scheme – privileges and users. First, the privileges determine what a ‘client’ can do with a file:
- Read. With this active, the client can read everything within the file, but can’t work with it in any way. In other words, it’s a classic read-only file.
- Write. This lets the client save changes to the file. This gets into dangerous territory, so granting write permissions doesn’t happen as often.
- Execute. When this is active, a client can ‘use’ the file. In a technical sense, writing to a file is using it. Here, it refers to running the file, given that most of the internet runs on scripted code.
In conjunction with this, you have a block of users that can access a file:
- Owner. Every file and folder has an assigned user, akin to an administrator of sorts.
- Group. This gives a group of users the privileges you set, rather than just one person. Though, it’s not exclusive, and you can set both Owner and Group users on a file.
- Public. You may see this user called “Other” or similar names. In short, it determines what everyone else can do. It’s the most dangerous user role, because whatever privilege you set applies to everyone in a literal sense.
To give you more to think about, there are two ways you can display a file permission.
How to Read Different File Permission Formats
We’ve already touched on how there are a couple of ways to present file permissions. The first is as a three-digit number, also called a permission mode. The numbers involved correspond to the individual user’s permissions. For example:
- The first digit states what an Owner can do with a file.
- The second digit relates to Group privileges.
- Public users have permissions based on the third digit.
The numbers themselves involve some addition, because the each of the actions you can take have an assigned number:
- Read: 4
- Write: 2
- Execute: 1
To give you an example, the most permissive mode is 777. Here’s how this breaks down:
- The Owner can read, write to, and execute the file.
- The Group can also read, write, and execute.
- In a scary permission, the Public can also read, write, and execute.
Of course, 777 means a file is as open as you can make it. This isn’t a permission mode you’d use in all but the most extreme of cases.
In other cases, you won’t see numbers. Instead, you’ll see a string of letters and hyphens, such as rwxrwxrwx. Much like the numbered permission modes, there’s a cipher to uncover:
- Read: r
- Write: w
- Execute: x
- No permissions: –
If you count, you’ll see nine letters in the above permission mode. There are three each for the Owner, Group, and Public roles. If you decide to ‘crack’ the string of nine characters, you’ll see it’s the same as the 777 permission mode.
If you’d like to play around with permission modes, there are a few great ‘chmod calculators’ that let you tick boxes and see the results:
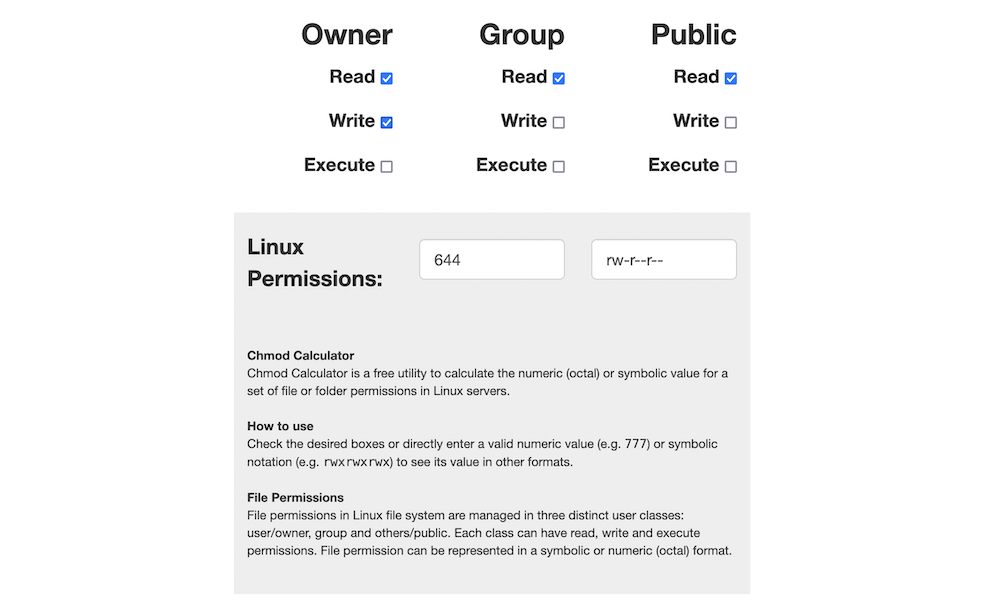
Regardless, you don’t need in depth knowledge to set WordPress file permissions, as we’ll show you next.
WordPress File Permissions: The Numbers You Need
Now we’re getting into how file permissions relate to WordPress. Despite the complex formats and explanation of them, you don’t need different permissions for every file and folder. Instead, you separate WordPress’ files into groups and apply the right permissions to all of them.
Here’s the general breakdown:
- PHP files (i.e. every file with the .php extension) should be 644. FIle owners can read and write, while every one else can only read. Some site owners will also set the index.php file to 444. This gives you more security, but it may not work well with certain actions within WordPress. You can set this permission, but keep an eye out for errors within WordPress.
- Folders should be 755. This gives the Owner license to read, write, and execute. Everyone else can read and execute.
- The wp-config.php file has different permissions depending on how you’d like to set things. You see permissions ranging from 400 or 440, through to 600 and 644. At the one end, Hardly anyone has any permissions. We’d recommend starting here, and opening the file up if you need to.
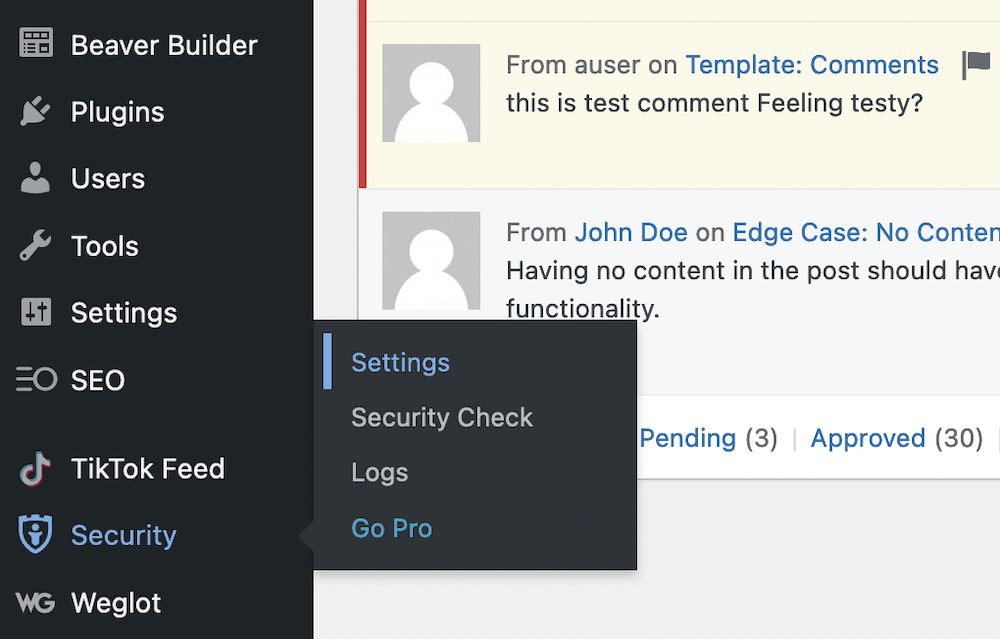
As such, you don’t need to set permissions on a per file basis. What’s more, WordPress’ file permissions don’t often need amending. Though, if you’d like to check them from your WordPress dashboard, your best bet here is iThemes Security:
Once you install and activate the plugin, head to the Security > Settings page:
From here, look for the File Permissions panel, then click Show Details:
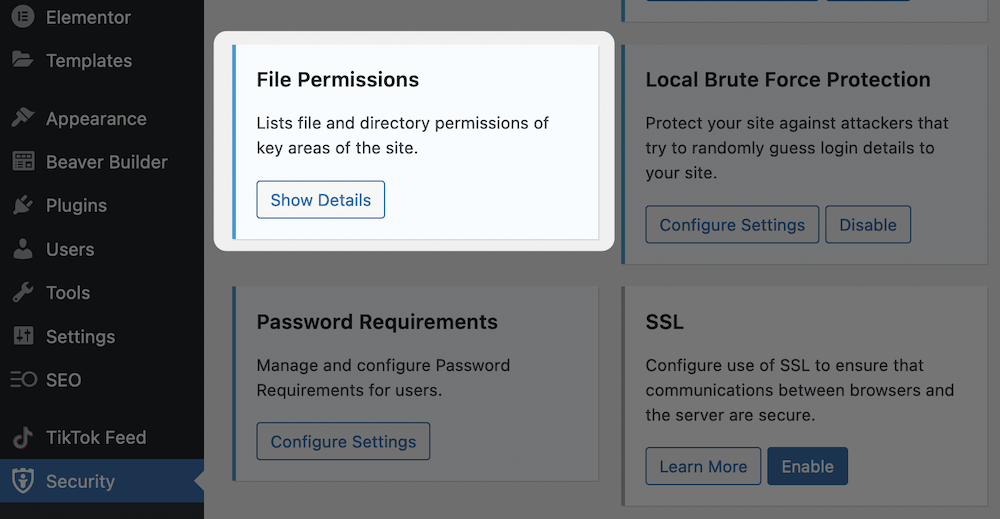
On the next screen, click the Load File Permission Details button, and you’ll see the details:
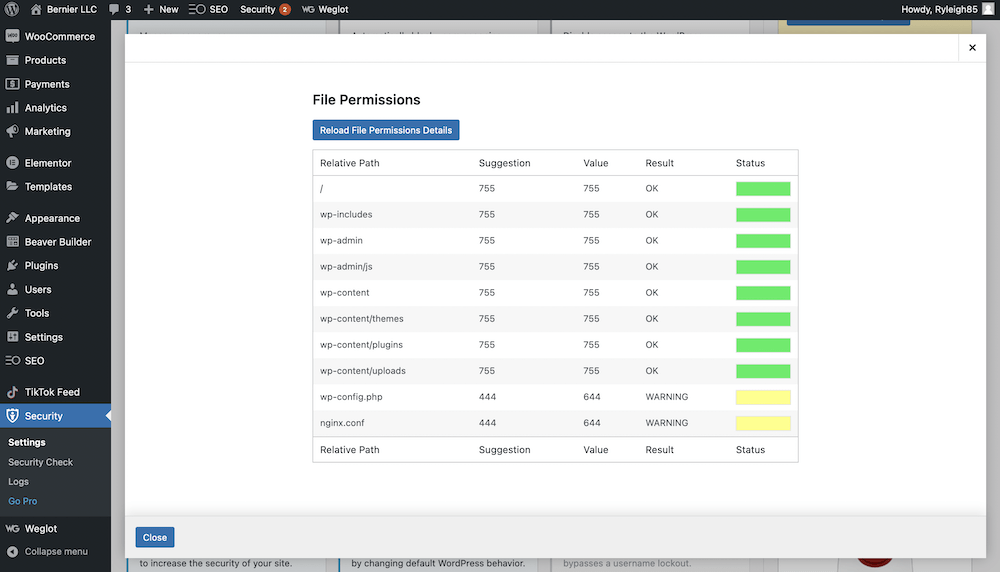
You’ll see whether the permissions are secure, and you can use the following couple of steps to change any you have a concern about.
How to Change WordPress File Permissions
We have two different ways to change WordPress’ file permissions. Let’s give you a quick overview:
Let’s show you the most common method first – SFTP.
1. Use Secure File Transfer Protocol (SFTP)
The most common method is to use SFTP, log into your server, and change the file permissions you need. Before you begin, there are a few elements you need. We cover this in another article on the site, but in short, you need a suitable SFTP client, and your login credentials.
We’d also advise you to carry out a full backup of your site, although you won’t do too much damage if you set a permission wrong. The worst case scenario in our opinion is that you’ll go back and revert your changes.
When you’re ready and logged in, select whatever block of files you’d like to change the permissions for. Next, you need to access the file permissions screen to make your changes. This differs depending on your client, but there’s often an explicit option available. This is true for FileZilla and others, but Cyberduck puts the permissions settings in its Info menu:
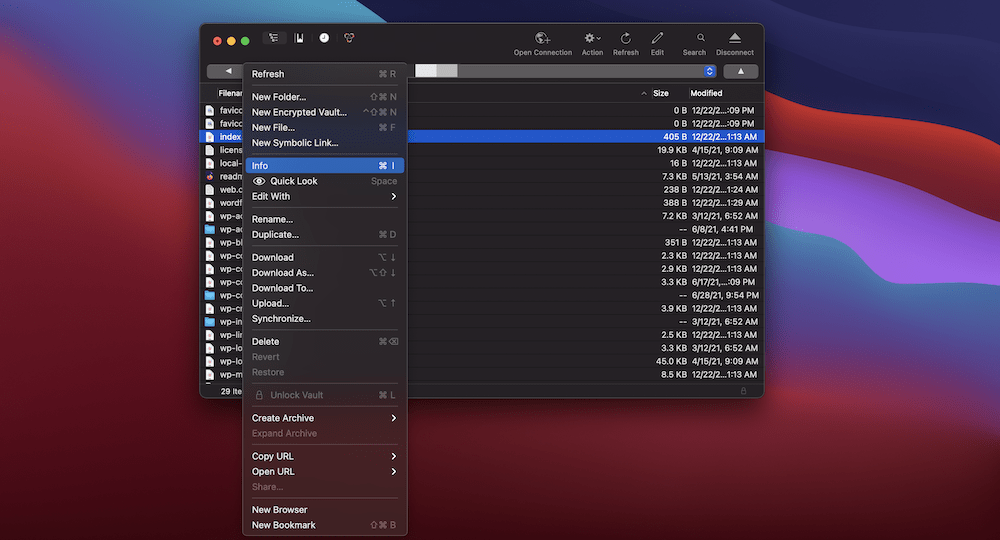
Regardless, when you get into the menu, you’ll see checkboxes to set various permissions, a place to enter numerical values, and more depending on your client:
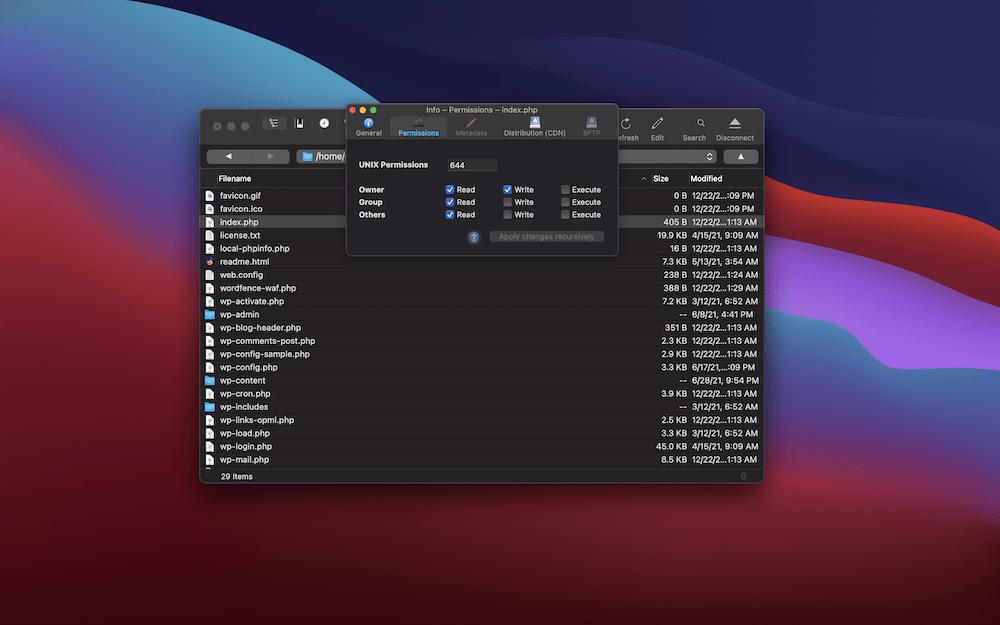
Once you save your changes, the new permissions will take effect.
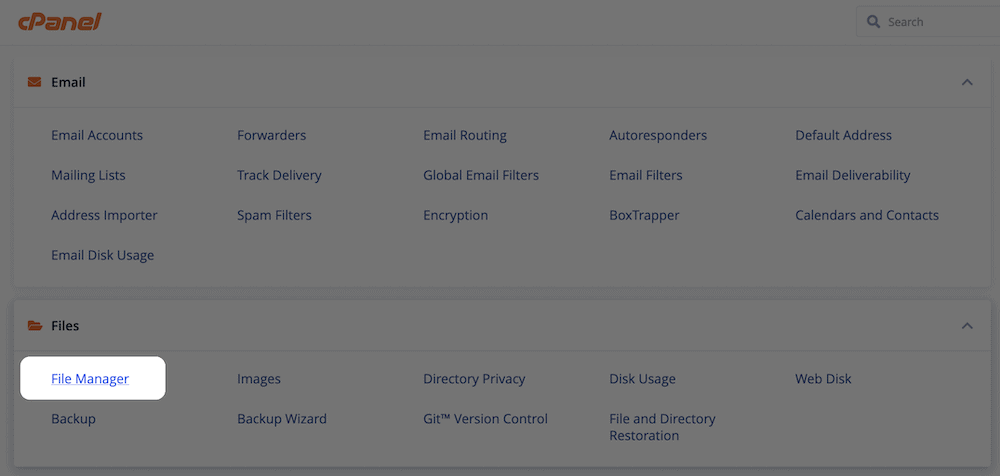
2. Use Your Web Host’s Control Panel
Using your web host’s file manager to change permissions is a similar proposition to SFTP. This time, you use a web-based Graphical User Interface (GUI) to work with your files.
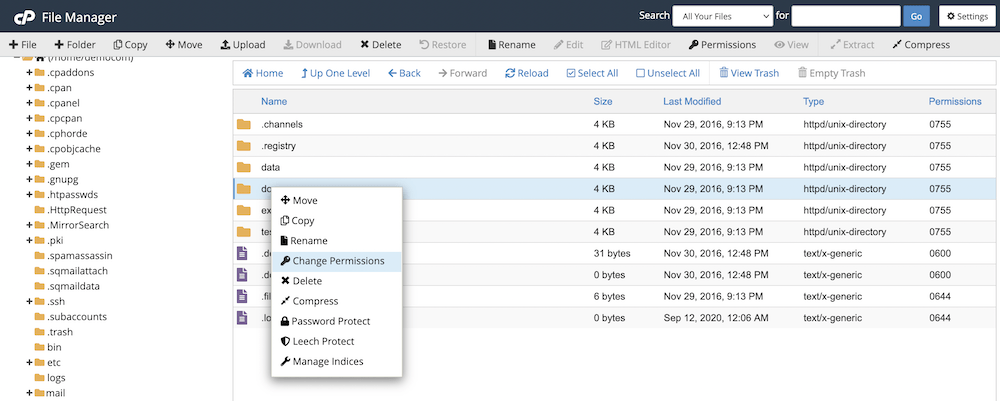
In cPanel, this is at Files > File Manager:
Within this screen, you’ll be able to see the current file permissions as one of the default columns. Still, if you right-click on a file or folder, you can select the Change Permissions option:
This will be a familiar screen by now. It shows checkboxes and the ability to use numerical settings to change permissions:
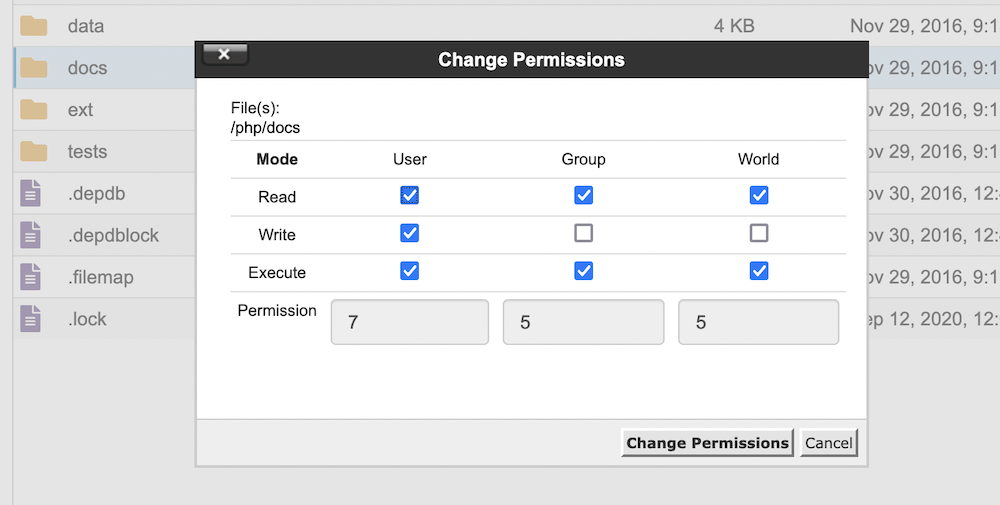
Once you make your changes, click the Change Permissions button, and cPanel will apply them straight away.
Wrapping Up
Without a way to restrict users from accessing certain system files, your site is in a bad situation. Instead, there are file permissions for every folder and file on your server. This helps to allow access only for those who need it. It’s a simple setup, with a complex implementation under the hood.
In short, you have to set whether the Owner, Group, or Public can read, write to, or execute the file. Most files have reserved privileges, and you can check them using SFTP or within cPanel. Once you understand how to read file permissions and create them, the process is straightforward. What’s more, WordPress’ file permissions mostly use 644 or 755. If you use an auto-installer for WordPress, the file permissions are already in place.
Do you ever need to change WordPress’ file permissions, and will this article help you? Let us know in the comments section below!