How To Go Beyond WordPress Basics
From WordPress Beginner ? Intermediate
What’s the difference between a WordPress beginner, and an intermediate WordPress user?
If you’ve mastered the dashboard, are great at working with themes and plugins, what’s next? How do you progress to the next step, without necessarily become a code-slinging developer?
Definitions are obviously arbitrary, but for me, an intermediate WordPress user is someone who has mastered the dashboard, can find their way around any theme pretty quickly, and who isn’t afraid to get their hands dirty behind the scenes. That might not be creating custom themes or plugins from scratch, but it likely involves customizing sites with copy/paste code snippets, tweaking CSS, migrating sites, using FTP, and generally understanding the ‘behind the scenes’ of a WordPress site. They are also familiar with WordPress best practices, such as safe ways to modify themes etc. This isn’t someone who is going to hack your site to pieces, but someone who understands the right way to do things, keeping a site future-proofed, update-able and easy for the owner to manage.
This is the kind of stuff that makes some folks shudder with horror, but in reality if you can grasp some of this stuff, it’ll give you so much more confidence. If you’re working with clients, I’d consider it not only a requirement, but your responsibility as a WordPress consultant.
So how do you get to the Intermediate stage, where to start?
If you are like a lot of users, you might be forced into it when something goes wrong on your site. Most of the cool stuff I’ve learned in WordPress, I’ve generally learned by things breaking ? It’s initiation by fire, but it forces you out of your comfort zone. And, let’s face it, there’s very little you can learn in life by staying exactly how and where you are.
Behind the Scenes of Your WordPress Site
Here’s a more comprehensive guide to what’s going on behind the scenes, to ease you into Intermediate status.
Download the accompanying PDF to get access to some simple practice exercises, as well as demo videos, accessible only to those with the PDF.
Now you’re connected let’s talk about what you are seeing.
Note: the following describes the most common server configuration, but there could of course be variations on this depending on the specific environment, hosting company etc.
public_html
This is the general folder for any files you want to be accessible via the internet
If you have multiple domain names hosted under the same hosting account, the primary domain (normally it’s the domain you used when you signed up for the hosting account) will be in the root (i.e. not within another sub-folder) of public_html, and any other domains you added on will each have their own folder within it:
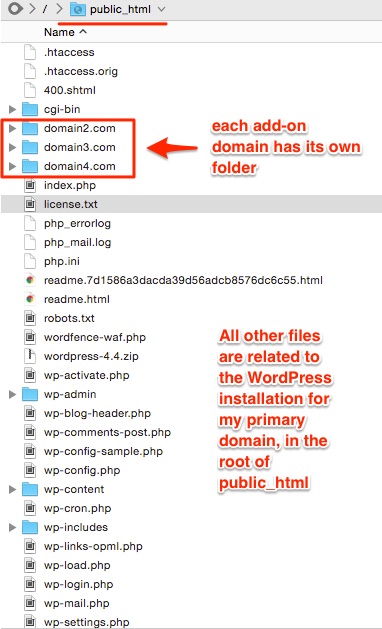
This is what the typical file structure of a WordPress site looks like:
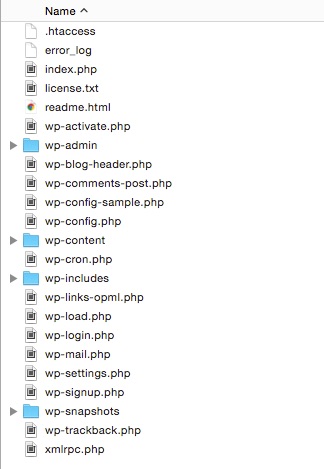
A fairly common variation on this structure is for the WordPress core files to be placed in their own folder, but have the site still be accessible from the root URL. Some people like to do this for organization, or because they believe it’s more secure. More details on giving WordPress its own directory here.
To explain further what happens in these folders, indulge me for a moment while I channel your grandmother.
Back in my day (say, 2004-ish), we didn’t have the luxury of installing a plugin through the dashboard. You wanted a new plugin? You had to manually download the files and upload them via FTP, there was no other way.
You kids have it easy now!
These days, when you want to install a new plugin or theme, you can do that directly from your WordPress dashboard, with a user-friendly interface.
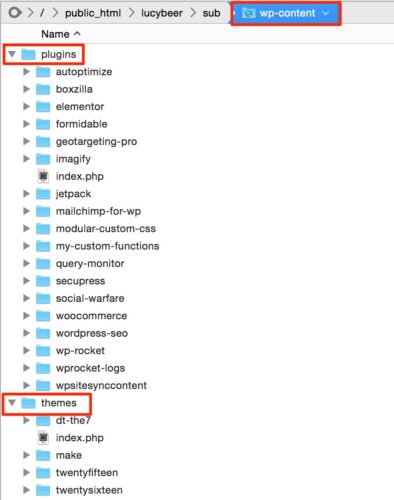
When you go to Plugins ? Add New, search for a plugin and then click Install, what’s actually happening in the background is an automated version of the process I outlined in my rant above. Your site is grabbing the relevant plugin files from the central WordPress.org repository and transferring them into the plugins folder on your server. The process is the same when you install a theme. Conversely when you delete a plugin or theme, your site removes those files from your server. When you update a theme or a plugin, a physical set of files are being replaced. That’s why you can’t just directly modify theme or plugin files, because you’ll lose those changes when the files are replaced in an update.
Media Uploads
- wp-content
- uploads
When you upload a file, such as an image, to one of your posts or pages, it’s placed in these folders. The uploads folders are usually arranged by date – year and month:
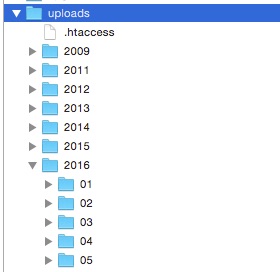
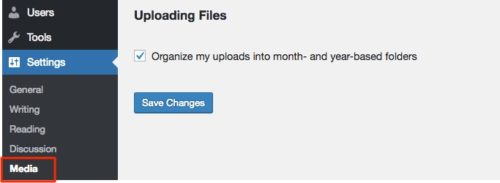
If for some reason you don’t want that structure you can un-check the box in Settings > Media:
Beware, that in order for you to be able to manage a piece of media through the Media Library in WordPress, it must be uploaded through the dashboard. If you upload a file directly to this folder via FTP, WordPress won’t know about it so it won’t show in the Media Library in the dashboard (unless you use a plugin like Add From Server )
htaccess
The htaccess file can seem quite mysterious. It can do many things, and if something is wrong in this file, it can also take your site down! If your site is completely inaccessible, for example due to a 500 error, a good place to start looking is the htaccess file.
Note that it’s a special type of file because the filename begins with a period. In some cases the file manager will hide this type of file and you have to select the option to ‘show invisible files’.
On a fresh WordPress install, the only thing you are likely to see in there are the standard WordPress rewrite rules, so that you can use the “pretty permalinks” setting.
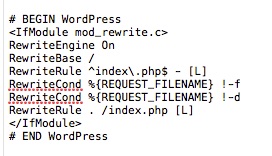
The htaccess file is processed very early on in the chain of events that happens when someone visits your site, and for that reason, it’s used for a variety of tasks, including but not limited to:
- Adding specific URL redirect rules
- Adding performance enhancements like GZIP compression, browser caching (these can be added manually or via a caching plugin)
- Security enhancements (protecting directories, blocking spam bots etc)
- Enhancements to PHP configuration, e.g. PHP “handlers”
If you want to become really well-versed in the htaccess file and all it can do, I do recommend this ebook, “Htaccess Made Easy” – it’s nerdy and fantastic.
wp-config.php
As I mentioned earlier, the wp-config.php is absolutely crucial since it connects the file system to the database. When you install WordPress there will already be a lot of stuff in this file, but as with the htaccess, it can also be extensively modified and customized, either manually, or by plugins.
When you use a specialized WordPress host like WP Engine, Flywheel etc, they will typically create a very custom configuration and utilize the wp-config.php to do that.
Usually the wp-config file is found in the same folder as the other WordPress files, but for security some people like to move it one folder above.
There are a wide range of uses for the wp-config file, which include (but are by no means limited to):
- Storing the database name, username and password
- Specifying the database prefix
- Controlling the number of post revisions that will be kept
- Enabling caching
- Enabling debug to view PHP errors
- Controlling the PHP memory for your site
File Permissions
When you get into working with WordPress files and folders directly, you’ll sooner or later come across the concept of permissions. Every file and folder has a permission set on it and it’s related to security. The exact set up will vary according to whether you are on shared hosting, or a dedicated server, and also by host. It can get quite technical, but I’ll explain by example.
Some plugins that you use on your site will need to create some specific files and folders, or edit your existing ones. For example, if you have a caching plugin it will need to add some information to your htaccess file. If your htaccess file has very restrictive permissions on it, it will prevent the caching plugin from automatically modifying the file.
So the permissions have to be adjusted to allow for that situation. Other fairly common problems related to permissions include not being able to upload a file to the media library, or not being able to install/update a plugin from the dashboard.
In most cases, permissions can be adjusted via FTP / File Manager. In some cases (such as if you’re on a dedicated server), the server admin or webhost may need to adjust them.
Database
The database is not accessible via FTP. To access it you need to log into your webhosting control panel. There you will find a tool named PHPMyAdmin, or something similar.
On some hosts, you need to input the database username and password to access the database tool. If so, you can get that info from wp-config.php.
Similar to the file structure, there are a common set of database tables in every WordPress installation. Some plugins and themes may add their own:
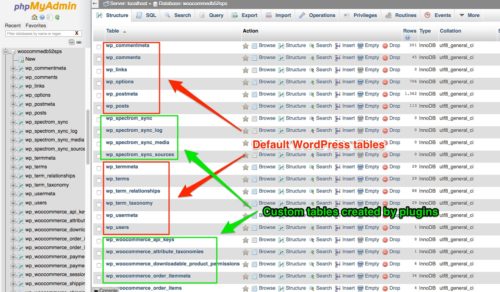
You do have to be careful in the database because you can screw things up really easily. Generally speaking you won’t have to do much manual editing of the database. But there are a couple of situations where editing certain fields might be necessary.
For example, when migrating a site from one domain to another, or from a local environment to the server, you might have to manually edit the site urls in the database.
I am referring to the WordPress address and Site address that you find in the Settings > General screen:
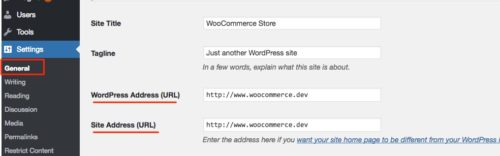
There are cases where you need to change those urls, but you may not have access to the WordPress dashboard to do that. So you can do it directly in the database. Those two fields are confusingly labelled differently in the database – home url and site url.
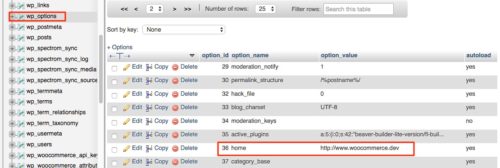
You will find these in the wp_options table.
Site URL is the first row when you browse that table:
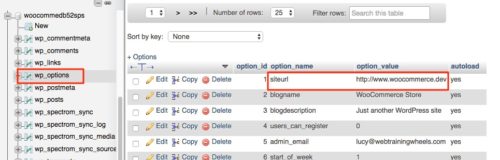
Home URL is usually row 36, so you need to go to the next page in PHPMyAdmin to find it:
So, when you are inputting information, text, or settings in your WordPress dashboard, it’s being stored in the database behind the scenes.
If you are interested in progressing beyond the beginner stages of WordPress-ing, I hope that you’ll use this information to practice delving deeper into your WordPress site and become more comfortable with the technical aspects.
To help you along, I’ve provided some practice exercises based on this tutorial, each with a video demo. Click below to get the PDF with all the info: