You probably love how easy WordPress multisite makes it to manage a network of sites. However, what you might not love is how WordPress multisite handles all of those sites by default.
With the default functionality, WordPress multisite lets you create additional network sites as either subdomains (site1.network.com) or subfolders (network.com/site1).
Now, that’s fine for some uses. But if you want to use WordPress multisite to manage distinct sites, you’d probably prefer to have each WordPress multisite network site get its own unique domain name (site1.com).
WordPress multisite domain mapping is what lets you do that. You can still get the back-end benefits of WordPress multisite while giving every network site its own unique domain – your sites’ visitors won’t even know the difference!
In this tutorial, I’ll show you exactly how to get up and running with domain mapping at your multisite network for the most recent versions of WordPress (yes, there have been some changes!).

Build a knowledge base and help your customers help themselves.
Get the Theme
WordPress Multisite Domain Mapping – Do You Need A Plugin?
No! You do not need a plugin if you’re using the latest versions of WordPress (which I hope you are).
As of WordPress 4.5, WordPress now includes multisite domain mapping in the core software, which eliminates the need to use a third-party plugin.
However, because this functionality is a relatively new feature, you still might see some WordPress multisite domain mapping tutorials telling you to use a plugin like WordPress MU Domain Mapping. You can safely ignore those recommendations as long as you’re using WordPress 4.5+.
A Bird’s Eye View Of How To Set Up WordPress Multisite Domain Mapping
To give you an idea of what you’re in for, here’s a quick summary of the various steps that you’ll need to complete to get up and running with WordPress multisite domain mapping:
- Set up WordPress multisite (I’ll assume you’ve probably already done this so I won’t cover it too deeply)
- Add a site as a subdomain or subfolder using the Network Admin interface
- Go back and edit the network site address to point to the external domain
- Add your external domain as an alias at your host
- Point your external domain’s nameservers towards your host
If you want to follow this guide, you’ll need to have both your hosting dashboard and domain registrar account handy.
Once you’ve got that ready, let’s dive in!
Step 1: Set Up Your WordPress Multisite Network
To get started, you’ll need to set up your basic WordPress Multisite network.
Again, I won’t cover this too deeply because this guide is specifically on WordPress multisite domain mapping (and let’s be honest – you probably already have your network set up if you’re reading this).
If you don’t have it ready though, here’s a high-level look at the process:
- Install the regular WordPress software
- Enable WordPress multisite by adding a code snippet to your wp-config.php file
- Follow the interface instructions to set up your network
- After running through the setup process, you’ll get two code snippets. Add one to your wp-config.php file and the other to your .htaccess file.
When you’re setting up Multisite, choose the option for subdomains as it makes things a little simpler (either will work, though – so don’t stress if you already chose subfolders).
If you would like a step-by-step guide to the basic WordPress multisite setup process, this article covers everything in detail.
Step 2: Add A New Network Site And Map It To External Domain
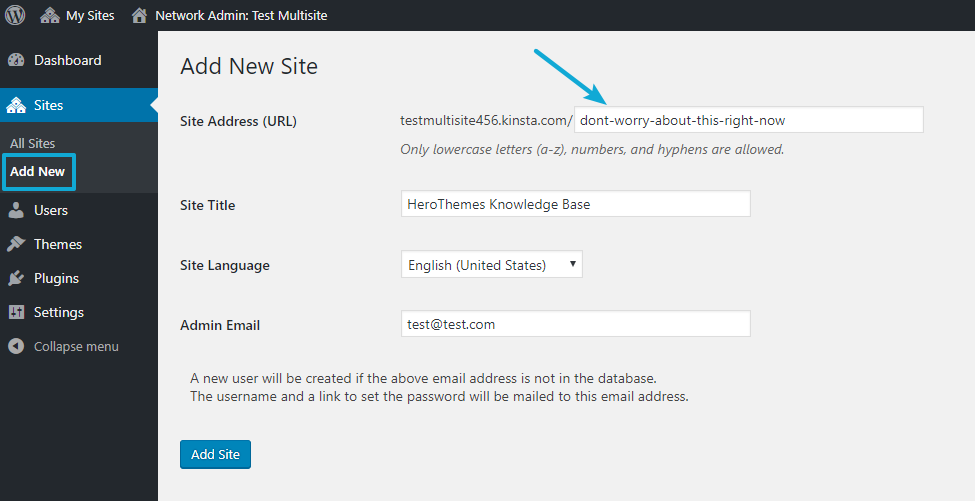
Once you have your WordPress multisite network up and running, add a new network site like you usually would (Sites ? Add New in the Network Admin interface).
When you first add the site, you’ll need to give it a subdomain or subfolder according to your settings. Don’t worry – we’ll fix that in a second. You can make it whatever you want for now because we’re going to change it in the next step:

When you’re finished, click Add Site.
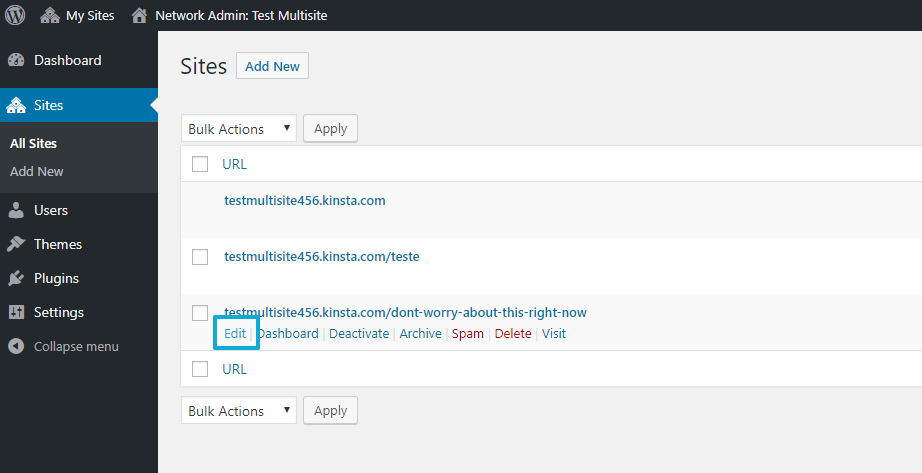
Once you’ve added the site, click on Sites and edit the network site that you just created:

Once you edit the site, you’ll now be able to enter the external domain that you want to map to the site:

Then, save your changes.
Now, you’ve finished up half of the puzzle (that was easy, right?). At this point, WordPress Multisite thinks that this network site is located at the external domain.
Now – it’s time for the other part of the puzzle, which is making sure that your external domain name actually points visitors to the right spot.
Step 3: Add External Domain Name As An Alias
Next, you need to add the external domain to the DNS records of your main network site.
The way that you do this depends on where you’re hosting, so I can’t give you one tutorial for all situations.
I will show you two different scenarios, though, which hopefully gives you enough to work with. I’ll do it…
- With cPanel, which is what most shared hosts use
- Via Kinsta’s custom dashboard, which is where my test site is hosted
Adding Domain Alias With cPanel
If you’re using cPanel, you’ll want to look for an option for Parked Domain or Aliases depending on your cPanel dashboard.
For example, in my dashboard I would select the Parked Domains option:

Then, enter the domain for your external domain and click Add Domain:

If you see something in the Redirects To box, choose the option to Manage Redirection:

Then, select Disable Redirection:

Adding External Domain With Kinsta
If you’re using Kinsta, the process is a little simpler. Go to the main network site. Then, choose Domains and click Add Domain to add the domain for your external site:

When you’re done, you should see your new domain in the Domains List area:

Step 4: Update Nameservers For External Domain
To finish things out, you need to update the nameservers for your external domain to point to your hosting account.
That is, you want them to point to the same nameservers as your main Multisite network domain (where WordPress is actually installed).
The exact process depends on where you’ve registered your external domain. If you’re not sure how to do that, here are tutorials for popular domain registrars:
- GoDaddy
- Namecheap
- Google Domains
Once the DNS propagation finishes (which might take up 24 hours), you should be able to access the network subsite via the external domain.
Repeat The Process To Add More Network Sites
While I showed you how to add a single external domain as a network subsite, adding additional external domains is as simple as repeating the process for each domain – there’s nothing special!
WordPress Multisite Domain Mapping Doesn’t Have To Be Complicated!
With older versions of WordPress, WordPress Multisite domain mapping was a complicated undertaking because it required third-party plugins and all kinds of configuration steps.
Lucky, WordPress 4.5 made things a lot easier. Now, you can get started with WordPress Multisite domain mapping with pretty much zero configuration. Remember – here’s all you need to do:
- Set up your Multisite network using the subdomain option (though subfolders will also work)
- Add a new network site
- Go back and edit that site and set its Site Address to the external domain
- Add your external domain as a parked domain or alias of your main domain
- Point your external domain’s nameservers to your server
And with that, you’ll be up and running with your own Multisite network of unique domains.
Have any other questions about using external domains with WordPress Multisite? Leave a comment and we’ll help out!
The post How To Set Up WordPress Multisite Domain Mapping For WordPress 4.5+ appeared first on HeroThemes.