
I have image.qcow2 file. How do I install the qcow2 image provided in the qcow2 format? How do I create Linux KVM VM from provided image (say image.qcow2) file?
Introduction: qcow is nothing but a disk file format used by QEMU. qcow is an acronym for QEMU Copy On Write. There are two versions of the file format: .qcow and .qcow2. Naturally, you must use qcow2. It is an updated version of the qcow format. This page shows how to use Linux KVM to import the .qcow2 image and create a VM from it.
How to create VM using the qcow2 in Linux KVM
Steps to import qcow2 to create VM on Linux:
- Download cloud image such as rhel-8.0-beta-1-x86_64-kvm.qcow2 or CentOS-7-x86_64-GenericCloud.qcow2
- Create meta-data and user-data file for KVM VM
- Create disk image to create a new VM
- Import qcow2 to create VM in KVM
- Create VM and verify by by log in into the VM using the ssh command
I am assuming that you have already download cloud image and set up and configure KVM. If not see:
Let us see all steps in details.
Setup required directories and config files
Type the following mkdir command:# D=/var/lib/libvirt/images ## <-- Dir to store new VM ##
# VM=nixcraft-rhel8 ## <-- set vm name ##
# mkdir -vp $D/$VM
meta-data file for KVM VM
You must create meta-data file using a text editor such as vi command to setup instance hostname and ID:# cd $D/$VM
# vi meta-data
Append the following:
instance-id: nixcraft-rhel8 local-hostname: nixcraft-rhel8 |
Save and close the file in vi/vim text editor.
user-data file for KVM VM
Next, you need to modify pre built cloud images as per your setup. For example, add users, ssh keys, setup time zone, and more using Cloud-init. Let us see how to create RHEL 8 (beta) vm with 2048MB ram, 60GB disk space, 2 vCPU, with user named vivek and ssh keys for login. Create a new file named user-data:# cd $D/$VM
# vi user-data
#cloud-config # Customize as per your need. At least change username (vivek) and ssh-ed22519 # key with your actual public key # Hostname management preserve_hostname: False hostname: nixcraft-rhel8 fqdn: nixcraft-rhel8.nixcraft.com # Setup Users with ssh keys so that I can log in into new machine users: - default - name: vivek groups: ['wheel'] shell: /bin/bash sudo: ALL=(ALL) NOPASSWD:ALL ssh-authorized-keys: - ssh-ed25519 AAAAC3NzaC1lZDI1NTE5AAAAIG+zTQJ5FBsD2dTPlPVvQUbMq3jt19HflOtAy1EPBmKw KVM VM Lab SSH Login key for user # Configure where output will go output: all: ">> /var/log/cloud-init.log" # configure interaction with ssh server ssh_genkeytypes: ['ed25519', 'rsa'] # Install your public ssh key to the first user-defined user configured # in cloud.cfg in the template (optional since I created vivek) ssh_authorized_keys: - ssh-ed25519 AAAAC3NzaC1lZDI1NTE5AAAAIG+zTQJ5FBsD2dTPlPVvQUbMq3jt19HflOtAy1EPBmKw KVM VM Lab SSH Login key for user # set timezone for VM timezone: Asia/Kolkata # Remove cloud-init runcmd: - systemctl stop network && systemctl start network - yum -y remove cloud-init |
Copy cloud image
I have rhel-8.0-beta-1-x86_64-kvm.qcow2 stored at /var/lib/libvirt/boot:# cd $D/$VM
# cp -v /var/lib/libvirt/boot/rhel-8.0-beta-1-x86_64-kvm.qcow2 $VM.qcow2
Sample outputs:
‘/var/lib/libvirt/boot/rhel-8.0-beta-1-x86_64-kvm.qcow2’ -> ‘nixcraft-rhel8.qcow2’
Create 60GB disk image for new KVM VM
Let us create 60GB image named ‘nixcraft-rhel8.new.image’ to store our new VM:# cd $D/$VM
# export LIBGUESTFS_BACKEND=direct
# qemu-img create -f qcow2 -o preallocation=metadata $VM.new.image 60G
# ls -l
I am going to use virt-resize command to resize a virtual machine disk called nixcraft-rhel8.new.image:# virt-resize --quiet --expand /dev/sda1 $VM.qcow2 $VM.new.image
# ls -l
Finally, overwrite newly resized image nixcraft-rhel8.new.image as nixcraft-rhel8.qcow2 using the mv command# mv -v $VM.new.image $VM.qcow2
# ls -l

Creating a cloud-init ISO and a pool for our RHEL 8 (beta) VM
Create ISO9660 file from our user-data and meta-data:# cd $D/$VM
# mkisofs -o $VM-cidata.iso -V cidata -J -r user-data meta-data
Finally, create a storage pool for our KVM VM:# virsh pool-create-as --name $VM --type dir --target $D/$VM
# ls -l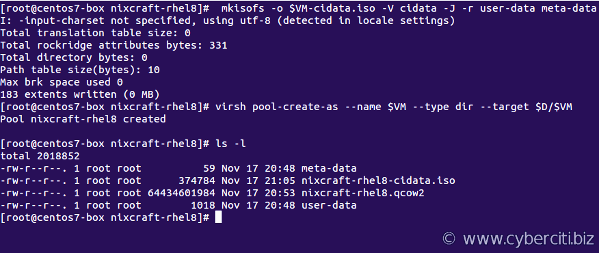
How do I install the rhel-8.0-beta-1-x86_64-kvm.qcow2 image provided in the RHEL 8 downloads?
Now all you have to do is install VM by importing newly created nixcraft-rhel8.qcow2 image, run:# cd $D/$VM
# virt-install --import --name $VM \
--memory 2048 --vcpus 2 --cpu host \
--disk $VM.qcow2,format=qcow2,bus=virtio \
--disk $VM-cidata.iso,device=cdrom \
--network bridge=virbr0,model=virtio \
--os-type=linux \
--os-variant=rhel7.5 \
--graphics spice \
--noautoconsole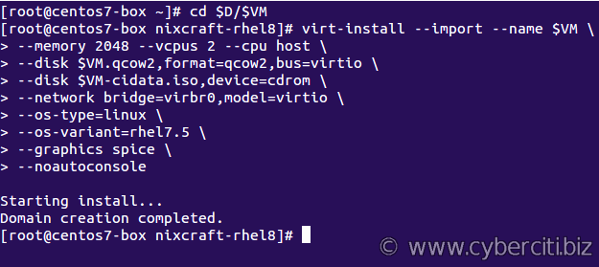
Delete unwanted files:
Use the rm command to remove files:# cd $D/$VM
# virsh change-media $VM hda --eject --config
# rm -vi meta-data user-data *.iso
How to find out IP address of KVM VM provided by DHCP
# virsh net-dhcp-leases default
# virsh net-dhcp-leases default | grep $VM | awk '{ print $5}'
192.168.122.229/24
Log in to your RHEL 8 (beta) VM
All you have to do is use the ssh command as follows:$ ssh vivek@192.168.122.229
Conclusion
So there you have it, RHEL 8 installed and running image provided in the RHEL 8 (beta) downloads section.