When you need to migrate a WordPress site, make an emergency backup, or generate a copy for testing, you should consider using the Duplicator plugin. Follow along as we show you how easy it is to backup and restore your site. We’ll also go over some of the other tools included in the WordPress Duplicator plugin.
- Backup WordPress to File
- Restore a WordPress Backup
- Remove Stored Data from WordPress
- WordPress Duplicator Plugin Settings
- View PHP Information in WordPress
- View WordPress Server Settings
Need a new home for your WordPress site? Check out InMotion’s WordPress Hosting solutions for optimized and secure servers that meet your budget needs.
Backup WordPress to File
Performing backups is one of the most critical steps you should take when hosting a WordPress website since it can help you recover after a disaster. You can also use the backup to migrate your site to a different server or folder location.
- Install the Duplicator plugin by Snap Creek.
- Click the Duplicator link in the navigation menu.
- On the Packages page click the Create New button.
- Enter a name for the WordPress backup, then click the Next button.
- Your website will then be scanned to see if it can be backed up successfully. Once the scan is complete click the Build button.
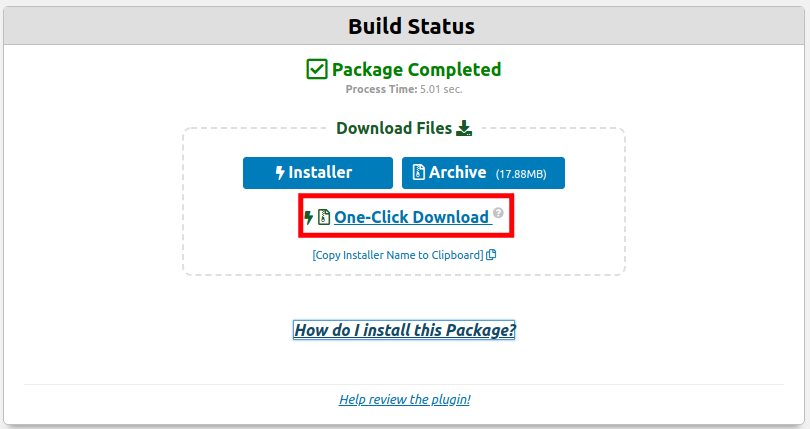
- Once the package has been built you can download the Installer files and Archive.
- You can also select the One-Click Download button to download both the installer.php and Archive (.zip) files at the same time.

Restore a WordPress Backup
Now that you know how to make a backup of your site, we’ll show you how to restore a WordPress Backup. This can be used to migrate your site to a new server, make a copy of your site for testing, or restore your site after a problem occurs. First, you must create a database then upload the installer file and archive. Then, you can navigate to the installer page and begin the restoration.
- Log into your cPanel.
- Create a database, database user, and password. Be sure to save this for later use.
- Upload both files to the document root of your website.
- In a browser, enter your website address then add /installer.php to the end of the address. Such as: example.com/installer.php
- You will see the Duplicator menu come up. Click the terms & notices link to read them. Check the box to confirm that you read and accept them, then click the Next button.
- You will then be on the Install Database page, enter the database information you setup in Step 2 then click the Test Database button.
- When you see a “Success” message, click the Next button.
- An install confirmation message will pop-up and ask if you want to “Run installer with these settings.” Click the Yes button.
- The WordPress Duplicator plugin will display your site Title, URL, and installation Path. Verify they are correct and make any changes if necessary. Then, click the Next button.
- Once your site has been installed, click the Admin Login button.
- Log into your WordPress Dashboard and you will see a message stating “This site has been successfully migrated!” Click the link to Remove Installation Files Now!
- You are finished when the installer files are successfully removed.
Remove Stored Data from WordPress
Are you finished restoring your WordPress site with Duplicator? We will now show you how to remove all reserved installer files and build data that is used by the Duplicator plugin when backing up your WordPress site. This can free up space and make your site more secure by removing temporary files from your server.
- In your WordPress Dashboard click Duplicator then Tools in the navigation menu.
- You will then be on the diagnostic tools page. In the Data Cleanup section click the Remove Installation Files button. The install file cleanup will then run.
- Click the Clear Build Cache button.
- A message will pop-up stating “This process will remove all build cache files. Be sure no packages are currently building or else they will be canceled.” Click the OK button. You are finished when you see a message stating “Build cache removed.”
WordPress Duplicator Plugin Settings
The Duplicator plugin can do more than just backup and restore WordPress sites. Options such as enabling debugging, choosing an SQL backup script, setting the archive engine, or managing your Duplicator plugin license are also available. Since we are using the free version of Duplicator, we will not go over any Pro Features.
- Click Duplicator then Settings in the WordPress Dashboard menu.
- You will then be able to choose your Duplicator settings. Select the tabs to access the available options.
- Choose your settings as needed, but be sure to click the Save Settings option before changing between tabs. Below is a summary of the available options. General
Version View the version of the Duplicator plugin you are using. Uninstall Choose if you want to delete your plugin settings and the entire storage directory when you uninstall the Duplicator plugin. Storage View the full path that your Duplicator snapshots are stored in and disable the .htaccess file in the storage directory. Custom Roles Check this if you want to integrate the User Role Editor plugin. Debugging Select this option to enable debugging. Trace Log If this is enabled it will begin logging all PHP errors and trace logs. PackagesSQL Script Select if you want to use Mysqldump or PHP Code to export the database. You can also enter a cus
tom file path to store the database backup.Archive Engine Choose if you want to archive your files with ZipArchive (archive.zip) or DupArchive (archive.daf). Archive Flush Select this option to try and keep the network connected when backing up an archive. Created Format Choose the date and time format to be added to the archive name. LicenseManage Click to access and manage Duplicator licenses. Type View the type of Duplicator license you are using. License Key View your Duplicator license here. This will only apply to Duplicator Pro licenses. AboutRate Duplicator Review the Duplicator plugin on WordPress.org. Spread the Word Access the social media accounts associated with the Duplicator plugin. Stay in the Loop Enter your email address to subscribe to the Duplicator newsletter.
View PHP Information in WordPress
Do you need to know the PHP settings of your WordPress Hosting Account? Details such as PHP memory_limit, max_execution_time, and environmental variables can all be seen right in your Dashboard. This will help you confirm if you meet the minimum requirements for a new plugin or when troubleshooting a WordPress issue. You can also view your PHP Settings with a phpinfo Page.
- Click Duplicator then Tools in the menu of your WordPress Dashboard.
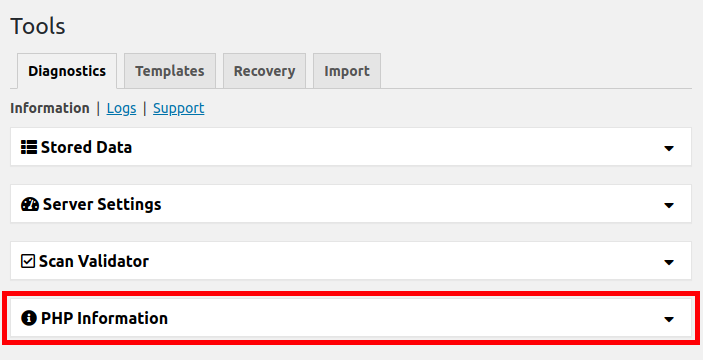
- You will then be on the Diagnostic Tools page. Click the PHP Information link.

- Your detailed PHP information will be displayed. You can scroll down to see more details.
View WordPress Server Settings
Do you need to see the settings for your WordPress server? Maybe you’re installing new software and want to ensure your environment is compatible. As we continue covering the WordPress Duplicator plugin, we will now show you how to view server settings with the WordPress Duplicator plugin. This can provide important information about the environment you are hosting your website on. Details about your operating system, WordPress version, MySQL, server disk, and PHP setup can quickly be seen in your Dashboard.
- Click Duplicator then Tools in your WordPress Dashboard menu.
- You will then be on the Diagnostic Tools page. Click the Server Settings link. It will then drop down and list detailed information about your server settings.
Become a master of WordPress plugins! Protect, optimize, secure, and expand the functionality of your website easily with the help of WordPress plugins!
