Want to learn how to upload files from a WordPress form to Google Drive? Luckily, connecting Google Drive to WordPress is a lot easier than you think. We’ll show you how.
Your form plugin often directly uploads any file to your WordPress sites. But, if you choose to upload files to Google Drive, your files will be stored in the Google Cloud.
So, in this article, we will share an easy tutorial on uploading files to Google Drive from your WordPress forms.
Before we begin, let us give you a brief overview of why you should upload files from WordPress form to Google Drive.
Why Upload Files from WordPress Form to Google Drive?
Google Drive is a safe, free, cloud-based storage service that enables users to store and access files online.
Some of the reasons why you should upload files from WordPress forms to Google Drive are:
- Google Drive provides you with 15 GB of free storage space.
- It also gives you the reliability of having your documents stored securely.
- With Google Drive, you can access your collected files through forms whenever and wherever.
- You can manage all the uploaded files in a convenient way from a single platform.
Hence, saving all the file uploads from your WordPress forms to a Google Drive is a good idea.
For this, you must have a good form builder tool that helps you upload your forms to Google Drive.
This is where Everest Forms steps in. With its prebuilt templates, you can create any form in minutes.

Integrated with various services, including Stripe, Zapier, Paypal, etc., this plugin is trusted by over 100K users.
Best of all, you can directly upload all the files submitted during a form submission to your Google Drive. You’ll just need the premium version of this plugin to utilize this amazing feature.
With that said, let’s move on to our stepwise guide on how to upload form files to Google Drive.
How to Upload Files From WordPress Form to Google Drive?
Uploading files to your Google Drive from form submissions is super easy with Everest Forms. Let’s look at the step-by-step process to do so in the tutorial below:
Step 1: Install Everest Forms and Everest Forms Pro
The first step would be installing and activating Everest Forms and Everest Forms Pro on your WordPress website.
You must also install the plugin’s premium version since the Google Drive feature is only available with a premium plan. You can choose from any of Everest Forms’ 4 pricing plans.
Once you’ve set up the plugin properly, you can move on to the following step.
Step 2: Create a New Form with a File Upload Field
Now, you must create a custom form to display on the front end of your website.
Specifically, a form with a file upload field allows users to upload and submit the required files.
It can be a contact form, a job application form, a leave request form, etc. It’s up to you!
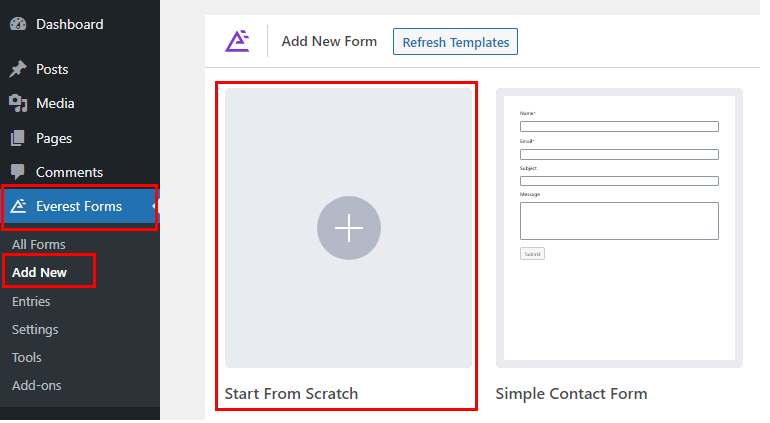
So, navigate to Everest Forms >> Add new. You’ll find a collection of pre-built form templates on the Add New Form page.

However, you can also start from scratch.
In this tutorial, we’ll be creating a file upload form from scratch. So, click on Start From Scratch.
Give your form a name and click Continue. Now, a form builder window will open up.

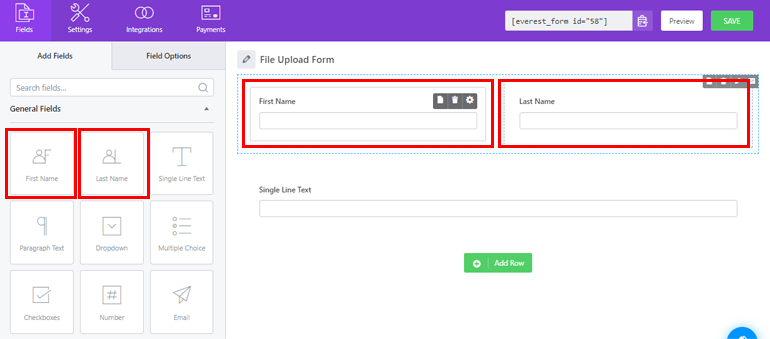
On the left side of your screen, you’ll see form fields that you can add to your form. You can drag and drop the fields to create your form on your right to the desired area.
Make sure you add the File Upload field to the form as well. Using this field, users can upload and submit files through the form.

Moreover, you can customize each form field from the Field Options. Just click on the field you want to edit and its Field Options will appear on the left.

After the form is complete, make sure to save the changes by pressing the Save button.
Step 3: Authenticate Google Drive
The third step is to authenticate your Google Drive account for your WordPress site. Only then, the files will be successfully uploaded to Google Drive.
For that, go to Everest Forms >> Settings. Next, open the Integration tab and click on Google Drive.

You’ll need a Google Client ID and a Google Client Secret code to authenticate Google Drive.
You can learn how to get them from our detailed documentation on how to get Google Client ID and Secret key.
After generating both codes, copy them and return to the Google Drive tab in Everest Forms.

Now, paste them into the respective fields and click on Authenticate with Google Account.
A new window will open where you’ll be asked to Choose an account. Select the existing account or add a new one to grant permission to integrate with Google Drive.

After selecting the Google account and allowing the permission, an access code will generate automatically. Copy the code and paste it into the Enter Access Code field.

Finally, click the Verify Access Code, and your authentication is complete.
Step 4: Enable Google Drive Upload
After you’ve successfully integrated Everest Forms with Google Drive, it’s time to enable Google Drive file upload.
To do this, open the form you created in the second step. In the form builder, open Settings >> General.
Scroll down and search for the External Upload Path option. All you have to do is tick the checkbox for Google Drive File path.

You can now either define the folder path in the input box or leave the box empty. If you leave the input box blank, your file will be directly saved in your drive and not inside any folder.
To give the folder path, you can follow the format below:
/your-drive/folder-name
For example, we’ll give the path as /my-drive/form-uploads. Likewise, you can use the appropriate path for your drive.
Finally, hit the Save button to save the changes.
Step 5: Add Your Form to the Website
For users to be able to upload and submit files to your form, you must display it on your WordPress website.
And to do that, you can simply use the Everest Forms block. So, go to Pages/Posts >> Add New.

Next, click the Add Block (+) button and search for the Everest Forms block.

Add it to the page and select your WordPress form from the drop-down.

And that’s it. Your form is now ready. Finally, you can hit the Publish button at the top.
Wrapping it Up!
And that’s a wrap for our guide on how to upload files to Google Drive from your WordPress forms using Everest Forms.
With its premium version, you can quickly integrate Everest Forms with Google Drive and enable file uploads directly from your forms.
Furthermore, Everest Forms allows you to do much more with all its advanced features. You can create customer support forms and even add a WYSIWYG field in WordPress forms.
You can read more about Everest Forms on our blog. You can also subscribe to our YouTube channel for easy video tutorials.
Also, don’t forget to follow us on Facebook and Twitter for future updates.