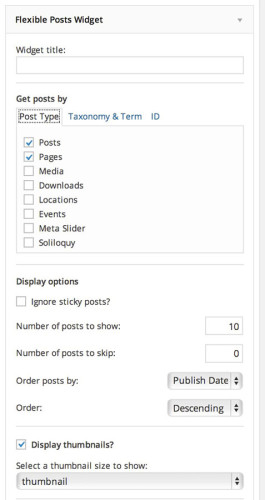
Recently I had a client that needed to display a grid of images in a sidebar widget, each one of which would link to a different page. Previously they had hard coded all the images and links as HTML in a text widget but this was understandably a pain for the client to maintain and update.
I previously used Special Recent Posts as my go-to plugin for this type of thing (although I’m not sure it could handle Pages) but the free version is no longer being updated so I needed a new solution. Fortunately I found the Flexible Posts Widget plugin – the best featured posts widget I think you’ll ever need.
The reason this plugin is awesome is because it truly offers the most flexible options. The default Recent Posts widget in WordPress outputs a list of the titles of your recent blog posts and the only option you have is how many to show. This plugin takes this basic concept and turbocharges it. You can feature regular posts, pages, custom post types or any combination!

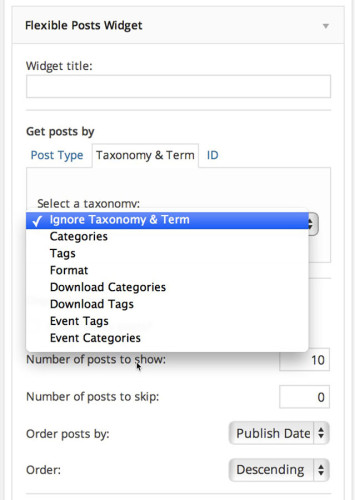
You can also use any taxonomy – whether the regular categories and tags you have for your posts, or any custom taxonomy you have created. Based on that you can have the widget dynamically populate – meaning it could always show whatever your most recent content is for example, without you needing to manually update the widget.

In my use case, the client had specific content he wanted to feature there so he needed to be able to handpick the pages. The plugin offers that feature as well – you can provide it the IDs of whatever posts/ pages to feature.
Page and Post IDs are not intuitive to find by default – you have to look in the URL when on an edit screen to locate the ID. So I use the Reveal IDs plugin to make those easily accessible to the client.

By default the widget will display a list of the post or page titles as a list. The plugin does not add its own styling, so the output is handled by your theme and therefore will match your other widgets. You can choose whether or not to include the featured image as well as the title.
Customizing The Featured Image Size
In my case the client wanted a 2 column layout of small images. The plugin allows you to select which image size to use. By default WordPress creates three image sizes each time you upload a photo – thumbnail, medium and large. The dimensions of those are defined in Settings > Media. Additional custom image sizes for specific purposes can be added – many themes and plugins do this,
In my case the images needed to be smaller than the thumbnail size defined in the client’s site, so I had to create a custom image size that the plugin could use. I needed a new image size of 80 x 80 pixels. To register a new image size I followed the Codex guide.
It’s as simple as adding this code to the child theme’s functions.php :
<?php if ( function_exists( 'add_image_size' ) ) { add_image_size( 'widget-thumb', 80, 80, true ); } ?> As you can see in line 4 of the snippet above, I called my new image size “widget-thumb”. Now when I go into the Flexible Posts widget my new image size is available as an option.

The different image sizes are generated as you upload images to your media library. So for all the pages/posts that had already been created and assigned featured images, the new 80 x 80 size did not yet exist. So I used
the Regenerate Thumbnails plugin to go back through the media library and create the new image size. This means that all the client needs to do is assign a featured image for each page if there isn’t one already, and the widget will pull it in at the correct size.
Customizing The Display Template
Another customization I had to do was to remove the page title from the output of the widget. The client only wanted the images to display, not the page titles. While there isn’t a specific option built in to the plugin interface to remove that, it does have a cool way of handling customization needs. The plugin uses a file called widget.php to control the output. If you want to customize it, all you have to do is copy that file to your theme folder and make your changes there. Your changes remain protected from plugin updates. So it was easy enough for me to do that and remove the line of code that output the post titles. The plugin doesn’t give you the option of including an excerpt by default, but with one other line of code you could easily add that in to the template file.
Overall I like this plugin because it has really flexible options that a beginner can take advantage of, but for developers it offers a great way to customize and take it further.
*header image credit