Here’s an interesting factoid for you. Approximately once every 13 seconds* another blogger posts on an internet forum or group a variation on the following question: “Why does Facebook always show the wrong image when I post a link to my blog ?!!”
This post is a guide to what’s going on and how to make it right.
I preface it with this caveat:
Facebook is a mean ole bully and often changes the way that it operates suddenly and without warning. What works today could become obsolete tomorrow. Today, this is what works.
Get To Know The Open Graph Protocol
The Open Graph Protocol is a particular set of meta data – that is, information about your site, that goes into the code of your site. Both Facebook and Google Plus look for this meta data in order to learn about your website.
When it’s all present and correct your site looks lovely in Facebook.
When it’s not there, they make stuff up based on whatever they can grab.
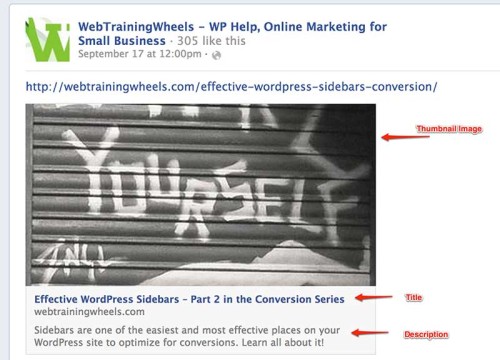
It looks something like this when working correctly:

Check To See If Open Graph Is Implemented On Your Site
If your site is not displaying the correct information when posted to Facebook, that’s a big clue that either you haven’t implemented Open Graph, or something is amiss with the implementation.
There are two ways to check.
1) Use the Facebook URL debugger
The Facebook URL debugger is far more simple than it might sound.
https://developers.facebook.com/tools/debug
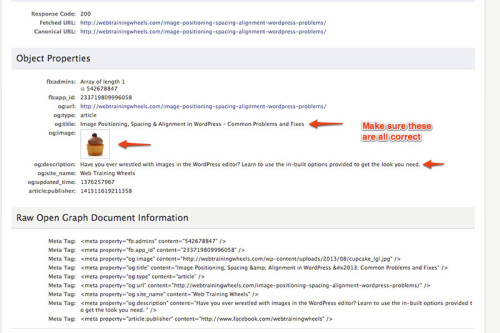
You simply enter a URL in there and it will tell you what information Facebook can see about your site. The debugger lets you see any error messages that Facebook generates as well as the info they are picking up. If it’s not detecting what you thought it should, you then need to check implementation on your site. It might also alert you to information that is missing, or images that are too small.
After you make any changes to your site and you want to test them, make sure to run the site through the debugger before checking it on Facebook again. Facebook caches information on your site, so you need to refresh their cache by using this tool, otherwise you may not see the latest version of the info you have implemented and will want to unnecessarily throw your computer off the balcony.
Here’s how it looks when you enter a url in the debugger:

2) View the page source of your site and look for og: tags

If these aren’t present in your page Facebook will just pick up any info it can find, which, when it comes to images, is not usually the one you intended.
How To Implement Open Graph
There are many WordPress plugins you can use that will add the correct code to your site. Be aware that not only do you need this implemented on a post-by-post and page-by-page basis, but also for the homepage of your site – this is especially important if you have blog posts on your homepage. The open graph info is needed whenever a link to your site is posted on Facebook, so if someone posts a link to your homepage, you need to set some “evergreen” information that pertains to your site/company as a whole. Most plugins also let you set a “default” image, which you could set as your logo, so that in the event your post has no image, or Facebook cannot find it, it will fallback to your logo rather than something random.
Plugins That Implement Open Graph
1) WordPress SEO by Yoast :: Recommended Solution
If you use Yoast’s WordPress SEO plugin, you can enable Open Graph in the social section. Once enabled it makes any images in your post available for use as the thumbnail on Facebook (each image gets its own “og:image” tag) and it will by default use the SEO title and SEO description for the title and description in FB. You can specify a different description for use on Facebook by clicking in the Social tab on each post. Although it offers a field for a Google Plus description, that doesn’t actually seem to work. Google Plus has stopped showing a description altogether lately.
Image Handling:
If you have a featured image and images inside the post, they will each have an “og:image” tag so when you post to Facebook you will have a choice of those images.
WordPress SEO by Yoast also includes the more recently added “article:publisher” property which allows a “like” button for your page to show up along with your story in the news feed. This last feature is really the one that sets it apart from the other plugins I mention below and makes it the most thorough solution. If you need help setting up the WordPress SEO plugin, check out my guide here.
2) All in One SEO pack
The most recent version of this plugin added a new feature called Social Meta which has some really cool controls for handling images and other social info. It still doesn’t include the “article: publisher” tag but if you’re not bothered about that, it’s a good choice if you’re not using Yoast’s plugin.
You have to go into the Feature Manager tab and activate the Social Meta module. It gives you a pretty thorough set of options to specify your Open Graph information including a really cool way to set up a default for image handling. You can choose, for example, whether the default should be the featured image, the first image in the post, a custom field etc. This setting can be over-ridden on any individual post making this implementation probably the most flexible of all the plugins here.

You’ll notice on that screenshot it gives you a way to turn off Jetpack’s social tags so that you can use the two plugins without any conflict.
As with the Yoast plugin, you’ll now find a Social tab on the individual post as well. So you can either choose to use the same SEO title and description or you can specify different info for Facebook.
3) Social SEO Booster
The free version of Social SEO Booster includes enough features to get your site looking good on Facebook. It also includes a way to set up Google Authorship info amongst other things. There is also a paid version with a lot more built in, but for Facebook, the free version works well.
Similar to Yoast and AIOSEO it gives you a panel on every post where you can specify the image, title and description that you want to use on Facebook.
4) Jetpack
Jetpack isn’t my favorite solution for this because it doesn’t really give you much control. But for those users that already have Jetpack installed and connected, and don’t need a granular level of control over this stuff, Jetpack is a fine “set it and forget it” type solution.
If you have Jetpack installed, it will add open graph tags automatically UNLESS you also have Yoast installed in which case Yoast takes precedence.
WordPress SEO by Yoast and Jetpack handle images for Facebook differently. While Yoast gives all images in a post their own tag, which allows the user to choose which one to use when posting on Facebook, Jetpack only picks up the featured image, unless there is no featured image, then it will use any and all images from inside the post.
What Size Should Your Facebook Thumbnail Image Be?
This is something that Facebook changes pretty often. They used to be mostly square images or close to it, but now they are featuring much larger images in the news feed when you post a link, so currently images that are more horizontally oriented will look the best.
According to Facebook’s developer documentation about the open graph properties:
“We suggest that you give us an image of at least 600×315 pixels. However, bigger is better, so if you have a 1200×630 or larger image that you can use, please give it to us. Also, we recommend that you keep images as close to a 1.91:1 aspect ratio as possible to avoid cropping. (Note: image sizes must be no more than 5MB in size.) “
However keep an eye on the above link for the most current information.
Hopefully this helps you make sense of the confusing world of Facebook!
* Totally made up stat, but sounds about right to me 🙂