Softaculous is an application installer that automates setting up various management systems. In this case, it will install WordPress and its database after just a few pieces of information from yourself. It’s a quick and easy way to set up a website without having to learn a single line of code.
In today’s tutorial, I’m going to show you how to install WordPress with Softaculous. In mere moments, you can start promoting your website and begin building something spectacular.
What Is WordPress?
WordPress is the most popular content management system on the Internet. It’s a platform that allows anyone regardless of skill level to build amazing websites without knowing how to program in HTML or PHP.
From the themes you choose to the plugins you install, it’s an easy system if you want a website up and ready within minutes.
Step 1: Open the Softaculous App Installer
When you have a GreenGeeks hosting account, you’ll have access to cPanel. This is a versatile administrative dashboard that gives you control over many aspects of your website.
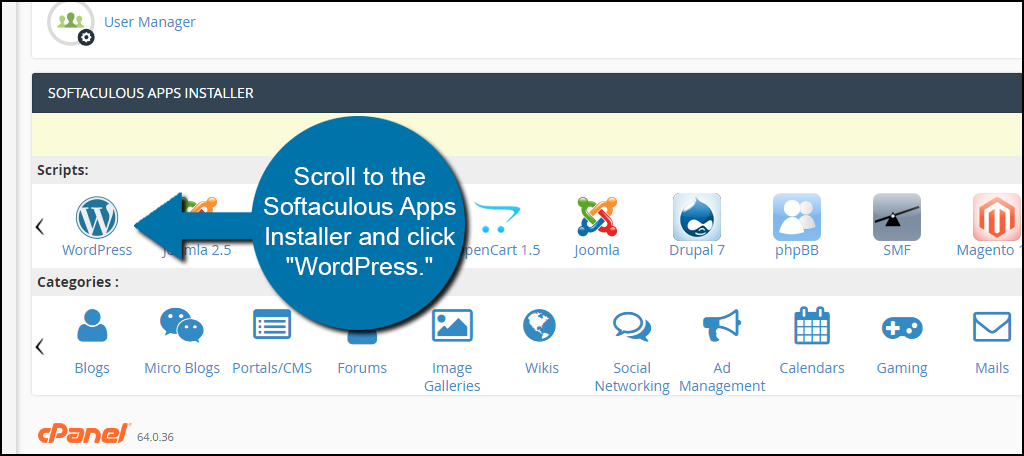
From cPanel, scroll to the Softaculous Apps Installer and click “WordPress.”

Step 2: Install WordPress
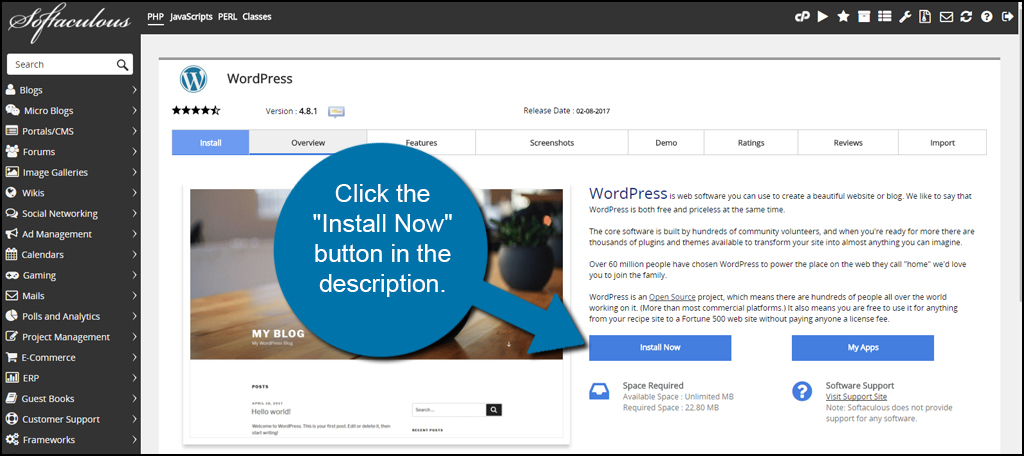
From the Softaculous script window, click the “Install Now” button in the description. The Softaculous software will usually have the most recent version of WordPress available. If you want to install an older version, you may have to do it manually.

In the next screen, you will need to input all of your website’s settings. Let me break them down a bit for you:
- Software Setup
In this section, you’ll choose whether your site uses SSL protocols or not. This is done by selecting which “http:” version you want to use from the drop down options. You’ll also pick your domain. If you only have one domain name, it will be displayed automatically. Otherwise, you’ll have to select it from the list. - Site Settings
This is the basic information of your website. You’ll put in your site’s name and a short description. This will be used by most themes as well as the WordPress system for identification purposes. It will also play a part in search engine optimization, so make sure the information is something you want seen in sites like Google. - Admin Account
Input the admin username and password you want to use to log into WordPress. I suggest never using the name “admin” as the administrator username. It’s the first thing bots and hackers will try when attempting to access your website. Make it something completely unique to you. - Admin Email Address
This address is only used by WordPress itself and is not available publicly. Plugins you install may also use this address to send you messages or updates. It can also be used for password recovery should you forget or lose your login credentials. - Choose Language
This is set as English by default. However, you have the option of using many different language types for WordPress. Choose one that is ideal for you and your website. - Select Plugins
Softaculous often comes with a couple of Plugins readily available should you choose. GreenGeeks displays “Loginizer” and “WPForms Lite.” These two plugins are very helpful for those who want to protect the login screen and create forms such as what you would use for contact information. Click the check boxes to activate or deactivate these optional plugins. - Advanced Options
Advanced options are for those who have a firm grasp of databases, upgrades and backup control. You can customize these elements if you wish, but I would suggest new users to leave these settings. - Select Theme
WordPress comes with a few themes readily available. These files dictate how your website appears. In Softaculous, you can choose from a wide variety of layouts. Simply click the one you want to install with WordPress and Softaculous will do the rest. Please note that you can change themes at any time and as often as you like.
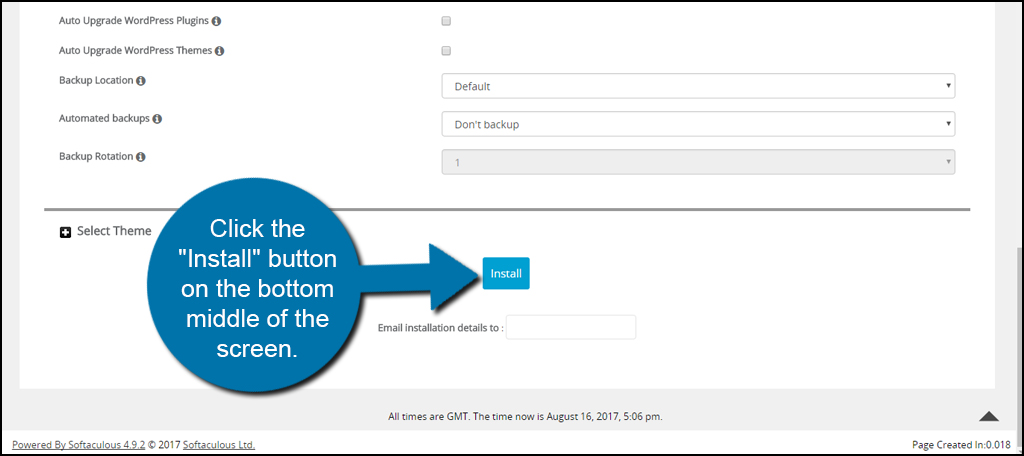
NOTE: At the bottom of the screen, below the “Install” button, you can assign an email address to send installation details. It may be helpful to have a record of the process. However, this is completely optional.
Once you’re done fine-tuning WordPress, click the “Install” button on the bottom middle of the screen.

Softaculous will then analyze your information and settings while installing the WordPress CMS onto your website.

After the installation is complete, Softaculous will give you a couple of links. One is the URL of your new website while the other is the admin address. Click the link next to “Administrative URL” to visit the login screen and access your site.

Bookmark this URL so you can find it easier at a later date.
Step 3: Install Your Plugins
One of the most amazing parts of WordPress is how you have access to more than 45,000 plugins. These small apps of sorts are available to help build just about any kind of website you can think of. After installing a plugin, your WordPress website has more functionality.
Before you get started created content, though, there are a few plugins I would suggest installing first.
Jetpack

Jetpack is a plugin that comes with a variety of modules. These modules are like small plugins themselves, and many of them are very beneficial. For example, the primary reason I use Jetpack is because of Proofread and Publicize. The proofreading module itself is worth the install as it scans for misspellings as well as grammatical errors.
Yoast SEO

Yoast SEO is a great tool for boosting search engine optimization. Not only does it help your content in sites like Google, but it will also give you suggestions about how to create better content. Yoast SEO comes with its own editing tools, meta data control and more for enhancing how your site appears in search results.
Wordfence Security

Before you start building up your website, it’s a good idea to have some form of security in place. Wordfence Security is one such tool that helps keeps your site protected from malicious coding and hackers. It’s one of the most used plugins for WordPress and is free. From file scanning to blocking features, you can rest well knowing your site is shielded.
TinyMCE Advanced

TinyMCE Advanced adds a new layer to the WordPress editor for those who want more control over text formatting. The editor built into WordPress is good, but this plugin extends what you can do. TinyMCE Advanced essentially turns the WordPress visual editor into a system similar to most word processors. It uses a drag-and-drop interface so you can easily add or remove editing tools.
W3 Total Cache

Speed is an important part of performing well for both search engines and your visitors. W3 Total Cache helps by caching common elements of your website for quick and easy access. This means there is less time spent downloading the various elements of your site. Your visitors will have a better experience and engines will rank your site higher in search results.
Plenty of Plugins to Choose From
The above list is just a small taste of what’s available in WordPress. These are just the basics as you’ll want to spend time looking for plugins that will accentuate your own content. For instance, health bloggers can easily find nutritional information displays to add to a post which look just like the ones from a package of food.
The hardest part is deciding which plugins to use as many will have competition.
Installing WordPress Using Softaculous is Just the Beginning
After you install WordPress, it’s time to get started creating content and building an attractive site people will love. Whether you want to start a blog to make money or plan on selling products from an online store, WordPress is a strong platform to use. Get your creative juices flowing and design the next biggest online craze.
What kind of a website are you planning to design? What kind of plugins do you prefer when setting up your site for the first time?
The post How to Install WordPress Using Softaculous appeared first on GreenGeeks.