How do I setup a firewall with UFW (uncomplicated firewall) on an Ubuntu Linux 18.04 LTS server to restrict traffic on my personal Ubuntu web-server that hosts my cat’s blog? How do I set up a firewall with UFW on Ubuntu 18.04 LTS?
Introduction : UFW is an acronym for an uncomplicated firewall. Securing a network with the uncomplicated firewall is super easy. The Ubuntu Linux comes with packet filtering called Netfilter. The iptables frontend command used to manage netfilter. However, ufw provide easy to use frontend for netfilter, and it is one of the most popular among Ubuntu sysadmins and developers. This page shows how to set up and secure your Ubuntu 18.04 LTS server with ufw.
How to setup a UFW firewall on Ubuntu Linux 18.04 LTS
The procedure to set up a firewall with UFW on Ubuntu 18.04:
- Make sure ufw installed
- Setup a default deny firewall policy with ufw on Ubuntu
- Open required ports with sudo ufw allow port syntax on Ubuntu
- At least you need to open SSH, HTTP/HTTPS and other TCP/IP ports using ufw.
- Enable ufw with sudo ufw enable
- Delete ufw rules ufw delete num command
- Check the status of netfilter with ufw status
- Disable ufw if needed
Let us see all commands to set up and securing your Ubuntu Linux 18.04 LTS server.
Ubuntu setup UFW firewall
By default UFW installed with Ubuntu. If not installed for some reason or removed by the previous sysadmin, type the following apt-get command/apt command to install UFW in Ubuntu:$ sudo apt update
$ sudo apt install ufw
How do I view status of ufw on Ubuntu?
Type the following:$ sudo ufw status
Sample outputs:
Status: inactive
Setting up default UFW policy
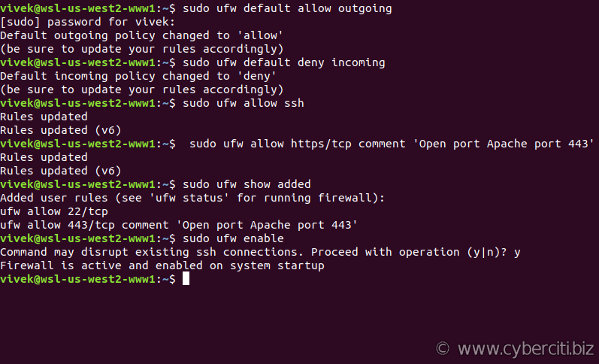
The default policy firewall works out well for both the servers and laptop/workstation as you only need to open a limited number of incoming ports. It is a good policy as it closes all ports on the server/firewall and you need to open ports one by one. You can run the following commands to set the system to block all incoming connection and only allow outgoing connections from the Ubuntu:$ sudo ufw default allow outgoing
$ sudo ufw default deny incoming
How to add a new rule to allow SSH access
Type the following command to allow SSH connections to your server:$ sudo ufw allow ssh
ORsudo ufw allow 22/tcp
Say if you are running ssh on port 2020, enter:$ sudo ufw allow 2020/tcp
The following rules allow access to tcp ssh port 22 only on 10.8.0.1 (i.e. your ssh server is listing on 10.8.0.1 port 22) from anywhere:$ sudo ufw allow proto tcp from any to 10.8.0.1 port 22
The following rules allow access to tcp ssh port 22 only on 10.8.0.1 (i.e. your ssh server is listing on 10.8.0.1 port 22) from 10.8.0.2 IP address only:$ sudo ufw allow proto tcp from 10.8.0.2 to 10.8.0.1 port 22
How do I add a comment for the ufw rule on Ubuntu?
The syntax is:$ sudo ufw rule comment 'my comment here about rule'
For example allow only TCP traffic over HTTPS (TCP port 443):$ sudo ufw allow https/tcp comment 'Open port Apache port 443'
You can view all added rules before enabling or starting the firewall on Ubuntu:$ sudo ufw show added
How to enable the UFW based firewall
Simply run:$ sudo ufw enable

Once enabled, the firewall runs after reboots too.
How do I disable the UFW based firewall?
If you need to stop the firewall and disable on system startup, excute:$ sudo ufw disable
Sample outputs:
Firewall stopped and disabled on system startup
How do I check the status of my fiewall rules?
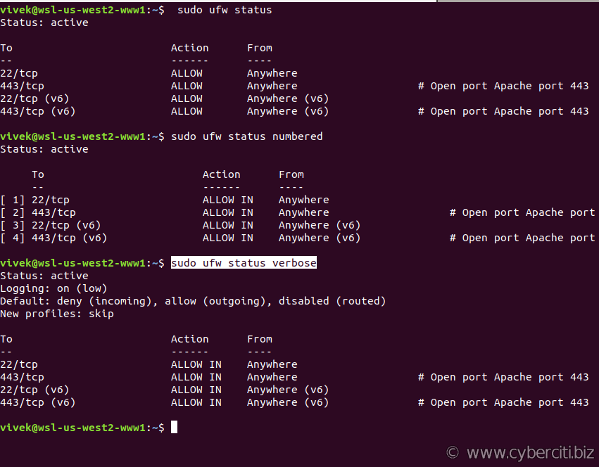
Use the status command:$ sudo ufw status
$ sudo ufw status numbered
$ sudo ufw status verbose

How to add more rules (open ports and allow IP address) with ufw
The syntax is as follows to open tcp port 80 and 25:$ sudo ufw allow 80/tcp
$ sudo ufw allow 25/tcp comment 'accept email'
Open UDP/1194 (OpenVPN) server:$ sudo ufw allow 1194/udp
How to allow port ranges via ufw
You can allow port ranges too say, tcp and udp 4000 to 6000:$ sudo ufw allow 4000:6000/tcp
$ sudo ufw allow 4000:6000/udp
Say you want to allow connections from an IP address called 1.2.3.4, enter:$ sudo ufw allow from 1.2.3.4
Let us allow connections from an IP address called 1.2.3.4 to our port 22, enter:$ sudo ufw allow from 1.2.3.4 to any port 22 proto tcp
OR (dest 222.222.222.222 port 22)$ sudo ufw allow from 1.2.3.4 to 222.222.222.222 port 22 proto tcp
How to allow incoming MySQL/MariaDB traffic (open port 3306)
Allow access to MySQL/MariaDB port 3306 from selected subnet only (see MySQL/MariaDB remote access tutorial):$ sudo ufw allow from 192.168.1.0/24 to any port 3306
Allow access to MySQL/MariaDB port 3306 Apache server only:$ sudo ufw allow from 202.54.1.1 to any port 3306
Set up and allow PostgreSQL traffic by opening port 5432
Allow access to PostgreSQL port 5432 from selected subnet only (see PostgreSQL remote access tutorial):$ sudo ufw allow from 192.168.1.0/24 to any port 5432
Allow access to PostgreSQL port 5432 Apache server only:$ sudo ufw allow from 202.54.1.1 to any port 5432
Open incoming IMAP/IMAPS mail server ports
$ sudo ufw allow 143
$ sudo ufw allow 993
POP3/POP3S port opened with ufw
$ sudo ufw allow 110
$ sudo ufw allow 995
How to denying access to port or connections
Do you want to close ports and block IP address? The syntax is as follows to deny access (i.e. simply ignoring access to port 443):$ sudo ufw deny 443/tcp
Make sure you deny all connections from an IP address called 1.2.3.4, enter:$ sudo ufw deny from 1.2.3.4
Deny all connections from an IP/subnet called 123.45.67.89/24, enter:$ sudo ufw deny from 123.45.67.89/24
Want to deny access to 1.2.3.4 (say hackers IP) on port 22? Try:$ sudo ufw deny from 1.2.3.4 to any port 22 proto tcp
How to reject access to port or connections (reject and let user know they are blocked by the firewall)
The deny syntax simply ignores traffic. If you want let the sender know when traffic is being denied, rather than simply ignoring it, use reject syntax:$ sudo ufw reject in smtp
$ sudo ufw reject out smtp
$ sudo sudo ufw reject 1194 comment 'No more vpn traffic'
$ sudo ufw reject 23 comment 'Unencrypted port not allowed'
If somebody try to connect to port 23 they will get reject message as follows:
telnet: Unable to connect to remote host: Connection refused
How to delete the UFW firewall rules
So far you learned how to add, deny, and list the firewall rules. It is time to delete unwanted rules. There are two options to deleting rules. The first syntax is:$ sudo ufw delete {rule-here}
In this example, delete HTTPS (tcp port 443) traffic rule,$ sudo ufw delete allow 443
If you no longer wished to allow smptd/email (port 25) traffic, execute:$ sudo ufw delete allow 25
The second option is to list list all of the current rules in a numbered list format:$ sudo ufw status numbered
Sample outputs:
Status: active To Action From -- ------ ---- [ 1] 22/tcp ALLOW IN Anywhere [ 2] 443/tcp ALLOW IN Anywhere # Open port Apache port 443 [ 3] 22/tcp (v6) ALLOW IN Anywhere (v6) [ 4] 443/tcp (v6) ALLOW IN Anywhere (v6) # Open port Apache port 443 |
To delete 2nd and 4th rule (rule that allows TCP/443 access, you type the command:$ sudo ufw delete 2
$ sudo ufw status numbered
$ sudo ufw delete 3

How do I reset the ufw based firewall?
Run:$ sudo ufw reset
How do I reload the ufw based firewall?
You can reload firewall with:$ sudo ufw reload
When you edit UFW’ configuration file, you need to run reload command. For example, you can edit /etc/ufw/before.rules, enter:$ sudo nano /etc/ufw/before.rules
OR$ sudo vi /etc/ufw/before.rules
To allow all traffic fro eth0 to eth0 (add after line that read as “# End required lines”), enter:
# allow all on eth0
-A ufw-before-input -i eth0 -j ACCEPT
-A ufw-before-output -o eth0 -j ACCEPT
Save and close the file. Reload the firewall:$ sudo ufw reload
How do I see the firewall logs?
By default all UFW entries are logged into /var/log/ufw.log file. Use grep command/more command/tail command and other command to view the ufw logs:$ sudo more /var/log/ufw.log
$ sudo tail -f /var/log/ufw.log
How do I see the ufw reports?
The added report displays the list of rules as they were added on the command-line:$ sudo ufw show added
$ sudo ufw show listening
Other possible reports are:$ sudo ufw show raw
$ sudo ufw show builtins
$ sudo ufw show before-rules
$ sudo ufw show user-rules
$ sudo ufw show after-rules
$ sudo ufw show logging-rules
Conclusion
In this guide, you learned how to secure your Ubuntu Linux 18.04 LTS server with the help of ufw. For more info, please see ufw help page here.