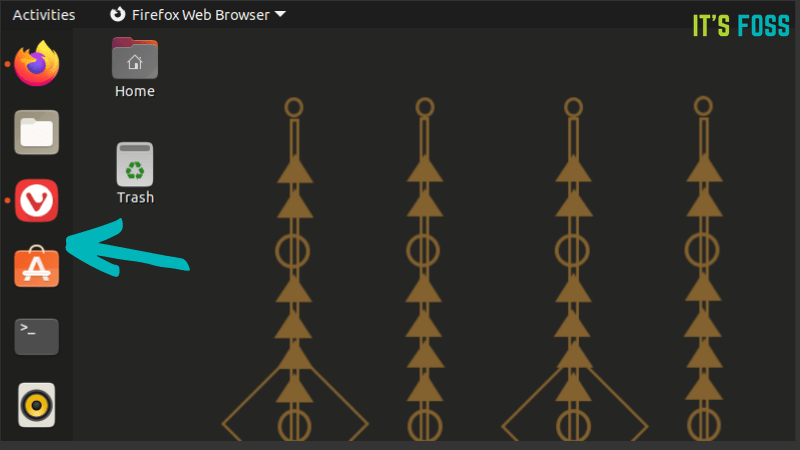
When you log into Ubuntu, you’ll see the dock on the left side with some application icons on it. This dock (also known as launcher or sometimes as panel) allows you to quickly launch your frequently used programs.

I rely heavily on the dock and I am going to share a few tips about using the dock effectively and customize its looks and position.
You’ll learn the following in this tutorial:
- Basic usage of the dock: adding more applications and using shortcuts for launching applications.
- Customize the looks of the dock: Change the icon size, icon positions.
- Change the position: for single screen and multi-monitor setup
- Hide mounted disk from the dock
- Auto-hide or disable the dock
- Possibility of additional dock customization with dconf-editor
- Replace dock with other docking applications
I’ll use the terms dock, panel and launcher in the tutorial. All of them refer to the same thing.
Using the Ubuntu dock: Absolute basic that you must know
If you are new to Ubuntu, you should know a few things about using the dock. You’ll eventually discover these dock features, I’ll just speed up the discovery process for you.
Add new applications to the dock (or remove them)
The steps are simple. Search for the application from the menu and run it.
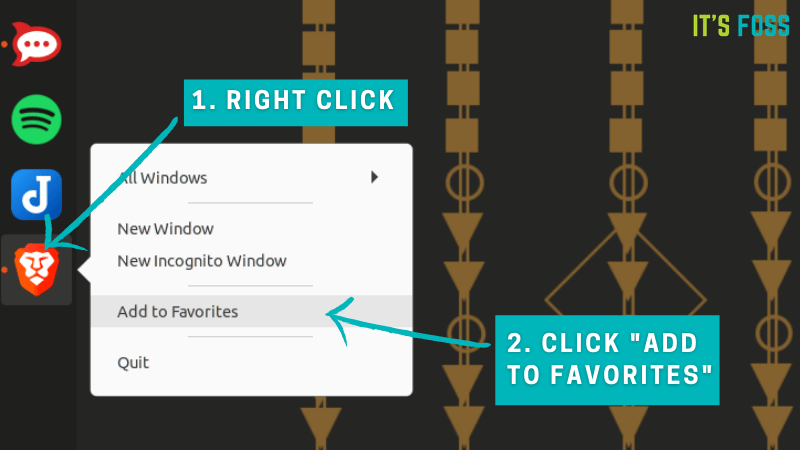
The running application appears in the dock, below all other icons. Right click on it and select the “Add to Favorites” option. This will lock the icon to the dock.

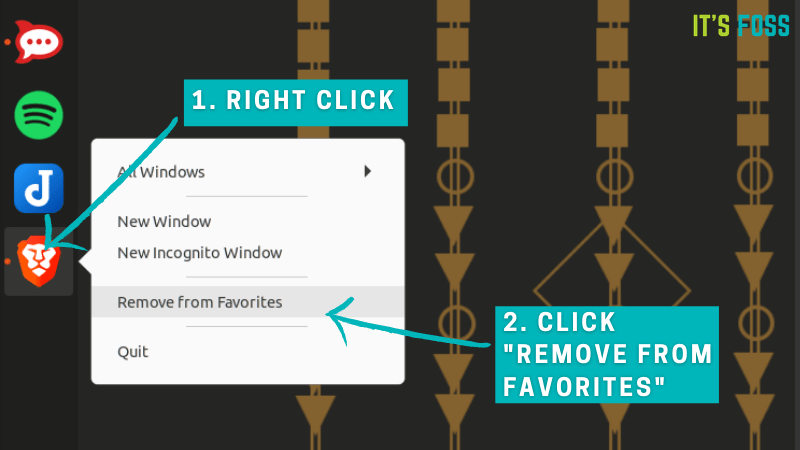
Removing an app icon from the doc is even easier. You don’t even need to run the application. Simply right click on it and select “Remove From Favorites”.

Reorder icon position
By default, new application icons are added after all the other icons on the launcher. You don’t have to live with it as it is.
To change the order of the icons, you just need to drag and drop to the other position of your choice. No need to “lock it” or any additional effort. It stays on that location until you make some changes again.

Right click to get additional options for some apps
Left-clicking on an icon launches the application or bring it to focus if the application is already running.
Right-clicking the icon gives you additional options. Different applications will have different options.< /p>
For browsers, you can open a new private window or preview all the running windows.

For file manager, you can go to all the bookmarked directories or preview opened windows.
You can, of course, quit the application. Most applications will quit while some applications like Telegram will be minimized to the system tray.
Use keyboard shortcut to launch applications quickly [Not many people know about this one]
The dock allows you to launch an application in a single mouse click. But if you are like me, you can save that mouse click with a keyboard shortcut.
Using the Super/Window key and a number key will launch the application on that position.

If the application is already running, it is brought to focus, i.e. it appears in front of all the other running application windows.
Since it is position-based, you should make sure that you don’t reorder the icons all the time. Personally, I keep Firefox at position 1, file manager at 2 and the alternate browser at 3 and so on until number 9. This way, I quickly launch the file manager with Super+2.
I find it easier specially because I have a three screen setup and moving the mouse to the launcher on the first screen is a bit too much of trouble. You can enable or disable the dock on additional screen. I’ll show that to you later in this tutorial.
Change the position of the dock
By default, the dock is located on the left side of your screen. Some people like the launcher at the bottom, in a more traditional way.
Ubuntu allows you to change the position of the dock. You can move it to the bottom or to the right side or on the top. I am not sure many people actually put the dock on the top or the right side, so moving the dock to the top is not an option here.

To change the dock position, go to Settings->Appearance. You should see some options under Dock section. You need to change the “Position on screen” settings here.

Position of dock on a multiple monitor setup
If you have multiple screens attached to your system, you can choose whether to display the dock on all screens or one of chosen screens.

Personally, I display the dock on my laptop screen only which is my main screen. This gives me maximum space on the additional two screens.
Change the appearance of the dock
Let’s see some more dock customization options in Ubuntu.
Imagine you added too many applications to the dock or have too many applications open. It will fill up the space and you’ll have to scroll to the top and bottom to go to the applications at end points.
What you can do here is to change the icon size and the dock will now accommodate more icons. Don’t make it too small, though.


To do that, go to Settings-> Appearance and change it by moving the slider under Icon size. The default icons size is 48 pixels.

Hide mounted disks from the launcher
If you plug in a USB disk or SD Card, it is mounted to the system, and an icon appear in the launcher immediately. This is helpful because you can right click on it and select safely remove drive option.

If you somehow find it troublesome, you can turn this feature off. Don’t worry, you can still access the mounted drives from the file manager.
Open a terminal and use the following command:
gsettings set org.gnome.shell.extensions.dash-to-dock show-mounts falseThe changes take into effect immediately. You won’t be bothered with mounted disk being displayed in the launcher.
If you want the default behavior back, use this command:
gsettings set org.gnome.shell.extensions.dash-to-dock show-mounts trueChange the behavior of dock
Let’s customize the default behavior of the dock and make it more suitable to your needs.
Enable minimize on click
If you click on the icon of a running application, its window will be brought to focus. That’s fine. However, if you click on it, nothing happens. By default, clicking on the same icon won’t minimize the application.
Well, this is the behavior in modern desktop, but I don’t like it. I prefer that the application is minimized when I click on its icon for the second time.
If you are like me, you may want to enable click to minimize option in Ubuntu:
To do that, open a terminal and enter the following command:
gsettings set org.gnome.shell.extensions.dash-to-dock click-action 'minimize'Auto-hide Ubuntu dock and get more screen space
If you want to utilize the maximum screen space, you can enable auto-hide option for the dock in Ubuntu.
This will hide the dock, and you’ll get the entire screen. The dock is still accessible, though. Move your cursor to the location of the dock where it used to be, and it will appear again. When the dock reappears, it is overlaid on the running application window. And that’s a good thing otherwise too many elements would start moving on the screen.
The auto-hide option is available in Settings-> Appearance and under Dock section. Just toggle it.

If you don’t like this behavior, you can enable it again the same way.
Disable Ubuntu dock
Auto-hide option is good enough for many people, but some users simply don’t like the dock. If you are one of those users, you also have the option to disable the Ubuntu dock entirely.
Starting with Ubuntu 20.04, you have the Extensions application available at your disposal to manage GNOME Extensions.

With this Extensions application, you can easily disable or re-enable the dock.

Advanced dock customization with dconf-editor [Not recommended]
The dconf editor gives you additional options to customize the dock in Ubuntu. Install it from the software center and then navigate to org > gnome > shell > extensions > dash-to-dock. You’ll find plenty of options here. I cannot even list them all here.

Replace the dock in Ubuntu
There are several third-party dock applications available for Ubuntu and other Linux distributions. You can install a dock of your choice and use it.
For example, you can install Plank dock from the software
center and use it in similar fashion to Ubuntu dock.

Disabling Ubuntu Dock would be a better idea in this case. It won’t be wise to use multiple docks at the same time.
Conclusion
This tutorial is about customizing the default dock or launcher provided in Ubuntu’s GNOME implementation. Some suggestions should work on the dock in vanilla GNOME as work well.
I have shown you most of the common Ubuntu dock customization. You don’t need to go and blindly follow all of them. Read and think which one suits your need and then act upon it.
Was it too trivial or did you learn something new? Would you like to see more such tutorials? I welcome your suggestions and feedback on dock customization.