If you’ve read the articles I’ve written before, you probably already know that I’m a big fan of the print-on-demand business model – and an even bigger fan of Gelato, the sustainability-first print on demand company.
Usually, I advise creators and store owners to use Gelato alongside Shopify – my favorite ecommerce platform. But, if you already have a WordPress site you want to upgrade, don’t worry.
Gelato also integrates with WooCommerce – the world’s leading WordPress ecommerce plugin – and connecting the dots between the two tools is easier than you’d think.
The integration process is a little more complex than connecting Gelato to something like Shopify or Etsy. Fortunately, I’m here to guide you through every step.
Let’s get started.
60-Second Summary
- The Print on Demand Market is booming: With growth rates around 25.8%, print on demand is an increasingly attractive business model for entrepreneurs and creators who love the idea of custom products without inventory hassles.
- Gelato and WooCommerce are a great combo: Pairing WooCommerce’s open-source flexibility with Gelato’s global, eco-friendly production network is a match made in POD heaven. WooCommerce is endlessly customizable, and Gelato ships to 200+ countries with local production, which often translates to lower shipping costs and faster delivery.
- Choosing the right products is crucial: I’d definitely recommend exploring Gelato’s range of high-quality print products for the best results. If you want to really stand out, consider taking advantage of the Gelato Personalization Studio too.
- Quick Shipping Setup: Gelato offers live rates, so customers see accurate shipping costs at checkout. Local production in different regions speeds up delivery and can lower carbon emissions
- Final Thoughts: Start small with a handful of products, track your analytics, and expand your catalog gradually. The Gelato + WooCommerce combo is flexible, scalable, and ideal for anyone serious about building a thriving POD business.
Why Gelato and WooCommerce?
As I said before, Shopify is generally my go-to platform for ecommerce, but if you’re looking for flexibility, endless customization options, and relatively low monthly costs, WordPress and WooCommerce make a great pair.
As part of the WordPress family, WooCommerce has massive flexibility baked in. You’re not locked into a single site-building philosophy, and you can easily tap into a near-endless library of plugins to tailor your store to your preferences.
Gelato, on the other hand, is one of the best print on demand services I’ve used so far – and I’ve tried a lot. It’s particularly good if you’re looking for high-quality paper products, a focus on sustainability, and solutions for fast, local production and delivery.
Plus, Gelato’s integration for WooCommerce comes with pre-set shipping rules, so you can save a lot of time on fine-tuning your fulfillment strategy.
How to Use Gelato with WooCommerce
First things first, WooCommerce is one of numerous sales channel options you can choose from with Gelato as your POD vendor. The setup process isn’t quite as simple as it is with Shopify – but you should still be able to get things up and running pretty fast.
The most important thing to keep in mind is that Gelato’s WooCommerce integration does have some limitations. It doesn’t support Namecheap hosting, and only works with WooCommerce version 2.4.8 or above.
You also need an HTTPS connection, access to WooCommerce REST APIs, and you might need to whitelist Gelato’s API addresses too.
With that out of the way, let’s dive into the steps.
Step 1: Creating Your Accounts
Before you can use Gelato and WooCommerce together you’ll need accounts with both solutions. With WooCommerce, you’ll need a WordPress website, and you’ll need to install the WooCommerce plugin.
One quick thing to keep in mind here is that while the WooCommerce plugin is free, you will need to pay for things like hosting, payment gateway fees, and customizations.
Once you have your WordPress site set up and your WooCommerce account, you’ll need to sign up for Gelato. Again, you can do this for free on the Gelato website – and I’d recommend starting with a free plan if you’re a beginner.
You can always choose to upgrade to one of the premium plans later, if you want extra features and tools.
Additionally, keep in mind that if you want to use the Personalization Studio (so your customers can create custom products), there’s an extra fee to consider here.
I’d recommend taking some time to make sure you’re comfortable with all of the features of both WooCommerce and Gelato before you start the integration process – as this should help you to streamline the next few steps.
Step 2: Enabling REST APIs and Configuring Permalinks
To use Gelato with WooCommerce, you need the WooCommerce “REST API” to be activated. Gelato relies on this API connection to access and manage products, orders and fulfillment settings – so if the API isn’t configured properly, you’re going to have issues.
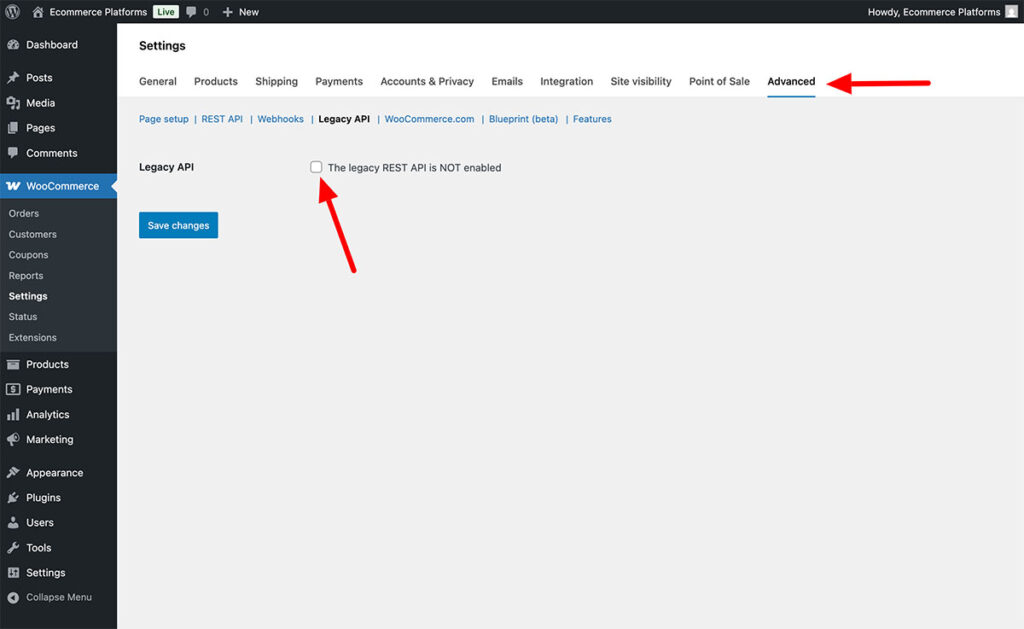
To enable the API, access the admin panel on your WooCommerce store. Click on the Settings tab, followed by the Advanced option, and you should see the “Legacy API” tab.
Toggle the option to “enable” the legacy REST API on, and save your changes.
Once you’re sure the REST API is connected, go back to your Settings, and click on the Permalinks tab. You’ll need to make sure that your permalink structure isn’t set to “Plain”. Choose a custom structure that supports rewriting, and save your changes.
If you’re having a hard time checking whether your API is working properly, you can visit https://[yourwebsitename]/wc-api/v1/. If you see JSON code, this generally means the API is working – so you’re on the right track.
Step 3: Installing the Gelato Plugin
Now you’re all set up with the right accounts, log into your WordPress admin panel, and click on Plugins then “Add New”. Search for Gelato and install the official plugin.

It might take a few minutes for the plugin to install, but once it’s ready, you should see a “Gelato” tab or menu item in WooCommerce.
Click on it and look for a button labelled “Connect to Gelato”. You’ll be asked to log into your Gelato account (or confirm the log-in), and approve permission requests so WooCommerce and Gelato can talk to each other.
When everything’s connected properly, you’ll see a confirmation message. At this point, WooCommerce and Gelato are officially synced!
Step 4: Choosing and Designing Gelato Products
This is where the fun stuff really begins – designing your products. Gelato offers a wide range of products: T-shirts, sweatshirts, hoodies, mugs, tote bags, stickers, wall art (posters, canvas prints, metal prints), greeting cards, and more.
If you’re uploading a lot of products or building out your store from scratch, it’s also worth noting that Gelato’s new CreateAI tools are now available on the free plan.
These include things like instant mockup generation, faster product publishing, and easier migration if you’re switching from another print on demand tool.
Nothing game-changing, but it speeds up the process-especially when you’re working on a big launch or store overhaul.
Personally, I really like the company’s brilliant range of art prints and posters – and definitely recommend starting there if you’re looking for some unique options.
Regardless of what you want to sell, here’s how you can start creating:
- In your WordPress dashboard, under “Gelato,” you’ll usually find an option to “Add Products” or “Browse Catalog.” This takes you to the Gelato product selection interface.
- Browse through the categories and select the item you want to sell – you should be taken straight to the Gelato design editor.
- Upload your artwork or files, browse through stock images, and make tweaks to the design placement and colors. Pay attention to Gelato’s notifications – the platform will tell you if the resolution of your images is too low.
- Select any extra branding elements (like custom labels), create mock-ups, and save your product as a template. Make sure you update all the product information sections, like your title, descriptions, tags, pricing, and collection information.
Once you’re happy, click “Publish”, and Gelato should send the product details to WooCommerce, so you can create a new product page in your WordPress dashboard. If you have any issues, Gelato has some useful FAQ insights here.
Step 5: Setting up your Shipping Settings
Shipping can be a deal-breaker for many shoppers – especially if they get to checkout and discover sky-high costs or long delivery times.
Gelato simplifies this by offering live shipping rates directly within WooCommerce. All you need to do is log into your WooCommerce dashboard, and go to the Settings page, followed by the Shipping tab.
If you’ve established the integration correctly, you should see “Gelato Shipping” as an option. You can then choose how you want shipping rates to be displayed on the checkout page.
Remember, WooCommerce typically organizes shipping by “zones,” like specific countries or regions. Make sure each zone is set up correctly.
You can assign Gelato’s shipping method to any zone you’d like to serve. You should be able to showcase live shipping rates on your website, but you can choose to set custom flat rates instead.
I’d recommend testing your checkout flow after you’ve enabled these settings – to make sure everything is easy to understand for your customers.
Step 6: Enabling Personalization Options
If you really want to stand out in the POD market, you can give customers the option to add their own custom elements to products.
Technically, Gelato’s Personalization Studio currently only works with Etsy and Shopify, but you can still allow customers to upload custom images and send them to you – so you can make design tweaks yourself.
If you do that, though, you’re going to need to active the “manual approval workflow”. This basically allows you to manually approve each order before it goes to the Gelato production team.
To enable this, go to the Stores section in your Gelato dashboard, and choose your WooCommerce store. Switch the setting for “Order Approval” to manual, and save your changes.
Remember, you’ll need to manually confirm each order “pending approval” before Gelato starts working on it, so make sure you keep a close eye on your orders.
Quick Tips for Success with Gelato and WooCommerce
You’ve got your WooCommerce store up, your Gelato plugin configured, and your products ready to go. All that’s really left to do is to build a strategy to reel in customers. Here are some quick tips to help boost your chances of success.
- Upgrade Your Product Pages: Write detailed, benefit-driven descriptions that speak to your audience. If you’re selling T-shirts, talk about the fabric weight, print quality, and comfort level. If it’s art prints, mention the paper type, durability, and how they brighten up any room. Remember to add high-quality mockups and photos.
- Promote on Social Media: Share behind-the-scenes design processes on Instagram Stories, run Pinterest boards with your best products, or create TikTok videos showing off your product mockups. Visual platforms work wonders for POD businesses.
- Collaborate: If you’re not a designer yourself, partner with an illustrator or photographer. If you do have design skills, consider collaborating with an influencer who can help you reach a broader audience.
- Highlight Gelato’s Strengths: Draw attention to the environmental sustainability of your products, the quick delivery times, or the incredible product quality. Consider giving your customers the option to customize their own products.
- Experiment with Promotions: Don’t be afraid to run limited-time sales to stimulate urgency, or to bump up the price for premium personalization. Test different approaches and track results. Remember to analyze your sales analytics and reports regularly.
Get Started with Gelato and WooCommerce
Personally, I still don’t think WooCommerce is the best platform to use alongside Gelato – but it could be a good pick if you’re looking for a highly customizable and flexible website building system.
You could always consider starting small with a few simple product ideas – then as you scale up, experiment with other ecommerce platforms, like Shopify, or marketplaces like Etsy.
Once you dive in, focus on developing a strong, memorable brand, and building powerful connections with customers, by highlighting your focus on product quality, and sustainability.
Keep an eye on industry trends, talk to other POD entrepreneurs, and don’t be afraid to pivot if something isn’t working.
Now you’re all set to carve out your own little corner of the booming print-on-demand market. Good luck!


