Transferring a WordPress website is relatively easy. However, it may be time-consuming depending on the number of files and the size of the database. For exceptionally large websites, the file transfer may take anywhere from a few minutes to more than an hour. Of course, this depends on how fast your Internet connection is.
Today, I’m going to show you how to transfer WordPress to a new host. It doesn’t require a lot of programming knowledge, but you will need to make a few minor adjustments. I’ll go over those in a moment.
Creating a Backup Copy of Your Website
Any time you make major changes to your site, it’s always best to create a backup. This way, you have a method of recovery in case something goes wrong. The method I am sharing for migrating WordPress from one host to another creates this file.
You have a couple of options available to you for creating a backup copy of the site. You can either use FTP programs like FileZilla or the File Manager in cPanel. FileZilla is a useful tool, especially when it comes to troubleshooting.
In this tutorial, I am going to show you how to use cPanel’s File Manager to move the website. If you don’t have access to cPanel, then I would suggest using FileZilla.
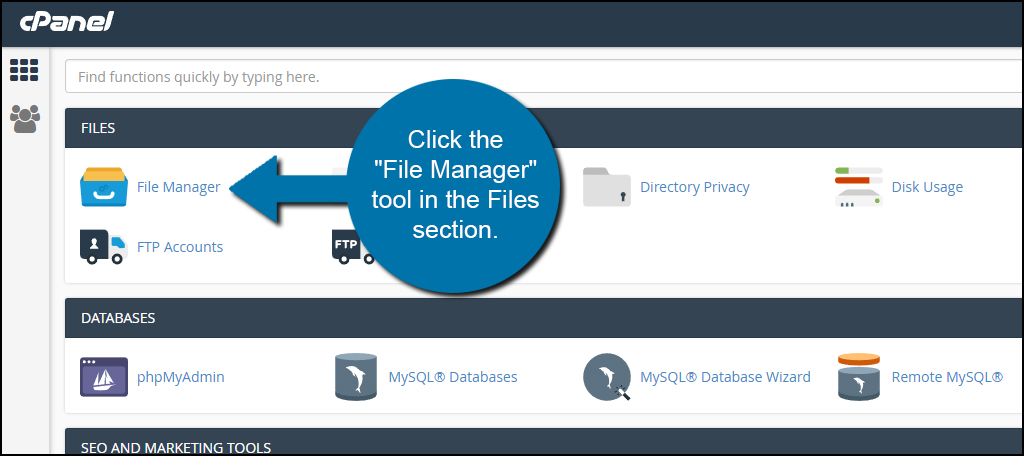
Access your cPanel dashboard. In cPanel, click the “File Manager” tool in the Files section. It may be one of the first elements you see in cPanel.

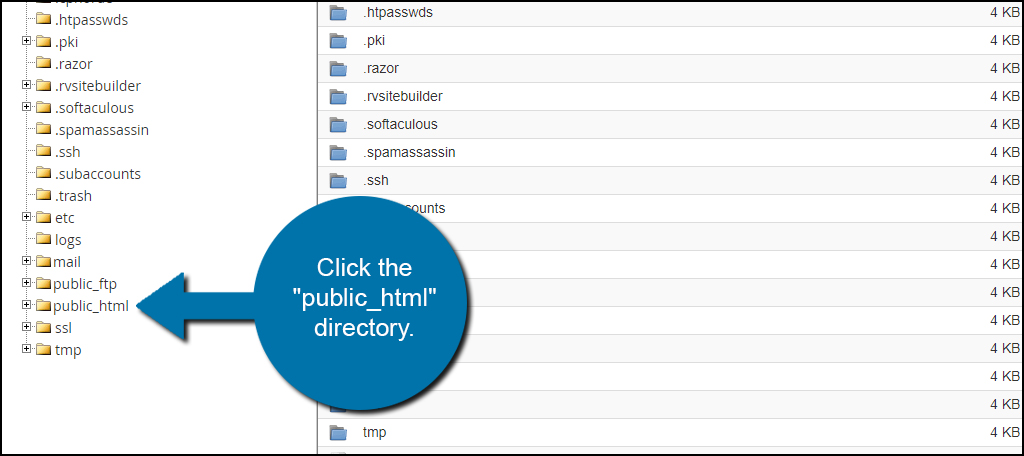
Access your WordPress website. This is usually done when you click the “public_html” directory. However, you may need to select the correct folder if you use a subdomain or another folder. For this tutorial, I’m going to assume you’re moving your primary website in the public_html directory.

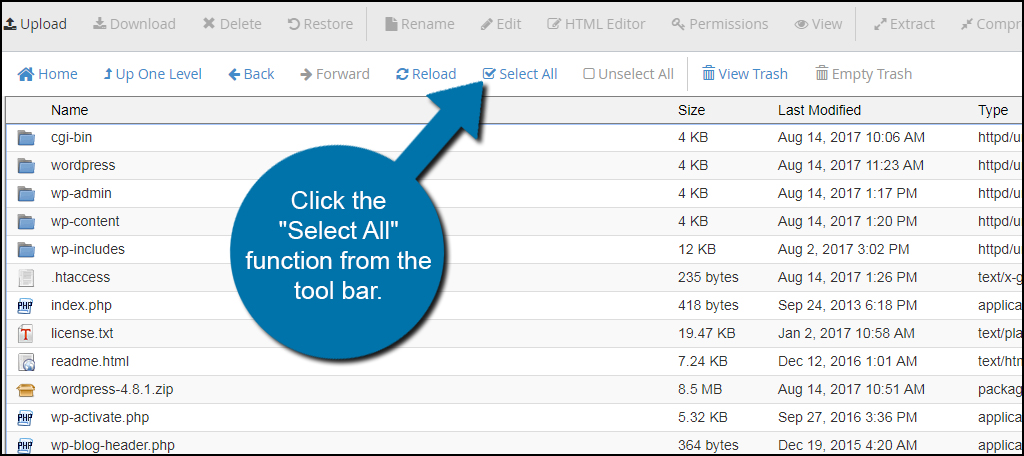
Click the “Select All” function from the toolbar.

Click the “Compress” function in the top right corner. Essentially, you’re creating a ZIP backup copy of the entire website using File Manager.

When the compress window opens, click the “Zip Archive” option on the top.

Scroll down to the bottom of the Compress window. Change the name of the Zip file to “wordpressbackup.” This will be the file you’ll need to move your website.
Click the “Compress File(s)” button to create the Zip file.

After a few moments, you’ll see a results screen displaying what files and folders were compressed. Click the “Close” button to exit the compressor.

Select the wordpressbackup.zip file and click “download.” Save this file somewhere you can easily find it. I usually store files I will need on the desktop. This makes it easier to find when it’s time to use them.

If your website is exceptionally large, it may take a bit to finish transferring the file to your computer.
Exporting the Database
Now that you have the website files saved on your computer, it’s time to grab the database.
From cPanel, click on “phpMyAdmin” located in the Databases section.

Find the database you want in the left panel and click it. If you only have one website, it should be the only one available. However, it’s quite common for some site owners to have several databases for various domains.

If you don’t know your database, you can find it in the wp-config.php file of your website. You can use File Manager to edit the file to find the database.

After you access the database you want in phpMyAdmin, click the “Export” option in the toolbar.

Leave the default options as they are and click the “Go” button to begin exporting the database.

Save the file somewhere that is easy to access. Again, I suggest placing it on your desktop.
Create Database on New Host
After you’ve saved the SQL file to your computer, you’ll need to create a database on the new website server.
Launch the “MySQL Database Wizard” from the new host.

Follow the instructions to create a new database for your website. Take note of the database name, username and password you are going to use. This is utterly important as you won’t be able to access your website’s content without it.
When you’re ready, click the “Create User” button to continue.

In the next screen, make sure you check the box for “All Privileges.” This is the access point for WordPress itself, and it needs the ability to access everything related to the database.

Scroll to the bottom of the page and click “Next Step” when you’re ready to build the database.

Next, you’ll access your database through phpMyAdmin as you did earlier. After you click on the new database, click the “Import” option above.

Choose the SQL file you downloaded a moment ago. This is not the Zip file for your website. It is the file with a .sql extension.
Click the “Go” button once you’re ready to upload your database.

Uploading Your Site Files
Now, you’ll need to upload your site files. If you’re using FTP, you can connect to the new server and upload them. If you’re following along with me in cPanel, here is how you do it.
Access your site’s directory by clicking “public_html” as you did before. This time, your directory will be empty except perhaps for a cgi-bin folder. Click the “Upload” option from the toolbar.

Select the wordpressbackup.zip file you made of your website. File Manager will immediately begin uploading it to your new web server.

Go back to your website’s directory, and you’ll see your .zip file uploaded. Select the file and click “Extract.”

When the Extract window appears, make sure you have the correct folder in the text field. As long as you uploaded the .zip file into your new website’s directory, this should be correct by default.
Click the “Extract File(s)” button to unpack your website.

Once the files have been extracted, you may have to refresh your view in File Manager. You can do this by leaving the site’s directory and then go back into it.
Editing the wp-config.php File
Before you can access your website, there is one more thing you’ll need to do. Remember when I said to write down the new name, user and password of the database? Now you’ll need to put that info into the wp-config.php file of your site.
Select the wp-config.php file and click, “Edit.”

In the file, you’ll replace the old database information with the new name, user and password you created a few moments ago.

After you enter your new credentials for the database, click the “Save Changes” button on the top right.

You can now access your website using the http://www.ggexample.com/wp-admin.php address (replace “ggexample.com” with your domain).
Verify Your Files
Before you deactivate your old hosting account, make sure your website files and information copied over completely. It’s better to be safe than sorry, and many hosts will completely delete data when an account is closed.
Take a glance at your:
- Posts
- Pages
- Media Files
- Plugins
- Themes
It may be a good idea to compare your new site with your old one to make sure everything copied correctly.
Keep Regular Backups
It’s always a good idea to keep regular backups of your website even if you don’t plan on moving. It’s a good way to ensure that you don’t lose your site’s data in the event of a disaster. Always side with caution as it will save you time and possibly money in the long run.
How often have you moved sites from one host to another in the past? Do you find it easier to use FTP programs like FileZilla or built-in tools like File Manager?
The post How to Transfer a WordPress Blog to a New Web Host appeared first on GreenGeeks.