Dec 23, 2024
Dominykas J.
While Terraria already offers countless hours of entertainment, adding mods can take the game experience to the next level. Mods unlock new features, introduce challenging bosses and enemies, and provide other custom content.
In this guide, you will learn how to install Terraria mods on a dedicated server in easy-to-follow steps, so you can enjoy a brand-new Terraria experience. Let’s get started!
Prerequisites
Before you start installing Terraria server mods, there are a few essential requirements you’ll need to have in place:
1. A dedicated Terraria server
To install and run mods, you’ll need to set up a dedicated Terraria server. Hostinger offers excellent dedicated game server hosting options from which you can choose.
Make sure your server has sufficient resources, like CPU, memory, and storage, to handle the modded game. Mods can add significant load depending on their size and complexity, so make sure your game server is optimized.
2. Access to file transfer tools
You’ll need a way to transfer files to and from your server. A File Transfer Protocol (FTP) client like FileZilla or WinSCP is essential if you’re using a hosted server, as it will allow you to upload the mod files and the required tools.
If you’re using Hostinger’s Game Panel, you can easily upload files using the integrated File Manager.
3. tModLoader (the modding platform for Terraria)
Mods in Terraria are managed primarily through tModLoader. This in-game mod browser acts as a bridge, allowing mods to be loaded and run on your server.
4. Basic familiarity with Command-Line or Server Console
Running a Terraria server, especially a modded one, will occasionally require using command-line commands or working with the server console.

How to install mods on a Terraria server
You can install mods on your Terraria game server with everything in place. Let’s dive into each step, from setting up tModLoader to enabling and testing your mods for a seamless gameplay experience.
In this guide, we will cover two approaches:
- You can access and manage your server and its files through the Game Panel directly in your browser–a beginner-friendly and intuitive approach.
- Modding other dedicated servers via FTP clients like FileZilla – an approach for more advanced users.
1. Install tModLoader on the server
To run mods on your server, you’ll first need to install tModLoader, the essential Terraria mod manager.
Game Panel setup
If you are using Hostinger’s Game Panel, you can set up tModLoader directly there:
- Log in to hPanel and navigate to the VPS page. Find your Game Panel server and click on Manage.

- Press Manage Panel and log in with your credentials.

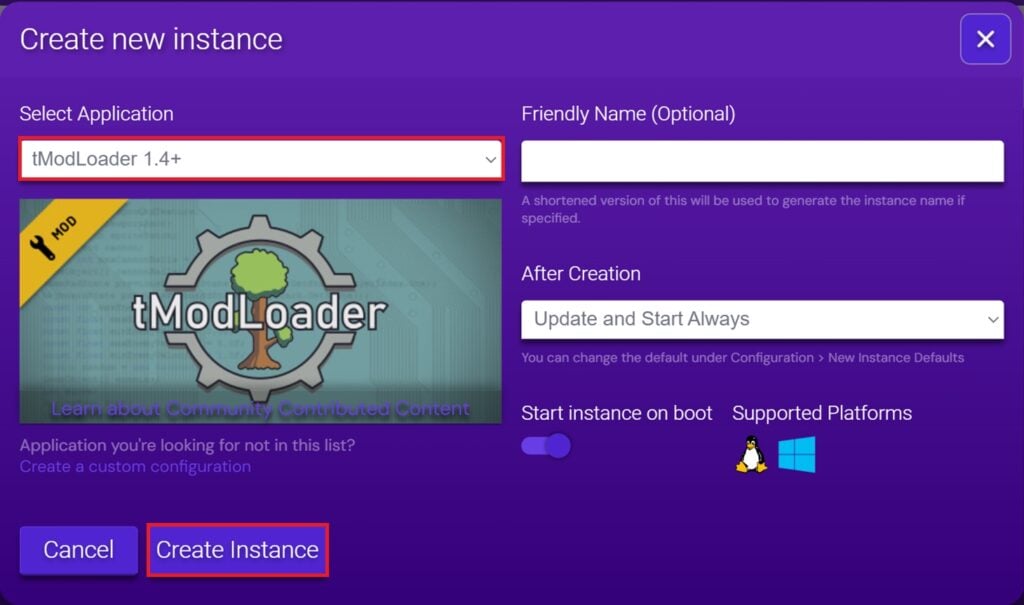
- In the Instances section, press Create Instance and select tModLoader 1.4+ in the Select Application dropdown menu. Press Create Instance again to finish the setup.
Other dedicated servers
- Head to the tModLoader official page and download the latest version. Be sure to select the version that matches your Terraria server’s game version to avoid compatibility issues. If you are hosting a local server, install tModLoader from the Steam Store.
- Once downloaded, locate the tModLoader zip file in your downloads folder and extract its contents to a separate folder. This will contain important files like tModLoaderServer executable for Linux server.
- With a client like FileZilla or WinSCP, navigate to your server’s Terraria directory. Upload all of the extracted tModLoader files into this directory, replacing any existing files when prompted.
Important! Be aware of the operating system differences between your local machine (PC) and the server. Make sure to download the proper version of tModLoader for each, as you will be running it both locally (to download mods) and on your server.
2. Launch the server with tModLoader
With the tModLoader installation complete, you’ll need to launch the server using the tModLoader executable and configure your settings.
Game Panel
With Game Panel, there are no additional steps you need to take. After you’ve created the instance, an automated setup will run. Once it finishes, you’ll see in the Instances section on your Game Panel console that the server is already running:

Other dedicated servers
- On your server, locate the tModLoaderServer executable in the directory where you uploaded it:
cd ~/.local/share/Terraria/ModLoader
Launch the server by running it in the background using nohup:
nohup ./tModLoaderServer &
- When the server starts, you’ll be prompted to choose settings such as:
- World size: Choose between Small, Medium, or Large, depending on your server’s resources and your preference for exploration.
- Difficulty level: Set the server to Normal, Expert, Master, or Journey mode. Expert and Master modes increase difficulty, while Journey mode allows more customization options.
- Server password: Add a password to limit access to authorized users only if desired.
- After you’ve set your preferences, save the settings and let tModLoader finish the initialization. The server console will display messages as it completes loading. When initialization is done, your server will be ready to accept users in modded mode.
3. Download mods
With your server running tModLoader, you can start adding mods. Here’s how:
- Launch tModLoader on your client (your personal computer), and from the main menu, select Mod Browser. This page provides access to a wide range of gameplay enhancements.
- Use the search bar to find mods by name or browse through popular options. Click Download for each mod you’d like to install. These mods will be saved as .tmod files in your local Terraria folder.
After you download the mods, you need to move them to your server.
Game Panel
- In the Instances section on the Game Panel, press Manage on the tModLoader card.

- Open the File Manager in the left side menu and navigate to ModLoader → Mods.

- Drag and drop .tmod files you previously downloaded into this folder.
Other dedicated servers
- Navigate to the mods folder on your computer:
- Windows: DocumentsMy GamesTerrariaModLoaderMods
- Mac: ~/Library/Application Support/Terraria/ModLoader/Mods
- Linux: ~/.local/share/Terraria/ModLoader/Mods
- Use an FTP client to navigate to the Mods folder in your server’s tModLoader directory. Upload each .tmod file from your computer’s Mods folder to the server’s Mods folder.
4. Enable mods on the server
After uploading your mods to the Mods directory, the next step is to enable them. To do this, you’ll need to edit the enabled.json file, which tells the server which mods to load.
Game Panel
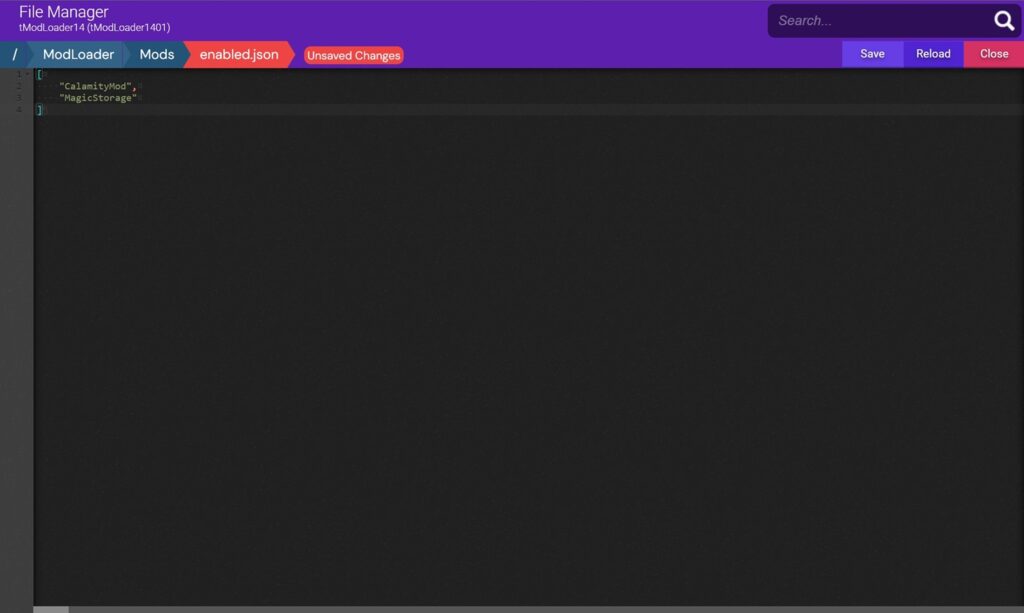
- The enabled.json file is in the same Mods folder where you previously uploaded your mods. Double-click it to edit it.
- Format the file as a JSON array, listing each mod’s filename without the .tmod extension. For example, if you have CalamityMod.tmod and MagicStorage.tmod, the file should look like this:
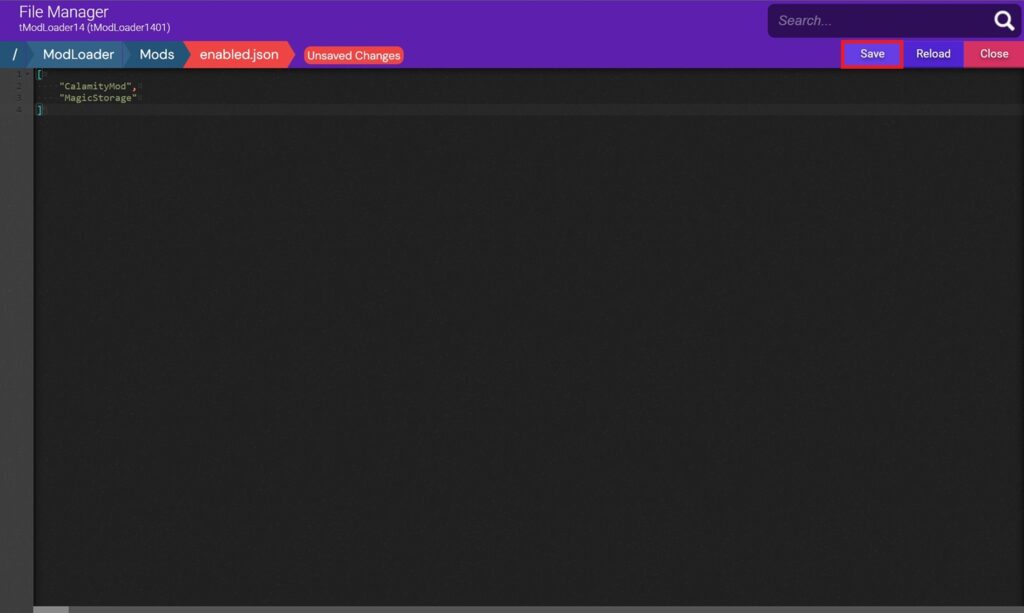
- Press Save at the top right corner to save your changes.
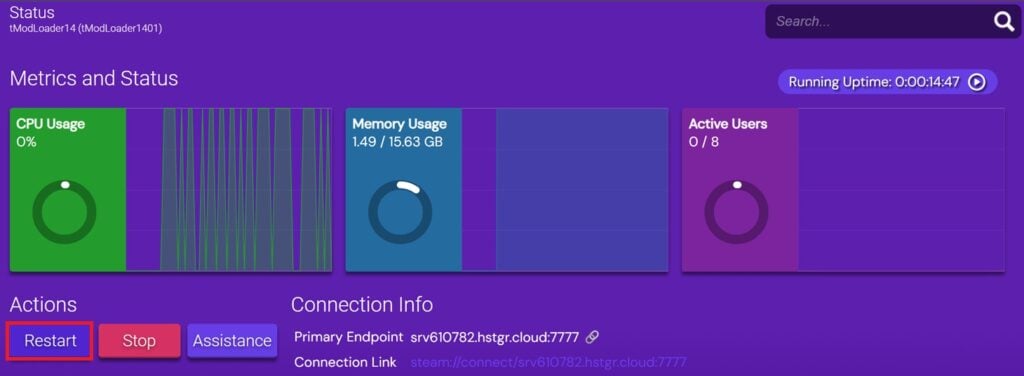
- Return to the Status section and Restart your server to enable the mods.
Other dedicated servers
- Connect to your server using SSH, and navigate to the Mods directory where you uploaded your .tmod files.
cd ~/.local/share/Terraria/ModLoader/Mods
- Check if enabled.json exists in this directory:
ls | grep enabled.json
If it doesn’t, you’ll need to create it:
touch enabled.json
- Open enabled.json with a text editor, such as nano:
nano enabled.json
Inside nano, format the file as a JSON array, listing each mod’s filename without the .tmod extension. For example, if you have CalamityMod.tmod and MagicStorage.tmod, the file should look like this:
[
"CalamityMod",
"MagicStorage"
]
- Press CTRL + O to save the file, press Enter to confirm the filename, and then press CTRL + X to exit.
- To load the enabled mods, restart your Terraria server.
pkill -f tModLoaderServer
nohup ./tModLoaderServer &
Once the server restarts, the mods listed in enabled.json will be active, allowing you to enjoy your modded Terraria experience. In the next section, we’ll cover how to test these mods to ensure everything is working correctly.
5. Test the mods
After enabling mods on your Terraria world, it’s essential to test them to ensure everything is working as expected. Testing helps confirm that mods load properly and allows you to troubleshoot any issues before inviting players. Here’s how to test your modded Terraria server:
Connect to your server:
- Launch Terraria on your client, making sure you are running it with tModLoader to match the server’s modded environment.
- Join your server using its IP address and port. If you encounter connection issues, double-check that your server is running, the correct port is open, and tModLoader is properly installed.
Verify mod functionality:
- Once connected, check for visible signs that mods are working. Depending on the mods you’ve installed, look for new items, NPCs, or changes in game mechanics
- Some mods may display a message in the chat or console when they load. If you see these messages upon joining, it’s a good indicator that the mods have loaded successfully.
Monitor the server console for errors:
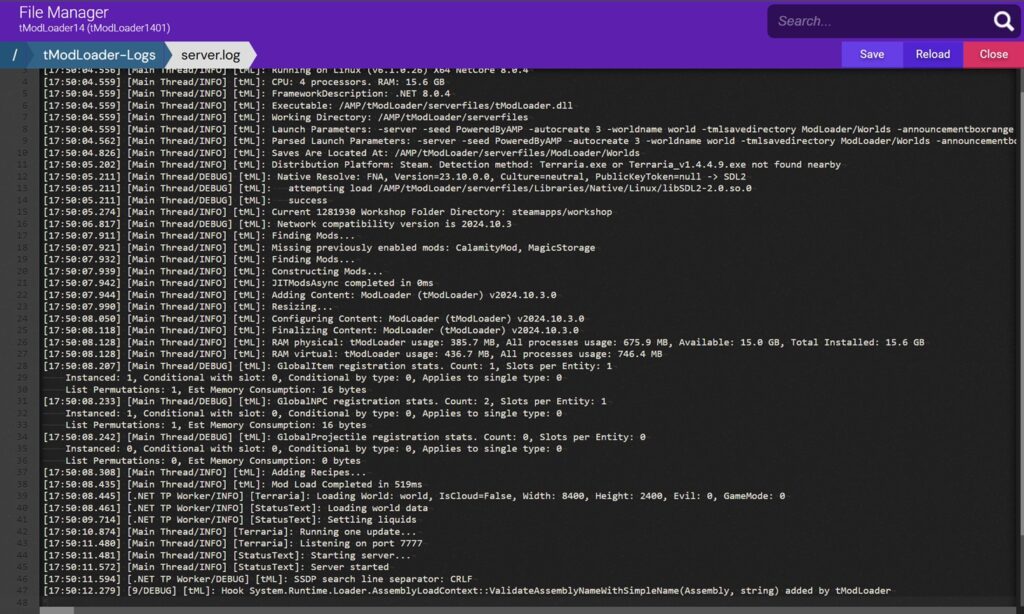
- Check the tModLoader server console for any error messages on your server. If a mod isn’t compatible or fails to load, tModLoader will usually display an error in the console log.
- To view console logs in Game Panel, use the File Manager to navigate to tModLoader-Logs → server.log – this file is where the server log is stored.
- To view console logs on other dedicated servers in real time, you can run:
tail -f ~/.local/share/Terraria/ModLoader/Logs/Log.txt
This command allows you to monitor server logs for any loading errors or warnings.
Troubleshoot common issues:
- Mod not loading: If a specific mod isn’t loading, confirm that it’s listed correctly in enabled.json and that the .tmod file is in the server’s Mods directory.
- Version mismatch: If you encounter a version mismatch error, ensure that your client and server are running compatible versions of Terraria and tModLoader.
- Server crashes: Some mods may not be compatible with each other or with the current game version. Try disabling mods one by one in enabled.json to identify which mod might be causing the issue.
Playtest with friends:
- Once the server appears stable, invite a few players to join and playtest the mods with you. Observe any issues that arise during gameplay, as multiplayer testing can sometimes reveal bugs that don’t appear in solo testing.
Tips for managing and updating mods
With your mods successfully installed and tested, the next step is to learn how to manage and keep them updated to ensure your server runs smoothly and stays compatible with the latest features.
1. Check for mod updates
Mods are frequently updated to improve features, fix bugs, or ensure compatibility with new Terraria and tModLoader versions. Here’s how to check for and apply mod updates:
- On your client, launch tModLoader and go to the Mod Browser page. This section shows if any mods you’ve downloaded have updates available.
- If an update is available, download the new version through the Mod Browser. After downloading, locate the updated .tmod files in your Mods folder on your local machine.
- Use the Game Panel’s File Manager or an FTP client to transfer the updated .tmod files to your server’s Mods directory, replacing the old versions.
- Once the mods are updated, restart your server to apply the changes.
2. Update tModLoader
tModLoader itself is periodically updated to improve stability and support new Terraria features, and updating it can be essential to maintain compatibility with newer mods.
Game Panel:
- In the Instances section on your Game Panel, press Update Instance to update your tModLoader on the server.

- Press Shutdown and Update in the pop-up window and wait for the process to finish. This will also restart your game server.
Other dedicated servers:
- Visit the official tModLoader website and download the newest version. Make sure to update Terraria on your server to the same version.
- Using an FTP client, back up your server’s Mods directory and enabled.json file by downloading them to your computer.
- Stop your server, then use an FTP client to upload the new tModLoader files, overwriting the existing files in the server’s Terraria directory.
- Upload the backed-up Mods folder and enabled.json file.
- After replacing the files, restart the server.
3. Back up your server and mods
Backing up your server regularly helps prevent data loss in case of issues with mods, server crashes, or unexpected errors. Here’s how to back up your Terraria server:
- Manual backups: Connect to your server via FTP and download the entire Terraria directory, including all world files, mods, and configuration files. Store this backup in a secure location on your computer or cloud storage.
- Automated backups: If you’re using a hosting provider, check if they offer automated VPS backups. Hostinger provides automated VPS backups that can be set to run daily or weekly. This can save you time and keep your server protected against data loss.
- Frequency: For modded servers, backing up after adding or updating mods is recommended. This ensures you have recent, stable versions of your server data that you can restore if issues arise.
4. Troubleshoot mod conflicts and errors
Terraria mod conflicts and errors can occasionally occur, especially if you’re using multiple mods. Here are some troubleshooting tips to resolve common issues:
- Check your server’s log file, typically located in the ~/.local/share/Terraria/ModLoader/Logs directory on Linux. The log file will often contain error messages if a mod fails to load or conflicts with another mod. Look for specific error messages or warnings that mention mods by name.
- If you suspect a particular mod is causing issues, disable it by removing its entry from enabled.json and restarting the server. Repeat this with each mod to isolate the problematic one.
- Many mods have their own documentation, where creators list common issues and solutions. Read through the mod’s documentation for guidance, especially if the issue is a known bug or compatibility problem.
- The Terraria modding community is very active and can often help with troubleshooting. Visit forums like the Terraria Community Forums, the tModLoader subreddit, or Discord servers dedicated to modding for advice.
By following these tips, you’ll be able to assure Terraria mod compatibility as well as manage and update them effectively.
Conclusion
Modding a Terraria server can transform your game, adding endless new content and creative possibilities. By following the steps in this guide, you’ll be able to set up and manage mods on your server.
We went over installing tModLoader, configuring and testing mods, backing up your server, and managing updates. With these essentials in place, your server is now ready for an enhanced, customized Terraria experience.
Remember, the world of modding Terraria is vast – don’t hesitate to explore new mods and experiment with different combinations to make your game server uniquely yours.
How to mod Terraria FAQ
What is tModLoader, and why do I need it?
tModLoader is an open-source tool that enables Terraria mod installation. It allows users to customize and enhance their gameplay with community-created content. It’s essential for running mods on both single-player and server setups.
How do I find and download mods for Terraria?
To find and download mods, launch Terraria through tModLoader and go to the Mod Browser page in the main menu. The Mod Browser allows you to search, browse, and download popular Terraria community mods directly to your game.
What are some of the best Terraria mods?
Popular mods include Calamity, which adds bosses, items, and biomes, Thorium, which introduces new classes, and a variety of content; and Magic Storage, which provides an advanced storage solution. These mods are well-regarded for enriching gameplay and expanding Terraria’s world.


