Learning how to manage categories in Magento will help keep your products organized. This is helpful for both you and the consumer. Think of it like setting up digital “isles” like you see in brick-and-mortar stores, only in this case its a virtual location of your Magento hosted website. You wouldn’t look in the baby section for dog food, would you?
You may have created a category already if you’ve added a product for sale or imported your product list. However, there may be a few elements you haven’t delved into just yet.
Today, I’m going to show you how to manage Magento categories and why it’s vital to the success of your online store. By keeping your goods organized, you improve the experience of the shopper. And that’s what it’s all about – keeping the customer happy.
Adding a Category in Magento
First, let’s create a category in Magento. If you’ve done this before, think of it as a refresher. There is no such thing as having too much practice when it comes to anything in life whether it’s online or off.
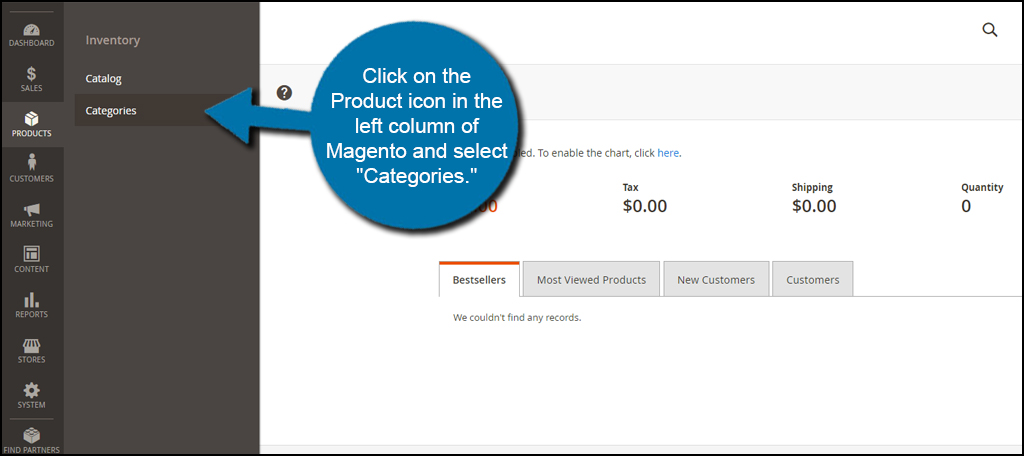
Click on the Product icon in the left column of Magento and select “Categories.”

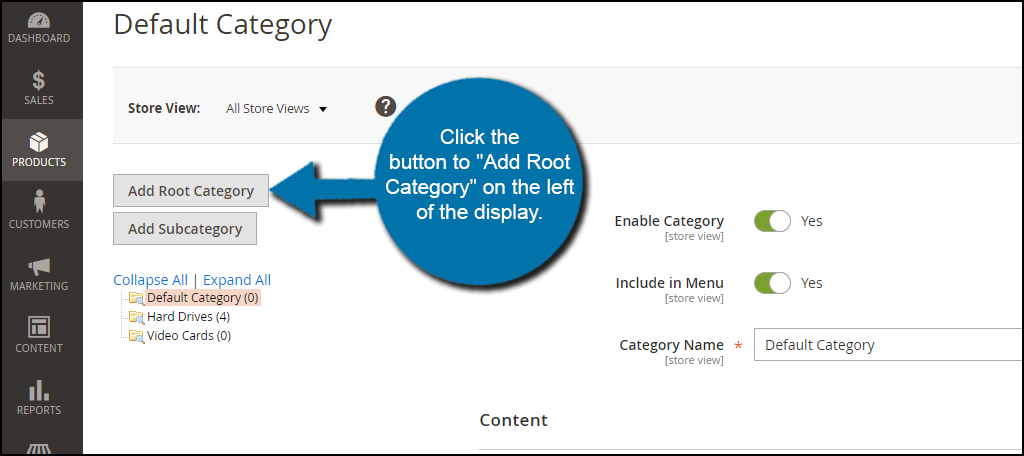
The primary category of your online store will be the first one displayed. For this tutorial, we’re going to add a new category to our list for the products we plan on selling.
Click the button to “Add Root Category” on the left of the display.
A root category is the primary location of any particular product list. For example, you could create a root category for “Hard Drives” and then use subcategories under it for “SSD” or “HDD” styles of drives. You could put “Baby Clothes” as the root and then add “His” and “Hers” as subcategories to differentiate between boy and girl clothes.

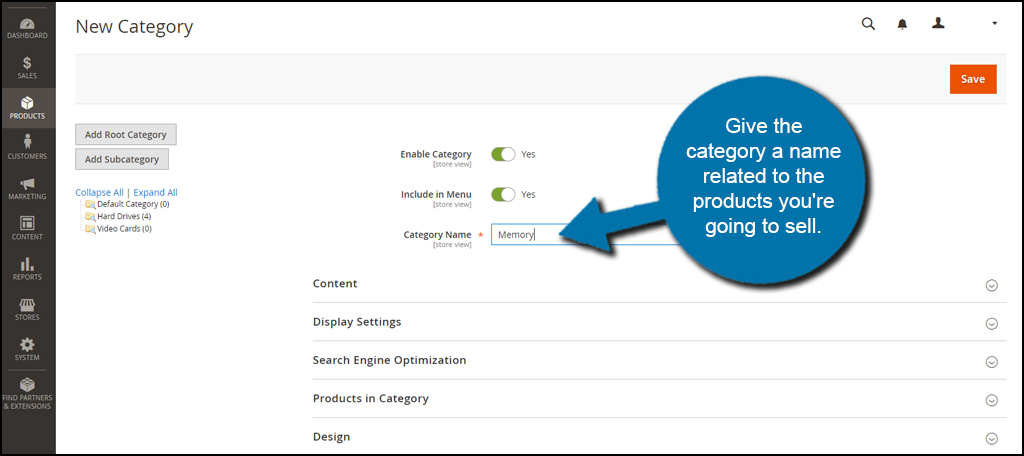
Give the category a name related to the products you’re going to sell. For this tutorial, I’m simply adding “Memory” to my list. You can add anything that relates to the products you have available. This will be what people see when they visit the site.

OK, now let me break down each of the following sections for you.
Content
The content section is where you add an image and description of the available products. While you have a few formatting options in the basic description editing window, you can also use the WYSIWYG editor to open a far more robust collection of text formatting tools. You can also select a specific CMS block if you have any available.

Display Settings
Display Settings allows you to control where and how the category is viewed. Since we are using a root directory, it’s more than likely going to be an anchor. From here, you can alter the sort order, position and the pricing used in navigation.
For the most part, you’re probably going to use the default settings for most of your categories. However, this is up to you and how you want to build your site.

Search Engine Optimization
Nearly every element within Magento has a section for search engine optimization. In this area, you add SEO elements specific to the category. If you leave the URL Key empty, Magento will automatically use the categories name in this field. Otherwise, you can customize all of these entries to improve performance in search engines.

Products in Category
If you already have products listed in your store, they will be located in this section. From here, you can add any items you already have to the category. This is useful if you have items placed but want to fine-tune the hierarchy of your online store.
In this tutorial, you can see that I only have a handful of hard drives and no memory. So, I will not need to move items to this new area. Otherwise, Otherwise, I would need to check the boxes on the left of the items I needed to move.

Design
In the Design section, you can modify how the category appears on the site. This is beneficial if you plan on running a sale, want to offer a holiday appearance or otherwise want to make the category of products visually unique to the rest of the site.
You have the option to use a completely different theme, change the layout of the products or even upload you own XML coding for even greater customization.

Schedule Design Update
This option is in relation to the Design customizing described above. In Schedule Design Update, you can set when the layout changes start and finish. This is a great tool if you want to launch holiday appearances, run sales, have weekend promotions and more.
Since it’s automatic, you won’t have to worry about remembering to change the design of the category back to default after the end date.

Once you’re done making your adjustments, click the “Save” button.

I would suggest you save often and after every section of the category you complete. Magento has a short window before it logs out idle users. If it takes you too long to completely set up your category, it will not save once that time expires.
Adding a Subcategory
Categories will keep your products separated, but what if you have items that are similar but need their own section? That’s when you create subcategories. For example, I am going to add “DDR3 Memory” to my list because it’s another type of memory but different than other models.
Another example would be using a subcategory for different sizes of shoes, or even separation between male and female clothing lines.
To make a subcategory, go to the Products area and click “Categories.”

Click the root category you want of which to add a subcategory. For instance, I am adding a new sub to the memory section. I am going to click on “Memory” so I can add a subcategory to it.

Click on the button to “Add Subcategory.”

Fill in the information for the new category and click “Save.”

After Magento saves, you will see the new subcategory listed under its root.

This list of categories comprises of all sections within your website. You can easily collapse or expand them all, which may make it easier to sift through them once you start adding more products to your online store.
Managing Magento categories is much easier today than in older versions of the application. Most of the elements you’ll need to set up your products are all in one display screen. Fill out as much information as possible when it comes to this part of your site. It will make a difference when visitors come looking to buy your goods.
The post How to Manage Categories in Magento appeared first on GreenGeeks.