
Creating PDFs is one of the easiest tasks to take for granted on Linux, thanks to the robust PDF support provided by CUPS and Ghostscript. However, converting multiple files to this portable format can get tedious fast, especially for students, non-profits, and businesses that may have several files to handle on any given day. Fortunately, the Linux ecosystem gives you everything you need to fully automate this task, supporting several file formats and any number of files.
This guide will show you how to use unoconv (powered by headless LibreOffice) to build a simple, reliable system that converts any supported document format into PDF, and optionally sorts your original files into subfolders for storage or further management.
We’ll cover common open document formats, and show you how to expand the approach so you can drop in other types as needed. We’ll also use cron to automate execution, flock to prevent overlapping runs, and logrotate to handle log rotation automatically. The final result will be a lightweight, low-maintenance automation you can replicate on almost any Linux system.
The methods here work on both desktop and server environments, which makes them a practical fit for organisations that need to handle regular PDF conversions. Once configured, the process is fully hands-free. We’ll keep things approachable and script-first, run everything as a non-privileged user, and focus on a clear folder layout you can adapt to your own workflow with no GUI required.
📋
Even if you do not need such a system, trying out such tutorials help sharpen your Linux skills. Try it, learn new things while having fun with it.
Our automation goals
We’ll build a practical, approachable system that does the following:
- Watch a single folder for new documents in any supported file format (ODF, DOCX, etc.).
- Convert each file to PDF using unoconv.
- Move converted PDFs into a dedicated folder.
- Move original files into subfolders matching their extensions (e.g., originals/odt/).
- Prevent overlapping runs using a lockfile.
- Log all actions to /var/log/lo-unoconv.log with automatic log rotation.
This gives us a self-contained, resilient system that can handle everything from a trickle of invoices to hundreds of archived reports.
📋
By supported file formats, we’re referring to any file type that we include in our script. LibreOffice supports many file formats that we are unlikely to need.
Where to use such automated PDF conversion?
Imagine this scenario: In a company or organization, there’s a shared folder where staff (or automated systems) drop finished documents that need to be standardized for archival or distribution. Everyone can keep editing their working files in the usual place. When a document is ready for the day, it gets saved to the Document Inbox folder and synched to the file server.
Every few minutes, a conversion job runs automatically, checking this folder for any supported documents, whether ODT, ODS, ODP, DOCX, etc. — and converts them to the PDF format. The resulting PDFs are saved to “Reports-PDF”, replacing any previous versions if necessary, and the processed copy of the source document is filed into a folder in “Originals”, sorted by extension for traceability.
There are no extra buttons to press and no manual exporting to remember. Anyone can drop a file and go on about their day, and the PDFs will be neatly arranged and waiting in the output directory minutes later. This lets the team keep a simple routine while ensuring consistent, ready-to-share PDFs appear on schedule. This is exactly the solution we’re aiming for in this tutorial.
Understanding Unoconv
Unoconv (short for UNO Converter) is a Python wrapper for LibreOffice’s Universal Network Objects (UNO) API. It interfaces directly with a headless instance of LibreOffice, either by launching a new instance or connecting to an existing one, and uses this to convert between supported file formats.
🚧
Why Use Unoconv Instead of Headless LibreOffice Directly?
You might wonder why we’re not using LibreOffice directly, since it has a headless version that can even be used on servers. The answer lies in how headless LibreOffice works. It is designed to launch a new instance every time the libreoffice --headless command is run.
This works fine for one-time tasks, but it puts a strain on the system if this command must be loaded from storage and system resources must be reallocated every time you try to use it. By using unoconv as a wrapper, we can allow headless LibreOffice to run as a persistent listener, with predictable resource usage, and avoid overlap when multiple conversions are needed. This saves time, and makes an ideal solution for recurring jobs like ours.
Installing the prerequisites
You’ll need to install LibreOffice, unoconv, and the UNO Python bindings (pyuno) for this setup to work. The Writer, Calc, and Impress components are also required, as they provide filters needed for file format conversions.
However, we won’t need any GUI add-ons — everything here is headless/server-friendly. Even if some small GUI-related libraries are installed as dependencies, everything you’ll install will run fully headless; absolutely no display server required.
Note: on desktops, some of these packages may already be installed. Running these commands will ensure you’re not missing any dependencies, but will not cause any problems if the packages already exist.
Debian / Ubuntu:
sudo apt update
sudo apt install unoconv libreoffice-core libreoffice-writer libreoffice-calc libreoffice-impress python3-uno fonts-dejavu fonts-liberation
RHEL/CentOS Stream
First enable EPEL (often required for unoconv on RHEL and its derivatives, Fedora has it in the default repos):
sudo dnf install epel-release
Then install:
sudo dnf install unoconv libreoffice-writer libreoffice-calc libreoffice-impress libreoffice-pyuno python3-setuptools dejavu-sans-fonts liberation-fonts
openSUSE (Leap / Tumbleweed)
sudo zypper install unoconv libreoffice-writer libreoffice-calc libreoffice-impress python3-uno python3-setuptools dejavu-fonts liberation-fonts
Arch Linux (and Manjaro)
Heads up: There’s no separate libreoffice-core/libreoffice-headless split on Arch, but the packages still run headless.
sudo pacman -S unoconv libreoffice-fresh python-setuptools ttf-dejavu ttf-liberation
Note: libreoffice-fresh includes pyuno on Arch; use libreoffice-still for the LTS track.
Testing that everything works
Once you’ve installed the prerequisites, I recommend checking to see that unoconv is working. To do this, you can try these instructions:
First, create a sample text file:
cat > sample.txt << 'EOF'
Unoconv smoke test
==================

This is a plain-text file converted to PDF via LibreOffice (headless) and unoconv.

• Bullet 1
• Bullet 2
• Unicode check: café – 東京 – ½ – ✓
EOF
Next, run a test conversion with unoconv:
# Convert TXT → PDF
unoconv -f pdf sample.txt
You may run into this error on recent Debian/Ubuntu systems:
Traceback (most recent call last):
  File "/usr/bin/unoconv", line 19, in <module>
    from distutils.version import LooseVersion
ModuleNotFoundError: No module named 'distutils'
This occurs because unoconv still imports distutils, which was removed in Python 3.12. You can fix this with:
sudo apt install python3-packaging
sudo sed -i 's/from distutils.version import LooseVersion/from packaging.version import parse as LooseVersion/' /usr/bin/unoconv
You may get a similar error on Fedora, that looks something like this:
unoconv -f pdf sample.txt
/usr/bin/unoconv:828: DeprecationWarning: distutils Version classes are deprecated. Use packaging.version instead.
  if product.ooName not in ('LibreOffice', 'LOdev') or LooseVersion(product.ooSetupVersion) <= LooseVersion('3.3'):
However, the conversion should still be able to proceeed.
Verifying the conversion
If the command proceeded successfully, it’s wise to verify that the output is valid before proceeding.
You can verify and validate the PDF with these commands:
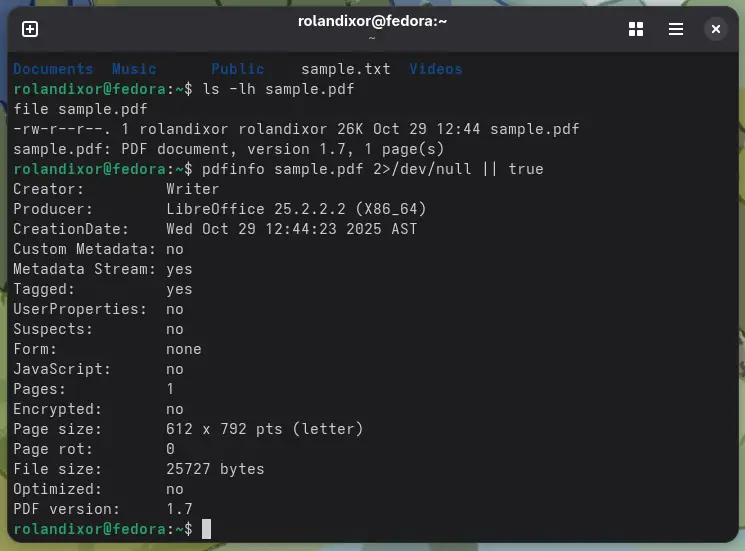
ls -lh sample.pdf
file sample.pdf
You should see output similar to this:
-rw-r--r--. 1 username username 26K Oct 29 12:44 sample.pdf
sample.pdf: PDF document, version 1.7, 1 page(s)
Optionally, if you have poppler-utils installed, you can check the PDF metadata:
pdfinfo sample.pdf 2>/dev/null || true
This should give you out that looks something like this:
Creator:         Writer
Producer:        LibreOffice 25.2.2.2 (X86_64)
CreationDate:    Wed Oct 29 12:44:23 2025 AST
Custom Metadata: no
Metadata Stream: yes
Tagged:          yes
UserProperties:  no
Suspects:        no
Form:            none
JavaScript:      no
Pages:           1
Encrypted:       no
Page size:       612 x 792 pts (letter)
Page rot:        0
File size:       25727 bytes
Optimized:       no
PDF version:     1.7
Finally, clean up the test files:
rm -f sample.txt sample.pdf
Setting up a persistent LibreOffice listener
By default, unoconv starts a new LibreOffice instance for each conversion, which is fine for small workloads, but for our setup, we want it to run as a persistent headless listener. This way, your system doesn’t have to fire up LibreOffice for every conversion, thus keeping resources predictable and enhancing system stability.
To do this, we’ll first create a dedicated profile for the headless instance to use. This is most critical on the desktop, since running a headless LibreOffice instance on a shared profile would block GUI functionality. On servers, you can skip this step if you are sure you will only need LibreOffice for this purpose or are otherwise fine with using a shared profile.
Creating the LibreOffice profile
To create the profile for your headless LibreOffice instance, run:
# Create the user with a proper home directory
sudo useradd --system --create-home --home-dir /var/lib/lo-svc --shell /bin/bash lo-svc

# Ensure the directory exists with correct permissions
sudo mkdir -p /var/lib/lo-svc  # ← Changed to match home directory
sudo chown -R lo-svc:lo-svc /var/lib/lo-svc
sudo chmod 755 /var/lib/lo-svc
You can choose any path you’d like, just be sure to remember this path for the next step.
Setting Up the Folder Structure
Now that we’ve installed all prerequisites and prepared the LibreOffice listener, we’ll set up our system with a simple folder layout.
🗒️ You can use any folder names you want, but you’ll need to pay attention to their names and change the names in the scripts we’ll create later.
/srv/convert/
├── inbox         # Drop documents here for conversion
├── PDFs        # Converted PDFs appear here
└── originals    # Originals moved here (grouped by extension)
Create these directories:
sudo mkdir -p /srv/convert/{inbox,PDFs,originals}
sudo chown -R lo-svc:lo-svc /srv/convert
sudo chmod 1777 /srv/convert/inbox  # World-writable with sticky bit
sudo chmod 755 /srv/convert/PDFs    # lo-svc can write, others can read
sudo chmod 755 /srv/convert/originals  # lo-svc can write, others can read
By using this folder configuration, anyone can drop files in the inbox folder, but only the script will have permission to write to the originals and PDFs folders. This is done for security purposes. However, you can set the permissions that you prefer, so long as you understand the risks and requirements.
You can also have this automation run on the same server where you’ve installed Nextcloud/Owncloud, and place these folders on a network share or Nextcloud/Owncloud directory to enable collaborative workflows. Just be sure to set the correct permissions so that Nextcloud/Owncloud can write to these folders.
For the sake of brevity, we won’t cover that additional setup in this tutorial.
Setting up a persistent LibreOffice Listener with systemd
The next step is to establish the headless LibreOffice instance, and use a systemd service to keep it running in the background every time the system is restarted. Even on servers this can be critical in case services fail for any reason.
Option A: System-wide service (dedicated user)
If you’re planning to use this solution in a multiuser setup, then this method is highly recommended as it will save system resources and simplify management.
Create /etc/systemd/system/libreoffice-listener.service:
sudo nano /etc/systemd/system/libreoffice-listener.serviceThen enter the following:
[Unit]
Description=LibreOffice headless UNO listener
After=network.target

[Service]
User=lo-svc
Group=lo-svc
WorkingDirectory=/tmp
Environment=VCLPLUGIN=headless
ExecStart=/usr/bin/soffice --headless --nologo --nodefault --nofirststartwizard --norestore
  --accept='socket,host=127.0.0.1,port=2002;urp;StarOffice.ComponentContext'
  '-env:UserInstallation=file:///var/lib/lo-svc'
Restart=on-failure
# Optional hardening:
NoNewPrivileges=true
PrivateTmp=true
ProtectSystem=full
ProtectHome=true

[Install]
WantedBy=multi-user.target
Press CTRL+O and enter to save the file and CTRL+X to exit nano.
Enable and start the systemd service:
sudo systemctl daemon-reload
sudo systemctl enable --now libreoffice-listener
Ensuring the service is running correctly
Once you’ve set up the system-wide systemd service, it’s best practice to ensure that it’s running smoothly and listening for connections. I’ll show you how to do this below.
- Check if the service is running properly
sudo systemctl status libreoffice-listener
- Check the logs if it’s failing:
sudo journalctl -u libreoffice-listener -f- Test the connection:
sudo -u lo-svc unoconv --connection="socket,host=127.0.0.1,port=2002;urp;StarOffice.ComponentContext" --showOption B: Per-user service
If you’d like to use this on a per-user basis, you’ll need to set up a systemd service for each user that needs it. This service will run without the need for root permissions or a custom user.
To set this up, first create the a folder in your home director for the libreoffice profile:
mkdir -p ~/.lo-headlessCreate the service file:
mkdir -p ~/.config/systemd/user
nano ~/.config/systemd/user/libreoffice-listener.service
In nano, enter the following contents:
[Unit]
Description=LibreOffice headless UNO listener
After=network.target

[Service]
Type=simple
ExecStart=/usr/bin/soffice --headless --nologo --nodefault --nofirststartwizard --norestore
  --accept='socket,host=127.0.0.1,port=2002;urp;'
  '-env:UserInstallation=file://%h/.lo-headless'
Restart=on-failure
RestartSec=5

[Install]
WantedBy=default.target
Save the file with CTRL+O and ENTER on your keyboard, then exit as usual with CTRL+X.
Then run the following commands:
systemctl --user daemon-reload
systemctl --user enable --now libreoffice-listener
systemctl --user status libreoffice-listener
For user services to start at boot, enable linger:
sudo loginctl enable-linger "$USER"
Building the conversion script
Now that we’ve setup the folders, we can move on to the heart of the system: the bash script that will call unoconv and direct conversions and sorting automatically.
It will perform the following actions:
- Loop through every file in the inbox
- Use
unoconvto convert it to PDF - Move or delete any original files
- Log each operation
- Prevent multiple conversions from running at once
First, let’s create the script by running:
sudo nano /usr/local/bin/lo-autopdf.sh
Here’s the full content of the script, we’ll walk through the details:
#!/usr/bin/env bash
set -euo pipefail
IFS=$'nt'
shopt -s nullglob

INBOX="/srv/convert/inbox"
PDF_DIR="/srv/convert/PDFs"
ORIGINALS_DIR="/srv/convert/originals"
# Note: If using per-user service, change this to a user-accessible location like:
# LOG_FILE="$HOME/.lo-unoconv.log"
LOG_FILE="/var/log/lo-unoconv.log"
LOCK_FILE="/tmp/lo-unoconv.lock"
LIBREOFFICE_SOCKET="socket,host=127.0.0.1,port=2002;urp;StarOffice.ComponentContext"
DELETE_AFTER_CONVERT=false

timestamp() { date +"%Y-%m-%d %H:%M:%S"; }
log() { printf "[%s] %sn" "$(timestamp)" "$*" | tee -a "$LOG_FILE"; }

for dir in "$INBOX" "$PDF_DIR" "$ORIGINALS_DIR"; do
    if [ ! -d "$dir" ]; then
        log "ERROR: Directory $dir does not exist"
        exit 1
    fi
done

# Global script lock - prevent multiple instances
exec 9>"$LOCK_FILE"
if ! flock -n 9; then
  log "Another conversion process is already running. Exiting."
  exit 0
fi

log "Starting conversion run..."

for file in "$INBOX"/*; do
  [[ -f "$file" ]] || continue
  base="$(basename "$file")"
  ext="${base##*.}"
  lower_ext="${ext,,}"

  [[ "$base" == .~lock*# ]] && continue
  [[ "$base" == *.tmp ]] && continue
  [[ "$base" == *.swp ]] && continue

  # Optional: Check if file is busy (being written to)
  # Uncomment if you need to avoid processing files during large transfers
  #if ! flock -n "$file" true 2>/dev/null; then
  #  log "File $base is busy (being written to), skipping..."
  #  continue
  #fi

  log "Converting: $base"

  # Convert file - PDF will be created in same directory as input
  if unoconv --connection="$LIBREOFFICE_SOCKET" -f pdf "$file" >>"$LOG_FILE" 2>&1; then
    # Get the expected PDF filename
    pdf_name="${base%.*}.pdf"
    pdf_file="$INBOX/$pdf_name"

    # Check if PDF was created and move it to PDFs directory
    if [[ -f "$pdf_file" ]]; then
      mv -f -- "$pdf_file" "$PDF_DIR/"
      log "Converted successfully: $base → PDF"
    else
      log "❌ PDF was not created for $base"
      continue
    fi

    if $DELETE_AFTER_CONVERT; then
      rm -f -- "$file"
      log "Deleted original: $base"
    else
      dest_dir="$ORIGINALS_DIR/$lower_ext"
      mkdir -p "$dest_dir"
      mv -f -- "$file" "$dest_dir/"
      log "Moved original to: $dest_dir/"
    fi
  else
    log "❌ Conversion failed for $base"
  fi
done

log "Conversion run complete."
Feel free to copy this script as-is, if you’ve used the same directory structure as the tutorial. When you’re ready, press CTRL+O followed by ENTER to save the file, and CTRL+X to exit.
Make it executable and create the log file:
# 6. Make script executable and create log file
sudo chmod +x /usr/local/bin/lo-autopdf.sh
sudo touch /var/log/lo-unoconv.log
sudo chown lo-svc:lo-svc /var/log/lo-unoconv.log
sudo chmod 644 /var/log/lo-unoconv.log
Note: If you’ve created your directories elsewhere, you’ll need to update the $INBOX, $PDF_DIR, and $ORIGINALS_DIR variables in the script to point to your chosen directories.
With that said, let’s take a closer look and break this all down.
Error handling and safety
Even for a simple script like this, it’s best that we practice safety and avoid common problems. To this end, we’ve built the script with some safeguards in place.
The first line:
set -euo pipefail
enforces certain strict behaviours in the script:
- -e: exit immediately on any error
- -u: treat unset variables as errors
- -o pipefail: capture failures even inside pipelines
These three options will make the script more predictable, which is critical, as it will run unattended.
The second line:
IFS=$'nt'
is there to ensure filenames with spaces don’t cause trouble.
The third line:
shopt -s nullglob
prevents literal wildcards (*) from appearing when no files are present in the Inbox folder.
Variables and directory definitions
The first three variables:
INBOX="/srv/convert/inbox"
PDF_DIR="/srv/convert/PDFs"
ORIGINALS_DIR="/srv/convert/originals"
Define the directories the script will use. You can change these to your liking, if you’d like to use a different setup from what is demonstrated here.
These LOG_FILE variable:
LOG_FILE="/var/log/lo-unoconv.log"
is used for logging. This way, the script will keep track of every time it is run and any errors it encounters, for later troubleshooting.
Note: if you’re using a per-user service, change LOG_FILE to point to a user-accessible location, such as $HOME/.lo-unoconv.log.
The LOCK_FILE variable:
LOCK_FILE="/tmp/lo-unoconv.lock"
is used by flock for preventing multiple instances of the script. This will prevent any potential conflicts that could arise from concurrent instances.
The LIBREOFFICE_SOCKET variable:
LIBREOFFICE_SOCKET="socket,host=127.0.0.1,port=2002;urp;StarOffice.ComponentContext"tells the script how and where to find and communicate with LibreOffice. If you ever change the location of your LibreOffice setup, whether the port or the host, you’ll need to update this variable.
The DELETE_AFTER_CONVERT variable:
DELETE_AFTER_CONVERT=false
controls whether the original file should be deleted upon conversion. If you’d like this to be the case in your setup, you can set this variable to “true”.
Timestamps & logging
Next, we have two functions, timestamp() and log():
timestamp() { date +"%Y-%m-%d %H:%M:%S"; }
log() { printf "[%s] %sn" "$(timestamp)" "$*" | tee -a "$LOG_FILE"; }
The log() function adds the timestamps to messages using the output of the timestamp() function, and appends them to both stdout (what you’d see in the terminal) and the log file (set in $LOG_FILE).
This ensures you can always check what time something went wrong, if anything fails.
Checking for the necessary directories
The next part of our script checks that the right directories exist before proceeding:
for dir in "$INBOX" "$PDF_DIR" "$ORIGINALS_DIR"; do
    if [ ! -d "$dir" ]; then
        log "ERROR: Directory $dir does not exist"
        exit 1
    fi
done
This is especially useful if you decide to change the location of any of the directories listed in $INBOX, $PDF_DIR, or $ORIGINALS_DIR. Any errors will show up in the log file.
Concurrency control with flock
Next, the script needs to be able to handle two concurrency issues:
- Multiple script instances: cron might trigger a job while another conversion is still in progress.
- File access conflicts (optional): users might be writing to files when the script tries to process them. This aspect of the script is within the the
forloop (see “The heart of our script: the file loop” below). While this check would be useful to have by default, it has proved to be unreliable in some cases, due to quirks in flock itself, which create false positives. For this reason, it’s been made optional for this guide.
To prevent multiple instances, we use flock with a global lock file:
exec 9>"$LOCK_FILE"
if ! flock -n 9; then
  log "Another conversion process is already running. Exiting."
  exit 0
fi
This opens a file descriptor (9) tied to a lockfile (defined by $LOCK_FILE). If there’s already a conversion in progress, the script detects it, logs a message and exits cleanly.
If you’d like to include individual file checks, you can uncomment this section:
  # Optional: Check if file is busy (being written to)
  # Uncomment if you need to avoid processing files during large transfers
  #if ! flock -n "$file" true 2>/dev/null; then
  #  log "File $base is busy (being written to), skipping..."
  #  continue
  #fi
This can be found in the for loop after [[ "$base" == *.swp ]] && continue. If you choose to use this, do be sure to test the script to ensure that no false positives are blocking conversions.
The global flock check should be sufficient in most use cases. However, you may want to enable this secondary check if you are working in a high traffic environment with many users saving files simultaneously.
The heart of our script: the file Loop
Now we come to the most critical part of this conversion script: The for loop that parses files in the $INBOX and passes them to unoconv.
for file in "$INBOX"/*; do
  [[ -f "$file" ]] || continue
  base="$(basename "$file")"
  ext="${base##*.}"
  lower_ext="${ext,,}"

  [[ "$base" == .~lock*# ]] && continue
  [[ "$base" == *.tmp ]] && continue
  [[ "$base" == *.swp ]] && continue

  # Optional: Check if file is busy (being written to)
  # Uncomment if you need to avoid processing files during large transfers
  #if ! flock -n "$file" true 2>/dev/null; then
  #  log "File $base is busy (being written to), skipping..."
  #  continue
  #fi

  log "Converting: $base"

  # Convert file - PDF will be created in same directory as input
  if unoconv --connection="$LIBREOFFICE_SOCKET" -f pdf "$file" >>"$LOG_FILE" 2>&1; then
    # Get the expected PDF filename
    pdf_name="${base%.*}.pdf"
    pdf_file="$INBOX/$pdf_name"

    # Check if PDF was created and move it to PDFs directory
    if [[ -f "$pdf_file" ]]; then
      mv -f -- "$pdf_file" "$PDF_DIR/"
      log "Converted successfully: $base → PDF"
    else
      log "❌ PDF was not created for $base"
      continue
    fi

    if $DELETE_AFTER_CONVERT; then
      rm -f -- "$file"
      log "Deleted original: $base"
    else
      dest_dir="$ORIGINALS_DIR/$lower_ext"
      mkdir -p "$dest_dir"
      mv -f -- "$file" "$dest_dir/"
      log "Moved original to: $dest_dir/"
    fi
  else
    log "❌ Conversion failed for $base"
  fi
done
In simple terms, the first part of the loop:
  [[ -f "$file" ]] || continue
  base="$(basename "$file")"
  ext="${base##*.}"
  lower_ext="${ext,,}"

  [[ "$base" == .~lock*# ]] && continue
  [[ "$base" == *.tmp ]] && continue
  [[ "$base" == *.swp ]] && continue

  # Optional: Check if file is busy (being written to)
  # Uncomment if you need to avoid processing files during large transfers
  #if ! flock -n "$file" true 2>/dev/null; then
  #  log "File $base is busy (being written to), skipping..."
  #  continue
  #fi
scans every file in $INBOX and skips over directories, LibreOffice lock files, and any temporary files that LibreOffice may produce during editing. As mentioned earlier, the flock check ensures that no file is processed while being saved. If everything is fine, the script continues.
The next section performs the conversion, and logs what files are being converted:
# Convert file - PDF will be created in same directory as input
  if unoconv --connection="$LIBREOFFICE_SOCKET" -f pdf "$file" >>"$LOG_FILE" 2>&1; then
    # Get the expected PDF filename
    pdf_name="${base%.*}.pdf"
    pdf_file="$INBOX/$pdf_name"

    # Check if PDF was created and move it to PDFs directory
    if [[ -f "$pdf_file" ]]; then
      mv -f -- "$pdf_file" "$PDF_DIR/"
      log "Converted successfully: $base → PDF"
    else
      log "❌ PDF was not created for $base"
      continue
    fi
The remainder of the script determines what happens to the files after conversion:
log "Converted successfully: $base → PDF"

 if $DELETE_AFTER_CONVERT; then
      rm -f -- "$file"
      log "Deleted original: $base"
    else
      dest_dir="$ORIGINALS_DIR/$lower_ext"
      mkdir -p "$dest_dir"
      mv -f -- "$file" "$dest_dir/"
      log "Moved original to: $dest_dir/"
    fi
  else
    log "❌ Conversion failed for $base"
  fi
done
If deletion is enabled ($DELETE_AFTER_CONVERT=true, then the original files are deleted upon conversion. Otherwise, the script sorts the files into the folder corresponding to their file extension.
For example:
originals/odt/
originals/ods/
originals/odp/
This organisation makes it easy to trace back where each PDF came from.
If any file fails, a log entry is written for that file. This allows you to have a a clear history of all conversions.
The script then cleanly exits with done.
Setting up cron
Now that you’ve got everything set, you can set up cron to run the script periodically. For the purposes of this tutorial, we’ll set it to run every five minutes, but you can choose any interval you prefer.
First, open your crontab:
sudo crontab -u lo-svc -eIf you’re using the per-user setup, use crontab -e instead.
Note: On Fedora and some other systems, editing the system crontab with sudo crontab -e may launch vim or vi, so the standard commands we’ve been using for nano won’t apply. If that is the case, use ESC, followed by typing “:wq!” and pressing ENTER.
Then add this line:
*/5 * * * * /usr/local/bin/lo-autopdf.sh
If you need finer control, you can adjust the interval. For example, you can set it to run once every hour:
0 * * * * /usr/local/bin/lo-autopdf.sh
Setting up logging and rotation
We’ve set up our script to write detailed logs to /var/log/lo-unoconv.log. However, this file grow over time, so to avoid it getting too large, we’ll use logrotate to keep it in check.
To do this, first create a file in logrotate.d new file:
sudo nano /etc/logrotate.d/lo-unoconv
In that file, add the following:
/var/log/lo-unoconv.log {
    weekly
    rotate 4
    compress
    missingok
    notifempty
    create 644 lo-svc lo-svc
}
With this configuration, the system will keep four weeks of compressed logs, rotating them weekly. If no logs exist or they’re empty, it skips the cycle.
Verifying log rotation worked
Now that you’ve set up log rotation, it’s a good practice to ensure that it’s working correctly.
To do this, first run a rotation manually:
sudo logrotate -f /etc/logrotate.d/lo-unoconv
Since a successful logrotate typically produces no output, we’ll need to check for some indicators manually.
First, check for rotated files:
ls -la /var/log/lo-unoconv*You should see your original log file and a rotated version (e.g., lo-unoconv.log.1 or lo-unoconv.log.1.gz)
Next verify the log file still exists and is writable:
ls -la /var/log/lo-unoconv.logThis should show the file is owned by lo-svc:lo-svc and has 644 (-rw-r--r–) permissions.
Now, check logrotate’s status:
sudo logrotate -d /etc/logrotate.d/lo-unoconvThe -d flag runs in debug mode and shows what logrotate would normally do.
Test logging works by running the script manually and reading the log:
sudo -u lo-svc /usr/local/bin/lo-autopdf.sh
tail -5 /var/log/lo-unoconv.logIf you see log entries and your rotated files showed correctly before, then your script is writing to the log correctly. The automated rotation will happen weekly in the background.
Now you can run a test conversion.
Testing your setup
Now that you’ve got everything set up, you can test that it’s all working correctly. To do this, you can try the following steps:
- Create two test files:
# 1) Create a simple text file and convert to an ODT document
cat > sample.txt << 'EOF'
Weekly Report
=============
- Task A done
- Task B in progress
EOF

soffice --headless --convert-to odt --outdir . sample.txt   # produces sample.odt

# 2) Create a simple CSV and convert to an ODS spreadsheet
cat > report.csv << 'EOF'
Name,Qty,Notes
Apples,3,Fresh
Bananas,5,Ripe
EOF

soffice --headless --convert-to ods --outdir . report.csv   # produces report.ods
- Move the test files into
/srv/convert/inbox:
mv sample.odt /srv/convert/inbox/
mv report.ods /srv/convert/inbox/
- Wait for the next cron cycle and check the contents of
/srv/convert:
ls /srv/convert/PDFs
ls /srv/convert/originals- Review
/var/log/lo-unoconv.logto see that logging is working.
If all went well, you’ll have a clean log with timestamps showing each conversion.
Conclusion
You’ve just learned how build a reliable automated PDF converter using unoconv with just one Bash script and a cron job. You can drop this into just about any setup, whether on your server, or personal computer. If you’re feeling adventurous, feel free to modify the script to support other formats as needed.


