WordPress’s greatest strength is that it just works. There is little for the average user to worry about beyond installing plugins, tweaking themes, and applying updates. However, as with any complicated software, bugs in WordPress’s code can cause unexpected behavior, especially during the development of plugins, themes, and custom functions.
WordPress has built-in debugging tools, but using them can be awkward and time-consuming. They are turned off by default and can’t be configured in the web interface. cPanel’s WordPress Toolkit makes debugging faster and more convenient by providing an intuitive interface to configure logging and diagnose errors.In this article, we’ll show you how to use the WordPress Toolkit to:
- Activate and configure WordPress debugging mode.
- Identify faulty plugins.
- Activate and customize WordPress maintenance mode.
Activate and Configure WordPress Debugging Modes
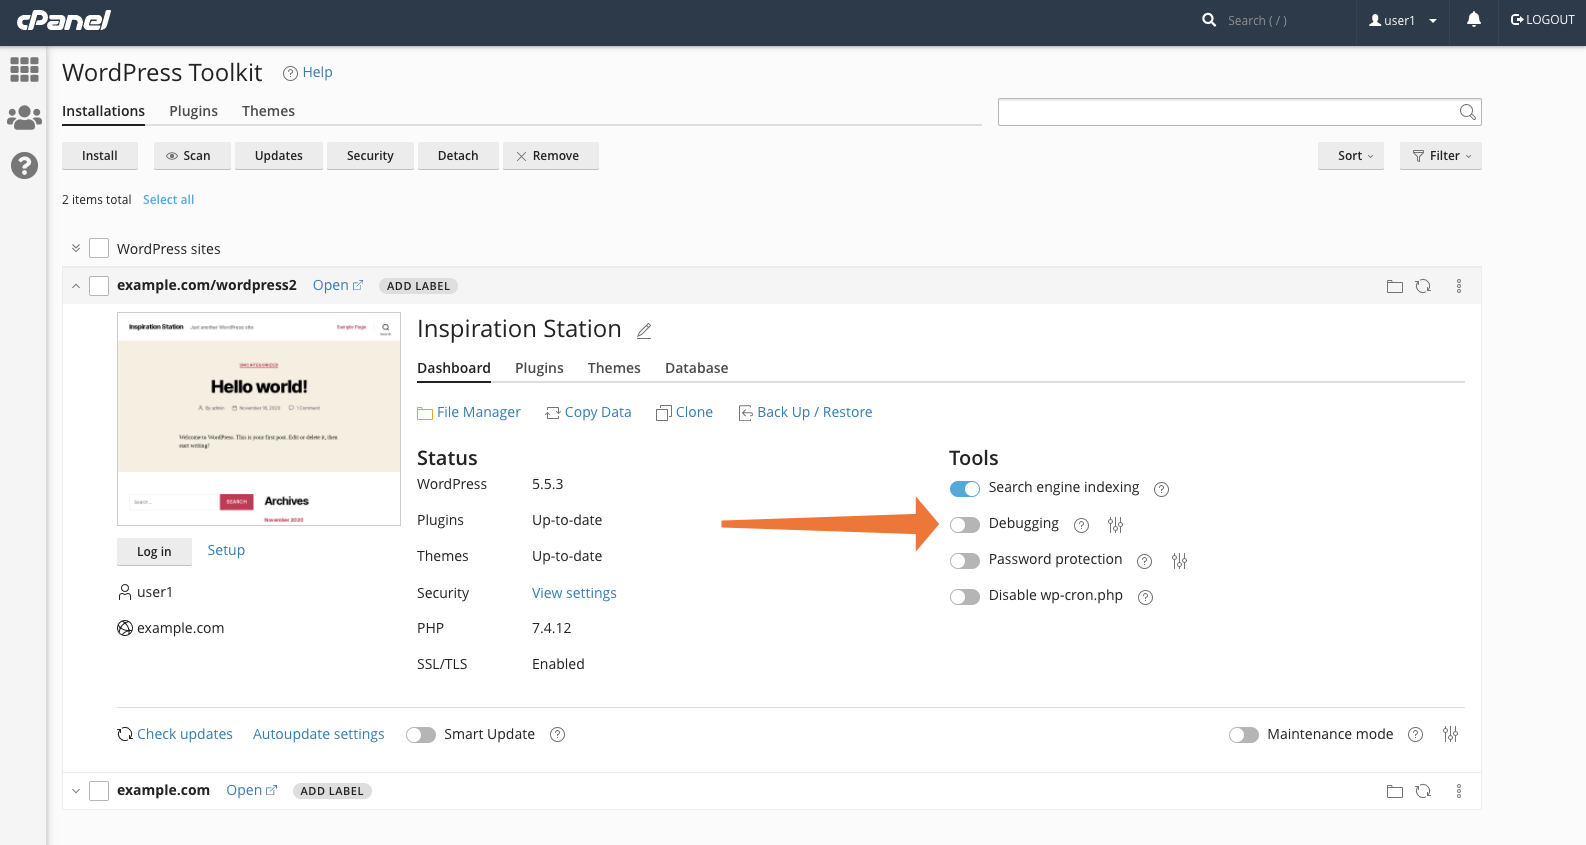
WordPress’s debugging mode tells the software to log error messages and warnings produced by the underlying PHP code. Error logs help developers to figure out the cause of unexpected behavior. Debugging is usually turned off because it consumes server resources and creates a potential security vulnerability. The logs reveal information about WordPress’s internal state that it’s better to keep secret. To turn on debugging mode, select a site in the WordPress Toolkit interface and click the Debugging switch in the Tools section.

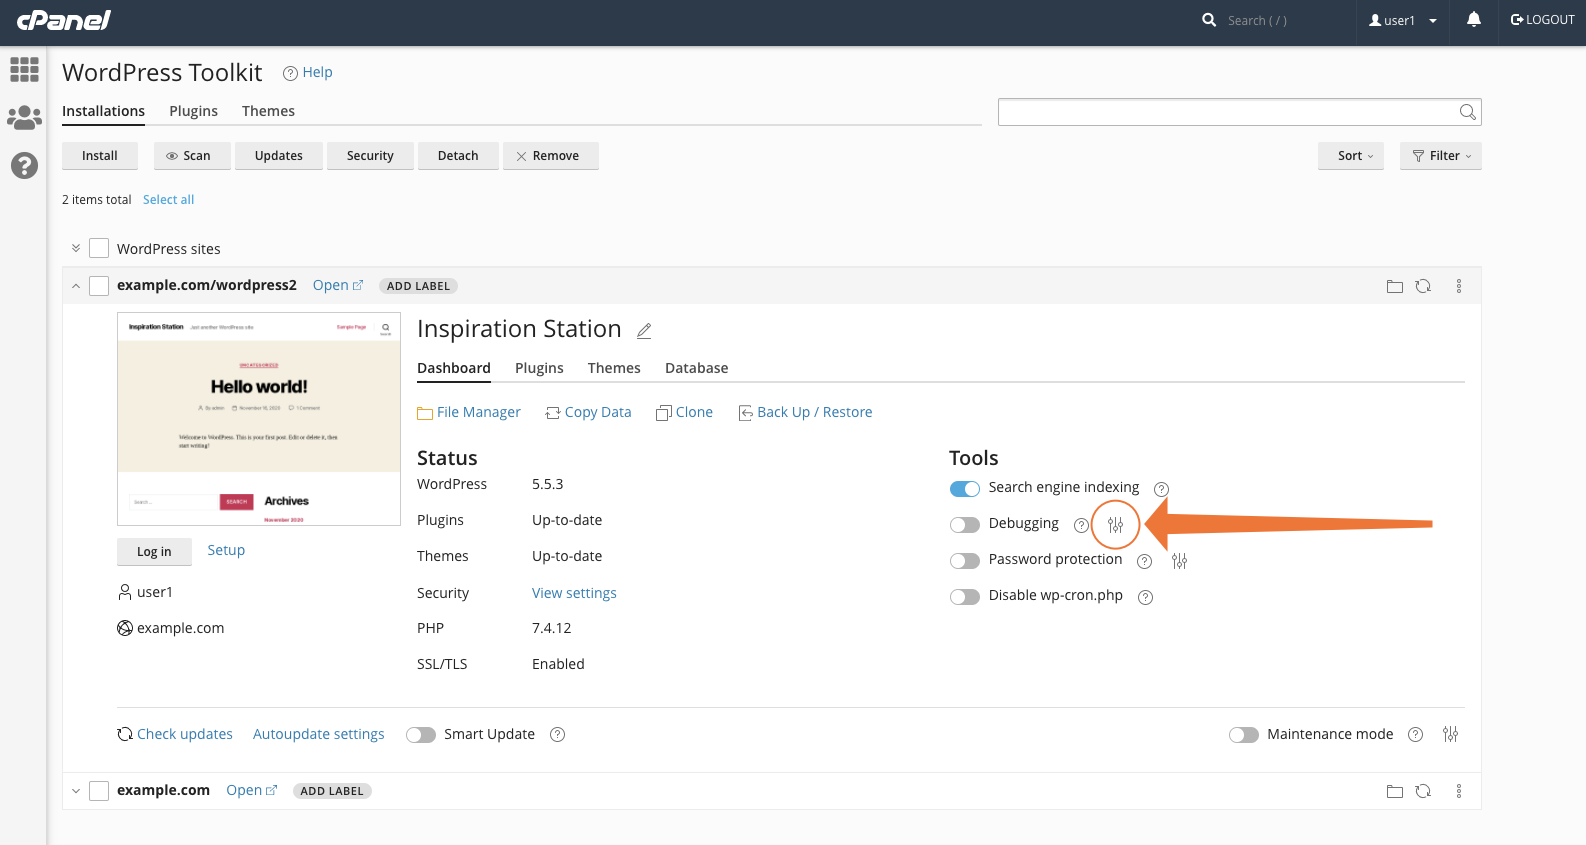
By default, debugging mode prints errors to WordPress’s HTML pages, but you can change its behavior in the configuration settings.

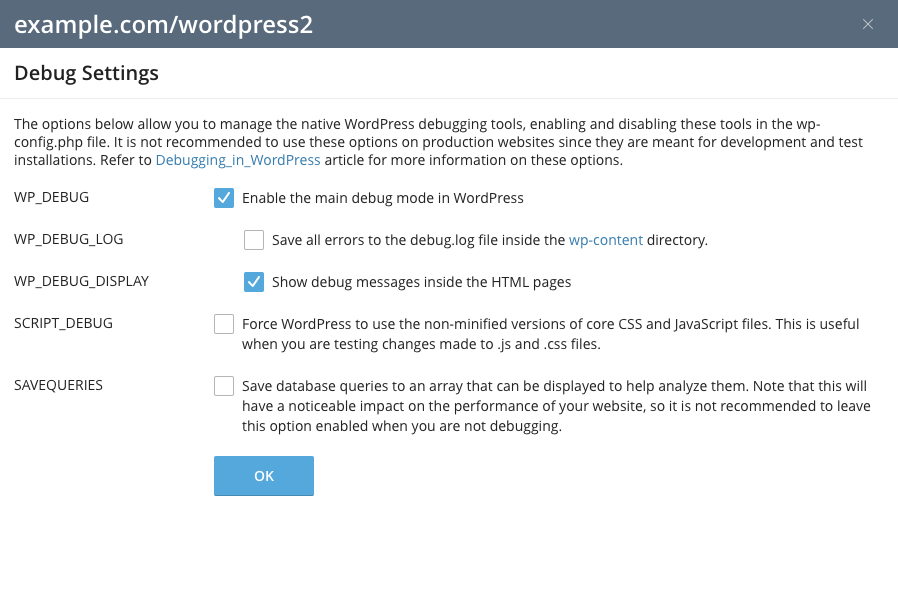
Let’s take a look at what the available options do:
- WP_DEBUG turns the debugging mode on and off. It should be off during regular operation.
- WP_DEBUG_LOG tells WordPress to write error messages to a file called debug.log, which you will find in the site’s wp-content directory when this option is turned on.
- WP_DEBUG_DISPLAY toggles whether error messages should be displayed on WordPress pages. If you’re debugging a staging or development site, showing error messages where they are generated is useful, but if you’re debugging a production site, it’s better to turn this option off and use the debug log instead.
- SCRIPT_DEBUG tells WordPress to use CSS and JavaScript files that haven’t been minified so it is easier to find bugs in front-end code.
- SAVEQUERIES saves database queries to a PHP array, which you can then display on a page or access in your code. Activating this option can significantly degrade your site’s performance, so don’t forget to turn it off when you’ve finished debugging.

Once you have selected debugging options, click the OK button, and WordPress begins to log errors. If you have turned on WP_DEBUG_LOG, you can use the File Manager to view logged errors by navigating to your WordPress site’s wp-content directory and opening debug.log.
Identify Buggy WordPress Plugins
Reading PHP error logs can be a challenge for non-developers, and there are easier options if you simply want to identify and deactivate a misbehaving plugin.You can find errant plugins through a process of elimination, deactivating plugins one at a time until the issue is resolved. Select a site in the WordPress Toolkit interface and click the Plugins tab.

You will find a switch that activates and deactivates individual plugins in the State column of the plugin table. Deactivate plugins in turn and check to see if the problem is fixed. Once you have identified the culprit, it can be uninstalled immediately by selecting the box next to the plugin’s name and clicking the Remove button.

To deactivate or uninstall a plugin from all WordPress sites hosted on your cPanel account, choose the global Plugins tab, select the offending plugin, and click the appropriate button.

Activate Maintenance Mode with WordPress Toolkit
Debugging mode is intended to be used by developers on staging and testing sites. It is not advisable to use it on a production website. However, if you have noticed a bug on a live site that impacts user experience, you may want to combine debugging mode with maintenance mode. Maintenance mode displays a static page to let users know a site is out of action. WordPress automatically puts the site in maintenance mode when updating plugins and themes, but you can turn it on manually with the WordPress Toolkit. The default WordPress maintenance mode page is minimal and unbranded, but the toolkit includes an enhanced page with a configurable template, countdowns, and custom copy. Open WordPress Toolkit and select the site you would like to debug. To activate maintenance mode, click the switch in the bottom right of the interface.

To configure the maintenance mode page, click the adjacent configuration icon, make your changes, and check that all is well with the Preview button.

We provide a simple and elegant default template, but the CSS and HTML controlling the layout, image, colors, and typography can be edited by clicking the Customize button to open the template folder in the cPanel File Manager.

Restoring WordPress Backups with WordPress Toolkit
The quickest way to fix a buggy WordPress site is to restore from a backup taken before the bug was introduced. WordPress Toolkit’s Backup and Restore interface makes light work of rolling the site back to an earlier point in time. Open the Back Up/Restore tool for the site you would like to fix.

Choose a recent backup from the list and click the restore button, as shown in the image below.

Restoring irretrievably deletes changes made to the site after the backup was made, so it’s a good idea to create a new backup before making changes. As you can see, the Back Up/Restore tool makes backing up and restoring a one-click operation. cPanel’s WordPress Toolkit simplifies the installation, management, and debugging of any number of WordPress sites, allowing WordPress hosts to offer a superior user experience while keeping support costs under control. You can learn more about the WordPress Toolkit’s security features in WordPress® Hardening: One-Click Security with cPanel and other features on the WordPress Toolkit landing page.
As always, if you have any feedback or comments, please let us know. We are here to help in the best ways we can. You’ll find us on Discord, the cPanel forums, and Reddit.