Are you having trouble sending or receiving emails from your WordPress website? Though form submissions should arrive to your inbox without a hitch, you’ve noticed that you’re missing a few or all of your customer inquiries? This problem can be frustrating but thankfully there is an easy solution that will fix the issue and allow you to get back to running your business quickly.
WP Mail SMTP is a WordPress plugin that fixes your email deliverability by reconfiguring WordPress to use a proper SMTP provider when sending emails. Continue reading to learn how to:
- Install WP Mail SMTP
- Set Up WP Mail SMTP Email Settings
- Send a Test Email
- Troubleshooting Email Issues
- Hide Announcements in WP Mail SMTP
- Uninstall WP Mail SMTP
Enjoy fast, secure hosting optimized for your WordPress site with our WordPress Hosting plans.
Install WP Mail SMTP
- Login to your WordPress Dashboard
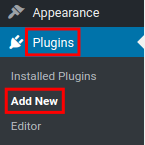
- Click Plugins then Add New in the navigation menu

- Type WP Mail SMTP in the available search field

- You will see WP Mail SMTP by WPForms listed, click the Install Now button

- Once it has been installed, click the Activate

Set Up WP Mail SMTP Email Settings
- Login to your WordPress Dashboard
- Click Settings then WP Mail SMTP

- Enter your appropriate email address in the From Email field
This email address should match your WordPress admin settings
- Check the box for Force From Email if you want to use this email for all transmissions from your site This will override settings in other plugins

- Enter the name you want your visitors to see in the From Name field

- Check the box for Force From Name if you want to use this name for all sent emails sent from your site This will override settings i
n other plugins
- In the Mailer section, choose Other SMTP

- Check the box to Set the return-path to match the From Email

- Enter your secure SSL/TLS setting in the available field
 Below is an example of what to enter
Option Example of Setting SMTP Host secure147.inmotionhosting.com Encryption TLS SMTP Port 587 Authentication Set to ON. SMTP Username admin@example.com (should be the same email address entered in the “From Email” section above) SMTP Password Enter the password for the email address you entered in the “SMTP Username” section above. - Click Save Settings once you have entered your SMTP settings

- You are finished when you see a message stating Settings were successfully saved

Sending a Test Email
- Log into your WordPress Dashboard.

 On the settings page click the Email Test link
  Enter the address you want to send the test to in the available field.
  Click the Send Email
button.
You will see a message stating “Your email was sent successfully!“

When you check your email you should have an email with the subject line similar to this: “WP Mail SMTP: Test email to admin@example.net“
Troubleshooting Email Issues
Below are some common problems and solutions for issues sending email from your WordPress site.
Email did not arrive
If the test email is missing and does not arrive, you can check the email log for records of the email.
- How to View your WordPress Mail Logs
Could not authenticate your SMTP account
Since this error often indicates an issue with your username or password, we recommend checking your settings in the WP Mail SMTP plugin.
Hide Announcements in WP Mail SMTP
Periodically, WP Forms the maker of WP Mail SMTP will post announcements in your WordPress Dashboard. These notifications can be helpful at times but you may find them distracting or irrelevant. Luckily, you do have the ability to disable them. In this tutorial, we will now show you how to hide announcements in WP Mail SMTP.
- Log into your WordPress Dashboard.


 In the General section check the box next to the Hide Announcement option.
  Click the Save Settings button.
Uninstall WP Mail SMTP
- Log into your WordPress Dashboard.


Select the Misc tab.

Check the box to Uninstall WP Mail SMTP on the Misc settings page.

Click the Save Settings button.

You will then see a message stating “Settings were successfully saved.“

Click the Plugins link in the navigation menu.

Find the WP Mail SMTP plugin and click the Deactivate link.

You will then see a “Plugin deactivated” message.

Click the Delete link under WP Mail SMTP.

A box will pop up and ask “Are you sure you want to delete WP Mail SMTP and its data?” Click the OK button to completely remove this plugin and all settings.

You will then see a message stating “WP Mail SMTP was successfully deleted.“
Become a master of WordPress plugins! Protect, optimize, secure, and expand the functionality of your website easily with the help of WordPress plugins!