PPA is a popular method of installing additional applications or newer versions of a software in Ubuntu.
I have written a detailed guide on PPA so I will just quickly recall it here. PPA is a mechanism developed by Ubuntu to enable developers to provide their own repositories. When you add a PPA, you add additional repository to your system and thus you can download applications from this additional repository.
sudo add-apt-repository ppa:ppa-address
sudo apt update
sudo apt install package_from_ppa
I have also written about deleting PPAs from your system. I briefly mentioned the PPA Purge tool in that article. In this tutorial, you’ll get more detailed information about this handy utility.
What is PPA Purge?
PPA Purge is a command line tool that disables a PPA repository from your software sources list. Apart from that, it reverts the system back to official Ubuntu packages. This is a different behavior than simply deleting the PPA repository.
Suppose application ABC has version x available from Ubuntu repositories. You add a PPA that provides a higher version y of the same application/package ABC. When your Linux system finds that the same package is available from multiple sources, it uses the source that provides a newer version.
In this example, you’ll have version y of application ABC installed thanks to the PPA you added.
Normally, you would remove the application and then remove the PPA from sources list. But if you use ppa-purge to disable the said PPA, your application ABC will automatically revert to the older version x provided by Ubuntu repositories.
Do you see the difference? Probably not. Let me explain it to you with real examples.
Reverting applications to the official version provided by Ubuntu
I heard that the upcoming VLC 4.0 version has major UI overhaul. I wanted to try it before it is officially released and so I used the daily build PPA of VLC to get the under-development version 4.
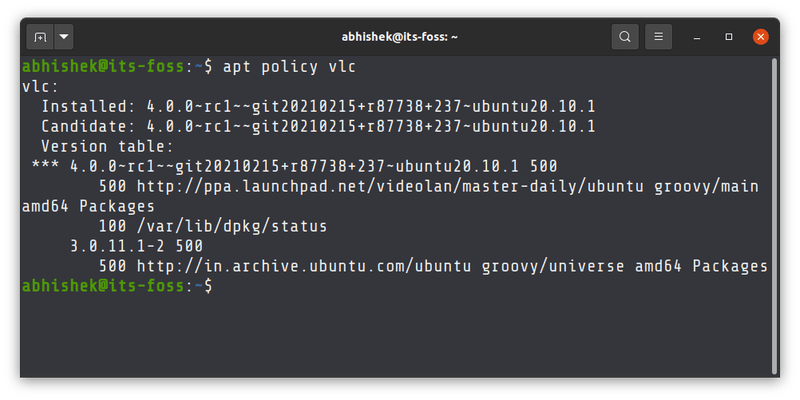
Take a look at the screenshot below. I have added the VLC PPA (videolan/master-daily) and this PPA provides VLC version 4.0 release candidate (RC) version. Ubuntu repositories provide VLC version 3.0.11.

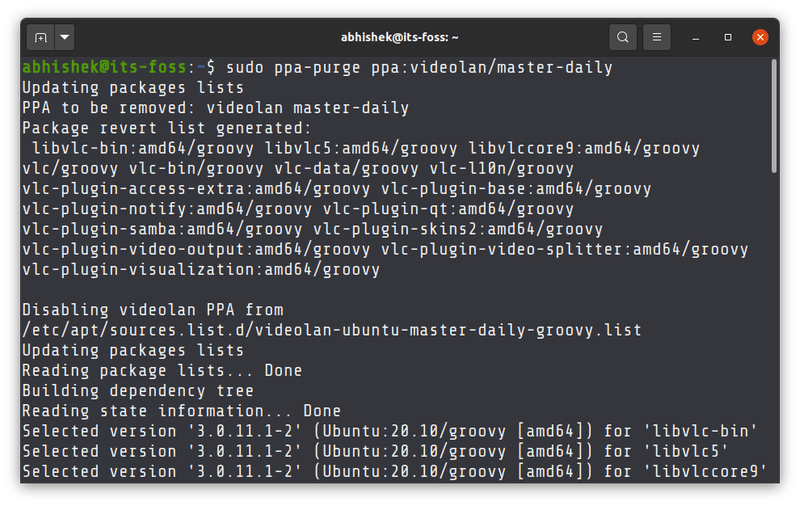
If I use the ppa-purge command with the VLC daily build PPA, it disables the PPA and reverts the installed VLC version to 3.0.11 which is available from Ubuntu’s universal repository.

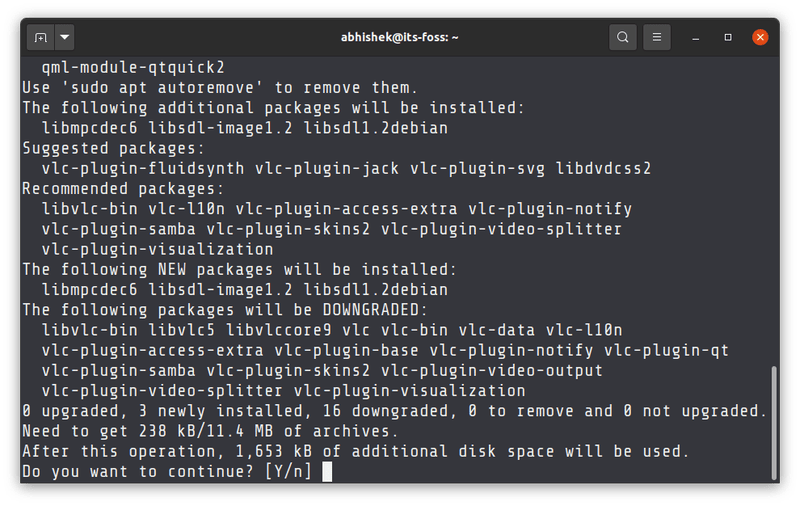
You can see that it informs you that some packages are going to be downgraded.

When the daily build VLC PPA is purged, the installed version reverts to what Ubuntu provides from its official repositories.

You might think that VLC was downgraded because it was upgraded from version 3.0.11 to VLC 4.0 with the PPA. But here is a funny thing. Even if I had used the PPA to install VLC 4.0 RC version afresh (instead of upgrading it), it would still be downgraded instead of being removed from the system.
Does it mean ppa-purge command cannot remove applications along with disabling the PPA? Not quite so. Let me show another example.
PPA Purge impact on application only available from a PPA
I recently stumbled across Plots, a nifty tool for plotting mathematical graphs. Since it is a new application, it is not available in Ubuntu repositories yet. I u
sed its PPA to install it.
If I use ppa-purge command on this PPA, it disables the PPA first and then looks to revert it to the original version. But there is no ‘original version’ in Ubuntu’s repositories. So, it proceeds to uninstall the application from Ubuntu.
The entire process is depicted in the single picture below. Pointer 1 is for adding PPA, pointer 2 is for installing the application named plots. I have discarded the input for these two commands with redirection in Linux.
You can see that when PPA Purge is used (pointer 3), it disables the PPA (pointer 4) and then proceeds to inform that the application plots will be removed (pointer 5).

Deleting a PPA vs disabling it
I have repeatedly used the term ‘disabling PPA’ with PPA Purge. There is a difference between disabling PPA and deleting it.
When you add a PPA, it adds a new file in the /etc/apt/sources.list.d directory. This file has the URL of the repository.
Disabling the PPA keeps this file but it is commented out the repository in the PPA’s file. Now this repository is not considered while updating or installing software.

You can see disabled PPA repository in Software & Updates tool:

When you delete a PPA, it means deleting the PPA’s file from etc/apt/sources.list.d directory. You won’t see it anywhere on the system.

Why disable a PPA instead of deleting it? Because it is easier to re-enable it. You can do just check the box in Software & Updates tool or edit the PPA file and remove the leading # to uncomment the repository.
Recap of what PPA Purge does
If it was too much information, let me summarize the main points of what the ppa-purge script/tool does:
- PPA Purge disables a given PPA but doesn’t delete it.
- If there was a new application (which is not available from any sources other than only the PPA) installed with the given PPA, it is uninstalled.
- If the PPA upgraded an already installed application, that application will be reverted to the version provided by the official Ubuntu repositories.
- If you used the PPA to install (not upgrade) a newer version of an application (which is also available from the official Ubuntu repository), using PPA Purge will downgrade the application version to the one available from Ubuntu repositories.
Using PPA Purge
Alright! Enough explanation. You might be wondering how to use PPA Purge.
You need to install ppa-purge tool first. Ensure that you have universe repository enabled already.
sudo apt install ppa-purgeAs far using PPA Purge, you should provide the PPA name in a format similar to what you use for adding it:
sudo ppa-purge p
pa:ppa-name
Here’s a real example:

If you are not sure of the PPA name, use the apt show command to display the source repository of the package in question.
apt show vlc
For example, the source for VLC PPA shows http://ppa.launchpad.net/videolan/master-daily/ubuntu groovy/main. Out of this the terms after ppa.launchpad.net and before Ubuntu are part of PPA name. So here, you get the PPA name as videolan/master-daily.
If you have to use to purge the PPA ‘videolan/master-daily’, you use it like this by adding ppa: before PPA name:
sudo ppa-purge ppa:videolan/master-dailyDo you purge your PPAs?
I wanted to keep this article short and crisp but it seems I went in a little bit of more detail.As long as you learn something new, you won’t mind the additional details, will you?
PPA Purge is a nifty utility that allows you to test newer or beta versions of applications and then easily revert to the original version provided by the distribution. If a PPA has more than one application, it works on all of them.
Of course, you can do all these stuff manually which is to disable the PPA, remove the application and install it again to get the version provided by the distribution. PPA Purge makes the job easier.
Do you use ppa-purge already or will you start using it from now onwards? Did I miss some crucial information or do you still have some doubts on this topic? Please feel free to use the comment sections.