Choosing to host your website on managed WordPress hosting over generic budget hosting implies you care about the performance and security of your website. And WPX Hosting is as good as it gets as far as WordPress hosting is concerned.
In this
post, I will share the detailed steps to install and configure WordPress on WPX
Hosting. This includes setting up your domain, installing WordPress, activating
free SSL, configuring free email, enabling 2FA, and managing backups.
Note: If you haven’t already signed up for WPX Hosting, sign up using this link to get 50% off on your first-month bill by using the promo code passionwp. You can also read my in-depth WPX Hosting review if you wish to know what makes WPX Hosting stand apart from the crowd.
MENU
Install WordPress on WPX Hosting
Setting up
WordPress on WPX Hosting once you’ve signed up is a piece of cake. After
logging in to your WPX account, you will be ushered into the client area (the
main dashboard).
Click on
the WordPress Hosting link to see your account details and manage your
websites. Now click the Manage all sites in this account button. You can
see your billing details here.
Before you
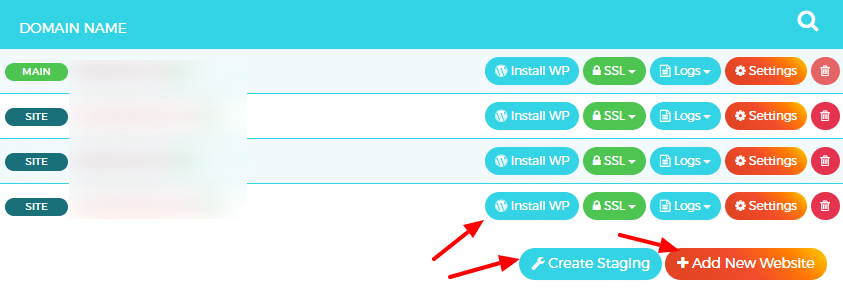
can install WordPress, you will need first to add a website. To do this, click
on the Websites/SSL link on the left menu. To add a WordPress site, click on
the Add New Website button.
Fortunately, WPX Hosting has integrated the separate tasks of adding a website, installing WordPress, and free SSL into a single activity.

You should
enter your website URL in the Domain Name field. Then you should check
the Install WordPress and Install SSL Certificate boxes and click
Next.
On this screen, you need to enter three crucial details:
- Your admin email (this can be
different from your WPX Hosting account email) - Your admin username
- Your admin password
Choose the
three wisely. The final step is to click the Create Website button, and
you’re done. You will receive an email with your website details once the setup
is complete. This usually takes less than 10 minutes.
Your new
website is setup on WPX Hosting with pre-installed WordPress and SSL. However, one
crucial step remains and that is to change your website nameservers to
point to WPX Hosting IPs. Until you do this, your WordPress site will not be
live.
So, log
into your domain account from where you purchased the domain name. Now, proceed
to the nameserver settings and remove the default settings and enter the
nameserver details emailed by WPX Hosting. It will be something like this,
ns12.wpxhosting.com and ns13.wpxhosting.com.
For example, if you bought a domain using Namecheap, then in your account dashboard, click the Manage button for your domain. Later, in the Nameservers setting, choose Custom DNS from the drop-down and enter your WPX Hosting nameservers.
Once you
have updated the nameservers, it can take anywhere from a few minutes to up to
an hour before your new WordPress site is visible. You can check the domain
propagation status here.
Now you do
two things: continue setting up your WordPress blog or configure your site on WPX
Hosting.
Activate free SSL on WPX Hosting
You
installed a free SSL certificate in the first step but didn’t activate it.
That’s why your site is presently loading on the non-https version.
To activate the free SSL from WPX Hosting, log into your WordPress site dashboard, and install and activate the Really Simple SSL plugin.
It will
show a message like Activate SSL or Reload Over SSL. Accept these and clear
your site cache. You will need to log out and log in again.
Check your
site; it should be loading over HTTPS now.
Configure free email from WPX Hosting
You might
have already known this, but in case you didn’t, you should know that WPX
Hosting provides free domain emails with all its plans. Moreover, the email
space isn’t tiny. It’s part of your overall hosting storage space so that you
can allow as little or as much space to your email account as your free storage
space permits.
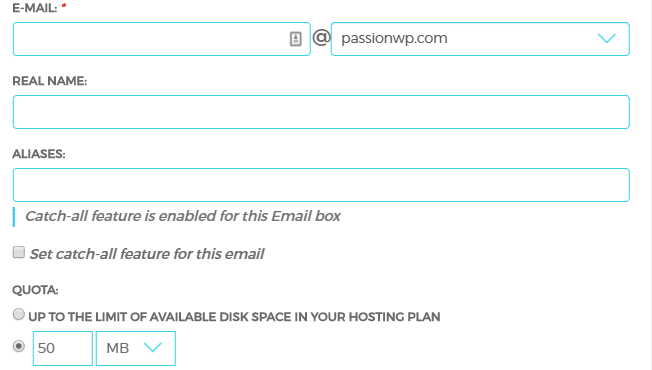
WPX Hosting offers multiple email accounts for free, and setting up an email account is a breeze. I have already shown how you can configure WPX Hosting email in the WPX Hosting review. I will list the steps from that review here for your convenience.
Head over to your hosting dashboard and click the Email
Boxes tab on the left menu. Enter the desired email address @ your domain and
allot the desired space to the email account.

Some of the advantages of using WPX Hosting email are:
- You can allot the entire free hosting space to your email account or define the exact email space
- You can create a catch-all email account. For example, if your email is hello@dogworld.com, then an email to woofwoof@dogworld.com will also be delivered to hello@dogworld.com.
- You can set up an email forwarder
- You can use 3rd party email clients like Gmail to receive and send emails
Enabling 2 Factor Authentication (2FA) on WPX Hosting
In today’s
hacking driven world, it is crucial to take your account security seriously.
Fortunately, WPX Hosting provides its clients with the option to enable 2FA for
their hosting account.
After logging into your WPX Hosting Dashboard, under the My Account navigation tab, click on Security. Then click on the Edit Details tab.
Scroll to
the bottom, and you will see a checkbox to enable Two-Factor Authentication.
Tick the box and scan the QR code with the Google Authenticator app to complete
the 2FA setup. Save the changes.
There are
additional security measures you can take to secure your WPX Hosting account
like Fort Knox.
Navigate to
the Security tab. Here you can
enable Login Notifications if you wish to receive an email alert on account
login. You can also allow access to your account from the selected IP range to
deter login attempts from different locations.
Creating and managing backups with WPX Hosting
WPX Hosting
provides free 28 days automated backups without requiring you to lift a finger.
The best part about their backups is that these are stored on separate servers,
which ensures data security in the event of your site getting hacked or going
offline.
Navigate to My Services > WordPress Hosting > Manage all sites in this account
Then click
on Backups in the left navigation
menu. Select the site whose backup you would like to manage.
Here, you can manage your personal backups (created by you) and the automated backups.
Let us
first look into the automated backups. Once you click on Restore Automated Backups, you will see the restore points for the
previous 28 days backups.
Click on a
date for which you wish to restore your backup.
You can
also create personal or manual backups.
Remember that you can create only one personal backup for each site in your
account.
The
personal backup is kept on your hosting server for only 24 hours, after which
it is automatically deleted. It also takes up your account’s storage space.
You may
want to create a personal backup in WPX Hosting only if you plan to migrate to
some other host. For all other purposes, automated backups should work just
fine.
Wasn’t that easy? You not only installed WordPress on your WPX Hosting site but also configured the webmail, SSL and learned to secure your account login with 2FA and even learned to manage your backups.
If you have any further queries about WPX Hosting, shoot them in the comments below.
Please Note: This page contains affiliate links to products or services that are tried and tested by us. If you buy the product or service using our affiliate links, at no additional cost to you, it will help us to maintain this site and publish useful content regularly. Thank you.
The post Install and Configure WordPress on WPX Hosting in Less Than 10 Minutes appeared first on WPBizBlog.

![Top 7 Best WordPress Hosting in Germany ð©ðª 2025,Jul [Reviewed]](https://wiredgorilla.com/wp-content/plugins/wp-fastest-cache-premium/pro/images/blank.gif)