WordPress is a well-organized and commonly used content management system (CMS). To improve the SEO ranking of your website, make sure that it is well-optimized, and also, you should refine your website’s workflow. You can use the Yoast SEO plugin to improve the traffic and the SEO ranking of your website.
Search Engine Optimization (SEO) is a technique or strategy used by website owners to improve their website’s traffic by ranking their sites higher in the search engines. SEO is to build a website with optimized code and formats to make it easily understandable by search engines.
Yoast SEO was formerly known as WordPress SEO, and it is a popular and powerful search optimization plugin for WordPress. Yoast SEO has a freemium version, which means they have both paid and free versions in the market. An essential feature in the free version of Yoast SEO plugin is the option to edit the slug, title, and meta description of your website. The paid version of Yoast SEO has the following added features.
- Social preview
- Multiple focus keywords
- Internal linking
- Redirect manager
Recent studies state that more than 75% of people don’t scroll to the second page of the search results. So, it is essential to optimize your website to appear on the first page of the search results. In this tutorial, you learn the SEO techniques used by the Yoast SEO plugin to improve the traffic of your WordPress site.
SEO Techniques
To improve your WordPress website’s SEO and ranking, you can perform the following SEO techniques.
- Configure meta robots.
- XML Sitemaps.
- Add/edit title, slug, and meta description.
- Analyze website content readability and SEO.
- Verify your website using Webmaster tools.
Configure Meta robots
You can configure meta robots’ tags on your website pages to instruct the search engines on how to index or crawl your website pages. There are some pages on your website, like the post-subscription “Thank You’ page, that you do not want the search engines to index or display in the search results. You can set up noindex or nofollow tags in the Yoast editor for these pages to easily remove it from indexing. The noindex tag asks the search engines not to add these pages to their indexes to prevent the search engine from showing these pages in the search results. Whereas, the nofollow tag asks the search engine not to follow any links on the mentioned page.
You can set noindex or nofollow site-wide or for individual posts. To configure site-wide settings for meta robots, follow the below process.
- Go to the ‘Search Appearance – Yoast SEO’ section and click the ‘Content Types’ tab.
- Select the content type from the list for which you want to set noindex from the ‘Content Types’ tab.
- For example, if you don’t want to index your posts to the search engine, then select the content type as post and then slide the following bar to ‘NO’ to make sure that none of your posts get indexed on search engines.
- Similarly, you can do the same with taxonomies, media, or archives in the respect tabs under the ‘Search Appearance – Yoast SEO’ window.
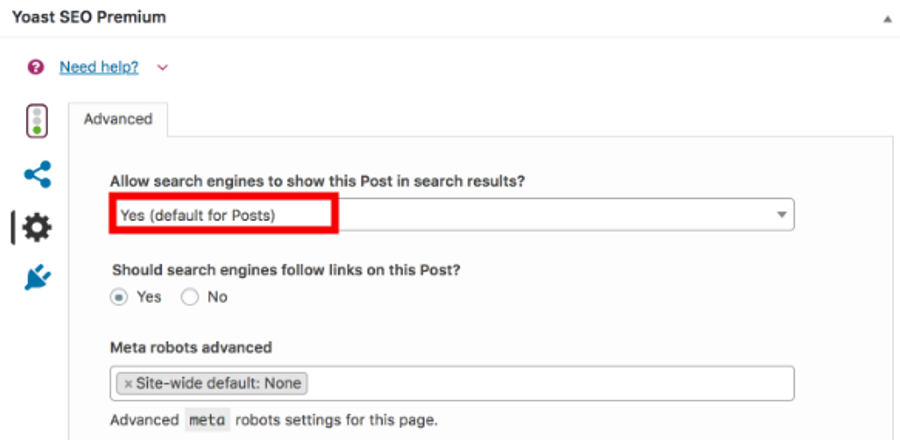
If you want to noindex or nofollow a particular page or post, follow the below process.
- Select the post, page, media, or taxonomy in WordPress, which you want to noindex or nofollow.
- Go to the ‘Yoast SEO meta box’ under the content editing block.
- Click the ‘Advanced’ button in the Yoast SEO meta box.
- Change the Allow search engines to show this post in search engine from default Yes to No.

2) XML Sitemaps
The XML sitemaps are known as a map that leads the search engine to locate the crucial pages of your website. The XML sitemaps help the search engine to crawl through your website efficiently, even if the management of internal links are not properly. To configure XML sitemaps for your website, follow the below steps.
- Go to the ‘General’ settings of Yoast SEO and select the ‘Features’ tab.
- If you want to enable XML sitemaps, slide the bar of XML sitemaps to ‘On’ under the features tab and to disable it, slide it to ‘Off’.
3) Add or Edit the Title, Slug, and Meta Description
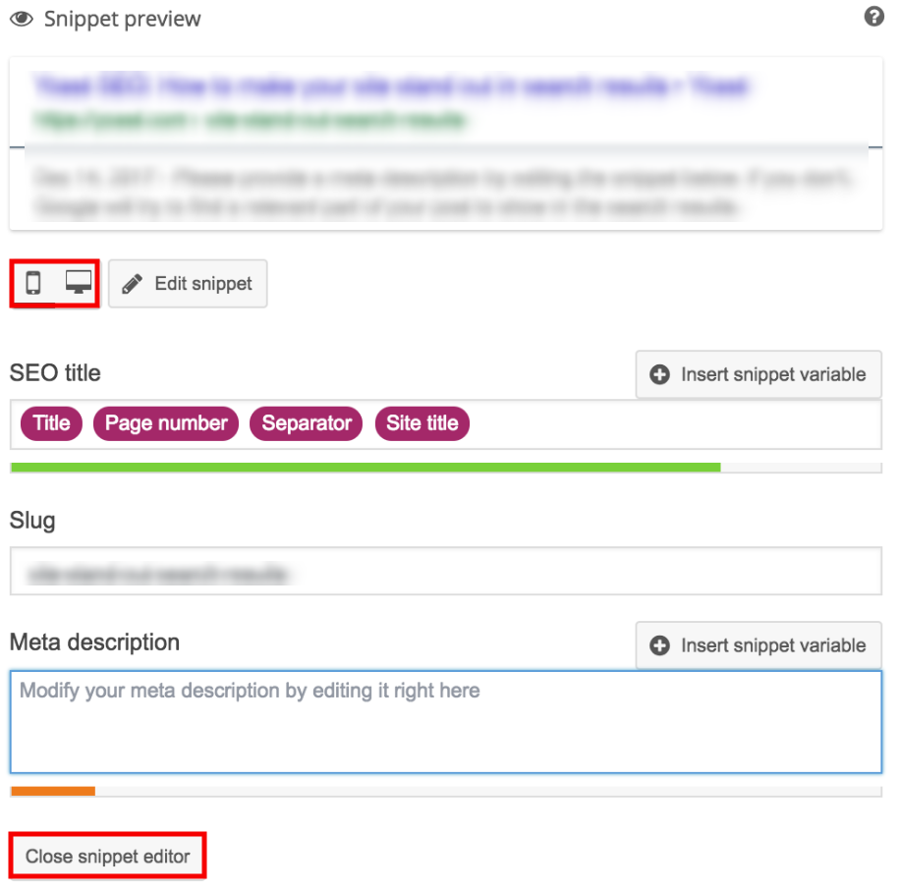
The Yoast SEO plugin supports the preview and editing of snippets. This option helps you to learn about how your site link appears in the search results. Using this option, you can check how your link gets displayed on both mobile and desktop search engines. Always keep in mind that the title and meta description of your link should attract or tempt the user to visit your website.
Follow the below process to add or edit the title, slug, and meta description for a post.
- Log in to WordPress dashboard as admin and select the ‘Posts’ option from the left side-bar menu.
- Click the ‘Add New’ option to start a new post. If you would like to optimize the existing post, then click ‘All Posts’ and select the title of the post that you need to optimize.
- Expand the ‘Yoast SEO’ section in the text editor.
- Then, click the ‘Edit snippet’ button in the Yoast SEO section.
- Now, you can edit or add details under the title, slug, and meta description to make your website post or page attractive.
- Yost SEO shows the preview of all the changes you make on the same page.
- After you are okay with the changes made, click the ‘Close snippet editor’ button.

4) Analyze Website Content Readability and SEO
You can use the content analysis tool of Yoast SEO for the analyses of the content readability and SEO. This tool helps you to identify all the problems that you made on your website. It displays the analysis result in the meta box of a post or page in three colors. The green dot-like emoji means the content is best to post or publish, and if it is orange, then the content is okay, but you can improve the content to make it perfect. If the analysis result shows any red-colored emoji, then there is some serious problem with the content or keyword strategy of your post or page. So, you need to rectify all this problem and then reanalyze the content using the tool until you make all the analysis result green.
5) Verify Your Website Using Webmaster Tools
The webmaster tools help you to communicate with the search engine giants, and with the help of this tool, you can perform the following.
- Submit the site maps.
- Check the errors of your website, which the crawlers indicated.
- Instruct the search engines to crawl or not crawl to a particular page on your site.
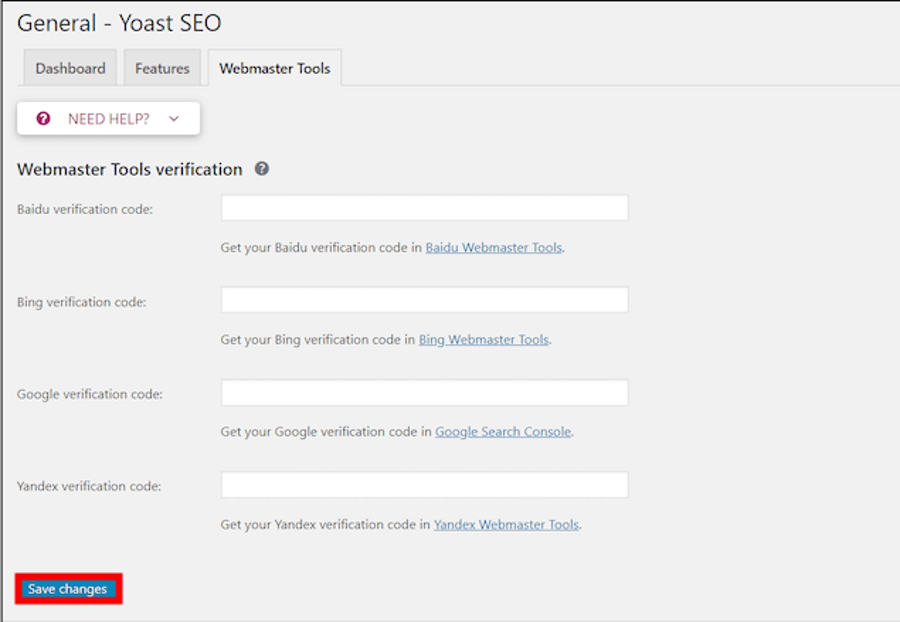
To connect to the webmaster tools, you need to copy and paste the verification code for each search engine, such as Bing, Google, Yandex, and more under the General >> Webmaster Tools tab. Then, click the ‘Save changes’ button.

Please comment below for any questions or queries. If you are an InterServer customer, please reach out to our support team for further help.
The post SEO Techniques for WordPress Using Yoast SEO Plugin appeared first on Interserver Tips.
