Controlling how users access your website is important for security and functionality. This can be done while managing users in Drupal. By setting certain permissions, you can delegate who can do what while logged into the website.
In this tutorial, I’m going to show you a bit of what can be done in an access control list in Drupal. By knowing how these functions will impact your site, you’ll have a better idea of what users are doing.
Setting Permissions for Access Control
By default, the site will come with a few roles for access control when you install Drupal. These are: Anonymous User, Authenticated User and Administrator. However, more can be added as you create new roles and user types for the website.
Managing the roles users have for the website can keep it clean and organized. It’ll also greatly reduce security threats and spam if you monitor it on a regular basis.
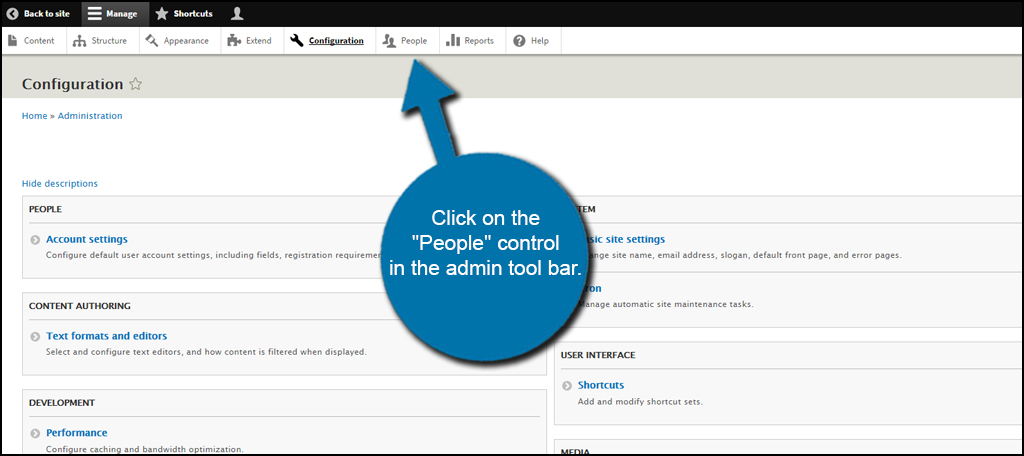
To access these permissions, click on the “People” control in the admin tool bar.

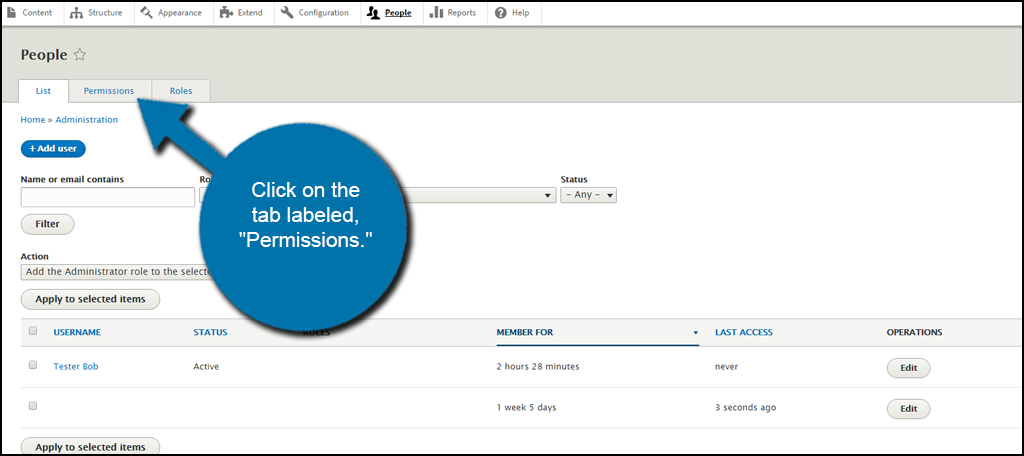
Click on the tab labeled, “Permissions.”

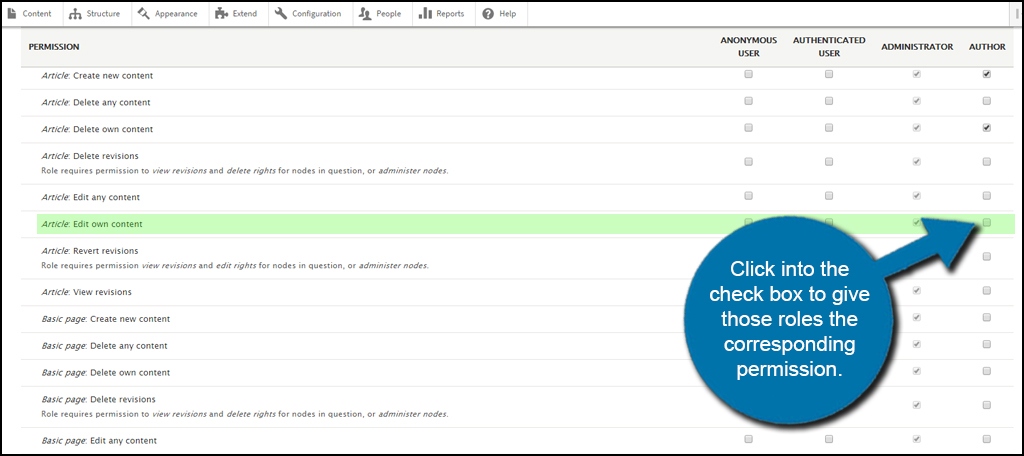
In the Permission section, you can modify the various ways users can control the website. The type is on the left while the roles are on the right. Click into the check box to give those roles the corresponding permission.
For example, I want to give my authors the ability to edit thier own content. For this, I would scroll down to “Node,” find the “Article: Edit own content” permission and then check the box to the right under “Author.”

As you can see from the list, there are a large number of features you can customize for the different roles you create. In fact, some modules and extensions will add even more to this access control list in Drupal so you can fine-tune what others can do.
Many of these controls will give suggestions and warnings when using them. For example, clicking the check box to give my authors, “Administer permissions” would allow them to change the permissions for everyone on the site. In this instance, I wouldn’t want to do that.
Be careful about what kind of permissions you’re handing out to your users. It often relies on trust and whether or not you feel comfortable giving certain people access control to various sections of your site.
Once all of your choices have been set, click the “Save permissions” button on the bottom.

Editing Access Control By Individual Roles
Any time you create new roles for your users, they will show up in the permission list. This can become quite overwhelming if you continue to add roles to website profiles.
If you want to focus on one single role instead of viewing all of them in the permission list, click the “Roles” tab at the top.

Next, click on the down arrow next to “Edit” of the role you want to modify. A new drop-down window will appear giving you a couple of choices. Click the option to “Edit permissions.”

This will open a window similar to the Permissions area with one important difference…the role you are editing is the only one you see.
Editing access control in this method is probably one of the safest ways to modify user control. It will greatly reduce accidentally giving someone control over features they shouldn’t have access to.
Once you’ve made your selections, click the “Save permissions” button.

Governing over the access control list in Drupal helps ensures site safety and productivity. You need to make sure the right people have access to the right material. Otherwise, it could cause all kinds of complications. This is just one of the methods to keep your Drupal web hosting safe and secure. Routinely managing these accounts could save a great deal of frustration and costs later on.
The post How to Use The Access Control List in Drupal appeared first on GreenGeeks.