The WebP image format is a great way to speed up your WordPress site. Large photos are often the main cause of slow loading times, but even an image compressor can leave your users forced to load megabytes of image files and slowing their connection to a crawl. Plus, compressors can also make your images blurry.
But there’s an often overlooked file format that can compress images down to nothing while barely affecting quality at all. If you hate how lossy JPEG compression makes your photos look, or the huge file sizes of PNGs, WebP might be just what you’re looking for.
What is WebP, when should you use it, and how can you add it to your WordPress site? Let’s go over all of these questions so you can get your image sizes down and your pages loading faster.
WebP: What is That?
Most image formats we use today have been around since nearly the beginning of the world wide web. And that makes sense; PNG, JPEG, and GIF do their jobs pretty well. What more do you need?
The problem comes when these file formats just aren’t compressing enough. Though the Internet is getting faster, the rise of mobile devices means less power packed into a tiny piece of technology (compared to desktop computers). In addition, while mobile connections are available worldwide, they can be slower than traditional wired internet.
WebP came out only ten years ago in 2010, and it offers a solution to that long-running issue — better compression and comparable image quality to what you’re already seeing. Its sister project WebM has a similar goal in mind: compressing video and audio while optimizing them for the web.
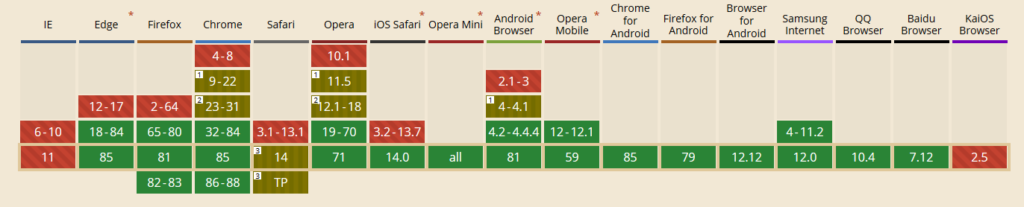
WebP uses both lossy and lossless compression, and even supports transparency, color profiles, metadata, and animation. It’s also supported or partially supported by all major browsers except Internet Explorer, KaiOS, and older versions of Safari which still see wide use today.
Overall, it has everything the file formats you’re using right now have and more.
Why WebP is So Important
Google has done multiple studies on WebP, and every time they’ve found that their algorithm can compress 26% smaller with lossless images and 25-34% smaller with lossy images.
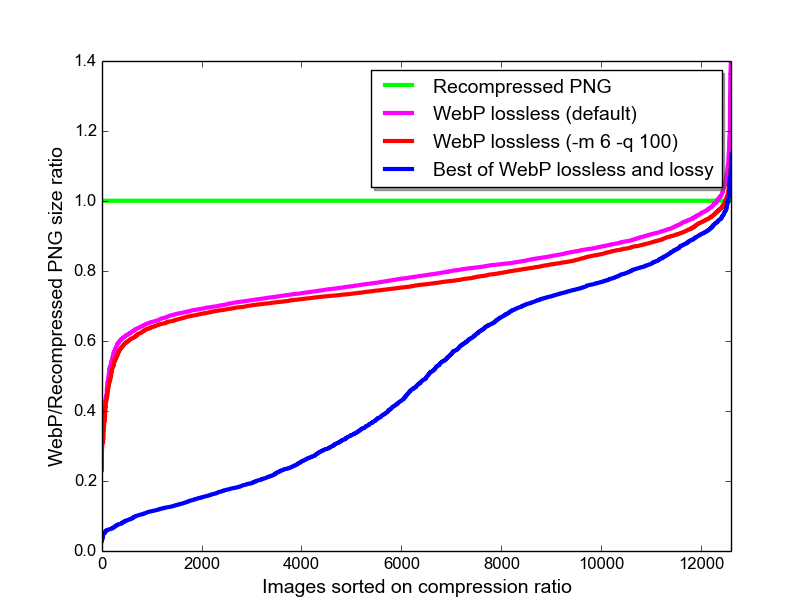
In other words, whether you choose to compress images more at the expense of quality or compress them less to preserve clarity, WebP consistently does it better. And even compared to lossless algorithms like PNG, you’re not losing much in terms of quality.
But despite these benefits, and WebP having been around since 2010, only 0.3% of all websites use it. Trends are going up, but it’s still a lesser-used technology. Considering how much WebP has to offer, this is surprising.
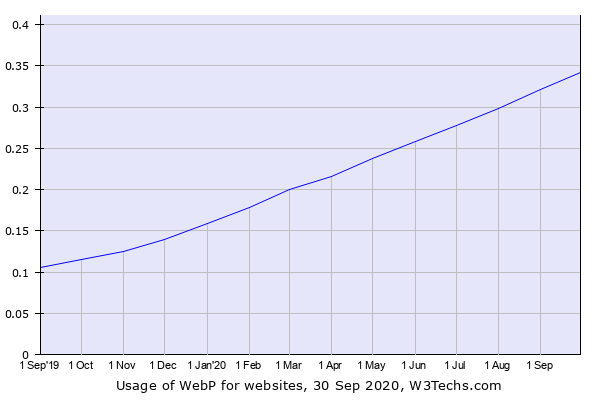
This is probably due to a lower early adoption rate as WebP didn’t use to support features like animation or transparency, and its previously minimal support on common browsers.
Plus, switching to WebP isn’t as easy as using common file formats like PNG. You can’t just save a WebP image on your computer and upload it to your site. It takes a few more steps.
But if you want your site to load as quickly as possible, it’s well worth the extra effort.
WebP vs. Other File Types
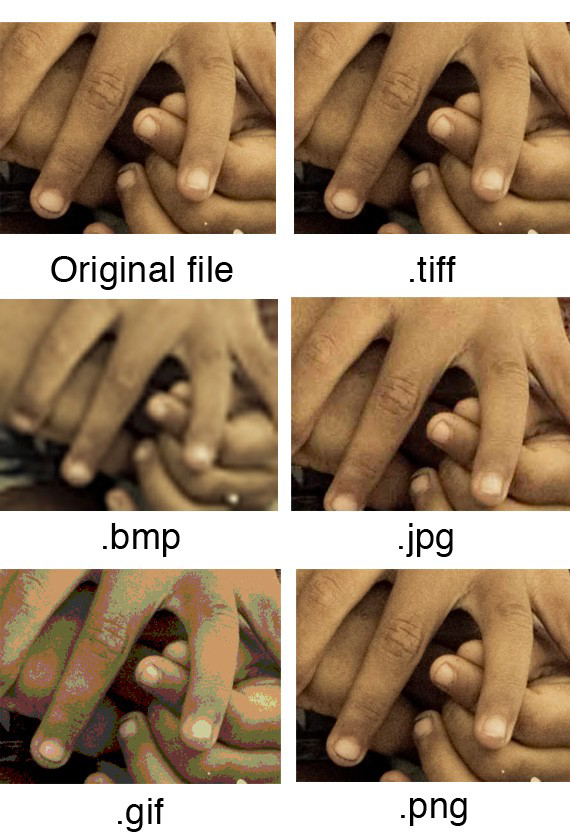
Many image formats exist, some more suited than others for certain tasks. Some compress well; others support animations; again others allow transparent backgrounds. WebP isn’t always the best choice, but it works well in a variety of situations.
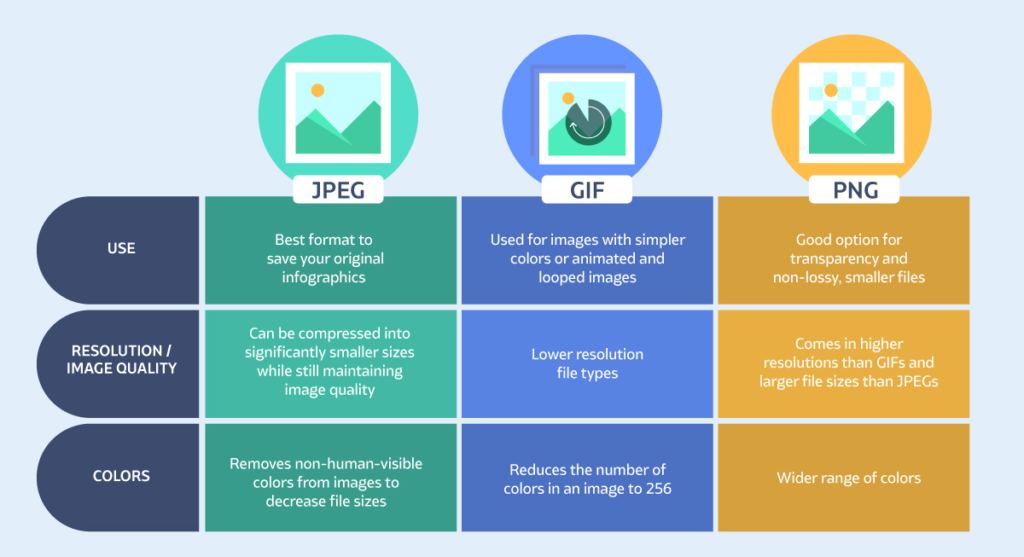
- PNG is one of the most common file formats, popular for its crisp lossless compression, suitable for displaying photography and artwork online.
- A lossy file format, JPG is a common choice to reduce file size. This comes with the drawback of noticeable artifacts in the image, and a lack of support for transparency.
- TIFF images have absolutely no compression. The image is displayed in all its glory, which, of course, comes at the cost of a huge file size. This is not a great file type for the web.
- GIF is one of the few common file formats that supports animation. But being an older format, it only supports 256 colors, which often leaves images looking ugly and low-quality. GIF should only be an option if you need animation.
- EPS and SVG files are a league of their own. These display vector images, which are perfectly clear and scalable because they’re not actually made of pixels.
- And last is WebP, which has an image quality comparable to JPG or PNG with much smaller file sizes, as well as support for transparency and animations. It’s the jack of all trades of image formats.
WebP is generally a good choice if you’re okay with losing a bit of quality in exchange for a smaller image. Unless you’re making a portfolio where quality is important, the tradeoff is usually worth it. If not, consider using PNG instead (TIFF images are just too unwieldy to actually use on a website).
Otherwise, WebP is often just the superior option.
How to Upload WebP Images to WordPress
There are two ways to get WebP images on your site: manually, or with a plugin. A plugin is the recommended way as it will handle all the coding for you and take a lot less setup.
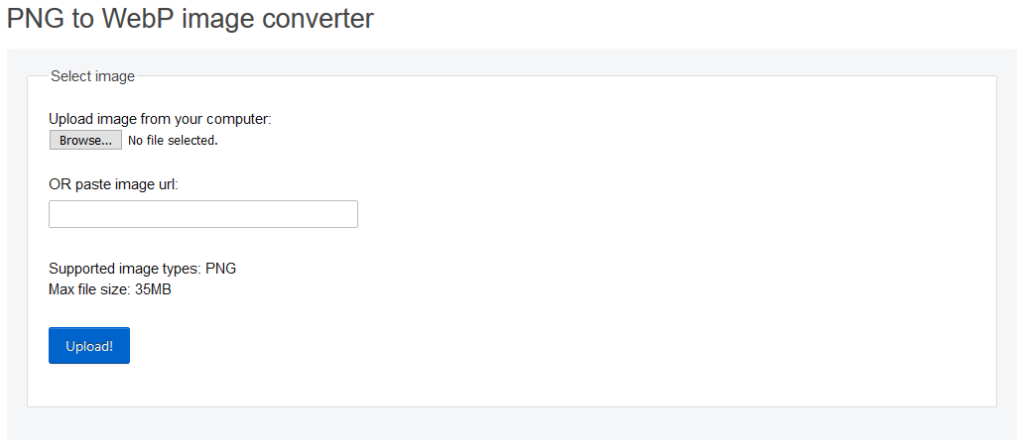
But if you’d rather do it manually, your first step is obtaining a WebP image. You can’t just save an image as WebP or change the extension manually on your computer; you need a dedicated converter.
For that, you could try Google’s own Photoshop plugin WebPShop, or you could use this online WebP converter and upload any image on your computer.
Either way, when you have a WebP image ready for upload, you can then display the WebP image in HTML or CSS like you would any other image. You’ll want to make sure you specify fallback images for unsupported browsers, but other than that it’s just like referencing any other image in HTML.
<picture> <source srcset="img/awesomeWebPImage.webp" type="image/webp"> <source srcset="img/creakyOldJPEG.jpg" type="image/jpeg"> <img src="img/creakyOldJPEG.jpg" alt="Alt Text!">
</picture> .no-webp .elementWithBackgroundImage { background-image: url("image.jpg");
} .webp .elementWithBackgroundImage{ background-image: url("image.webp");
}
There’s just one problem with that: WordPress doesn’t allow you to upload WebP images using the media uploader. It will just display an error telling you that file type isn’t supported.
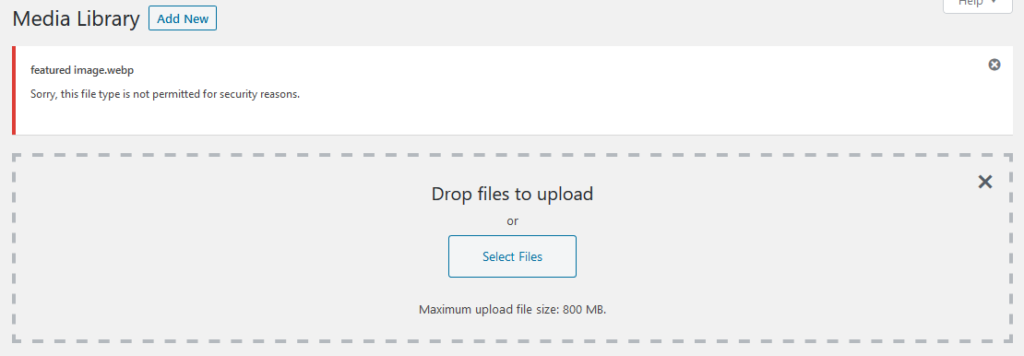
You can manually upload WebP images to your server and configure your site to properly display them, but it’s a lot of effort.
Instead, you might want to try out one of these plugins. They do the conversion much easier and most don’t require you to edit code to insert your images.
Imagify

Imagify is for more than just WebP conversion; it also optimizes your images and thumbnails as you upload them. Imagify has three levels of compression: normal (lossless), aggressive (lossy), and ultra (maximum lossy compression). But the optimization techniques make it so that even at ultra level, it’s often hard to tell an image has been compressed.
The Bulk Optimizer also allows you to compress all previously uploaded images. And backup versions are saved, so if you don’t like the compression, you can always undo it.
When you upload an image to your site with Imagify activated, it automatically generates a separate WebP version. That way, you can display the optimized WebP images on your site while still retaining a fallback image for unsupported browsers.
Imagify is free and you can compress 25MB of images every month unless you purchase a plan. Converting to WebP is totally free and has no cap.
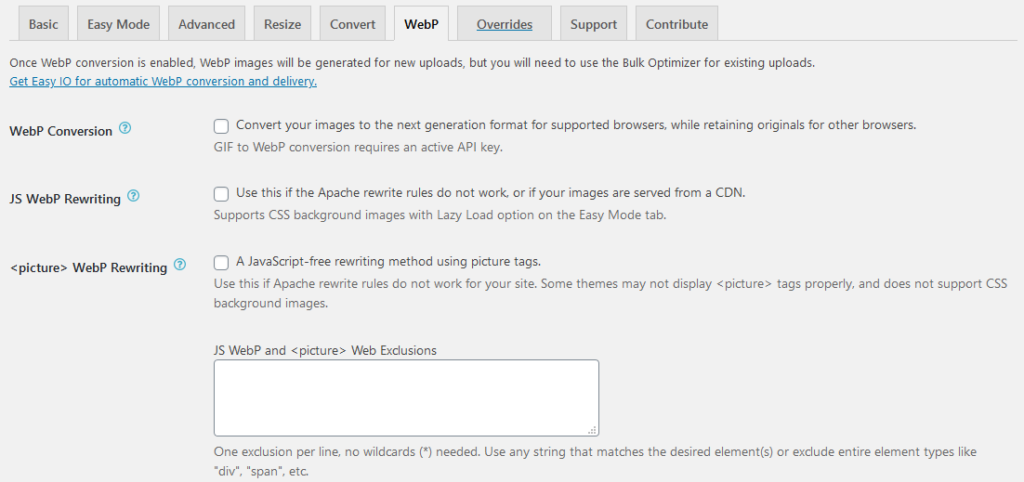
EWWW Image Optimizer

EWWW (don’t you love that acronym?) is another popular WordPress image optimizer that doubles as a WebP converter. Its compression is unlimited and free, so no monthly data caps to worry about. There’s also a bulk uploader and the plugin compresses every image, not just those in your media library.
WebP conversion is available. With Easy IO, it’s automatic and you also get automatic lazy loading, compression, and page size scaling without modifying the original image.
It is worth noting that EWWW IO has a premium version with better compression, so you’ll need to pay to get your images as small as possible. It also only stores backups of uncompressed images for 30 days.
Overall, EWWW IO is very easy to use and it makes converting your images to WebP simple. It has no upload limits, which is great. But the best compression is only available on paid plans, so keep that in mind.
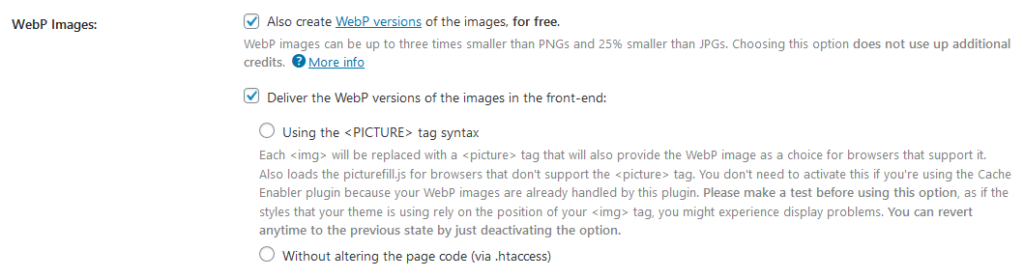
ShortPixel

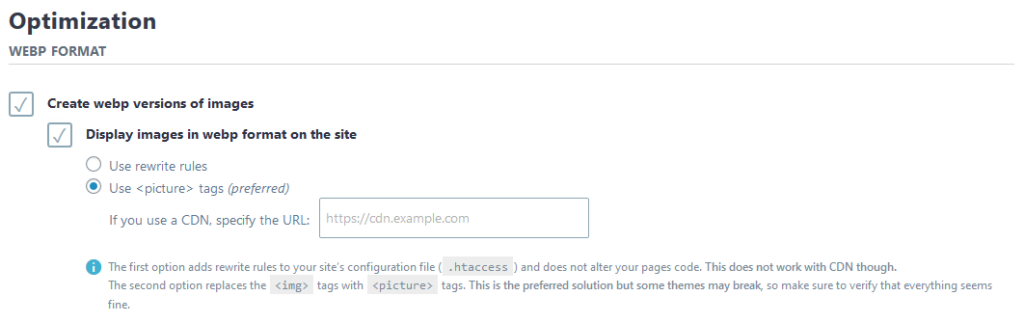
ShortPixel offers a surprising amount of features for an image compression plugin. With the tick of a simple setting, it automatically generates WebP versions whenever you optimize an image, either by uploading directly or with the bulk optimizer. Displaying them is as easy as changing a setting or modifying a document on your server.
Besides that you can automatically convert PNG to JPG, optimize thumbnails, resize images, optimize images outside the media gallery, remove metadata, and back up unoptimized images on your server. And that’s just brushing the surface of this plugin’s features.
It runs on a credit system, where you get 100 image credits a month. You can buy more credits if you need them, but there are no locked-off premium features. It’s also possible to get more credits for free if you’re a non-profit or recommend ShortPixel to your friends.
ShortPixel offers the most for free and is definitely the best choice if you are planning to upload less than 100 images per month.
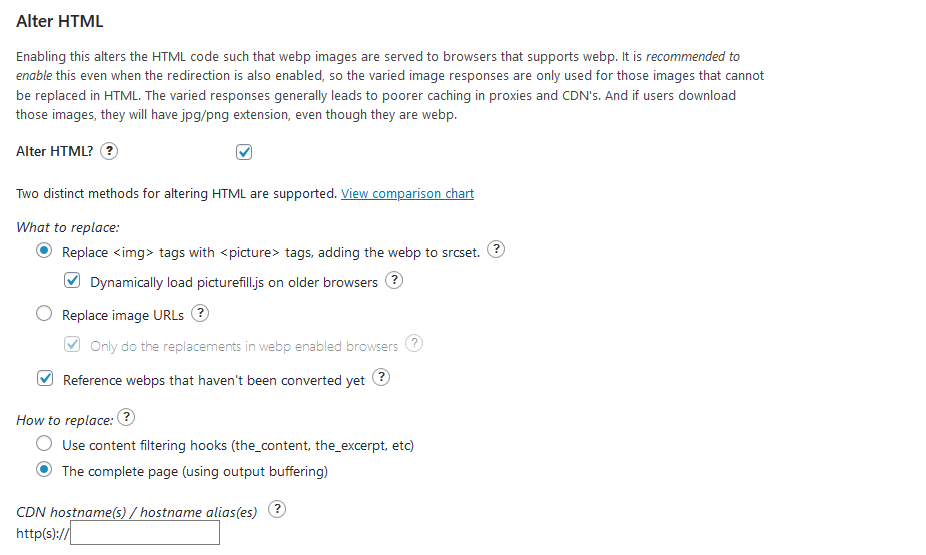
WebP Express
If you don’t need these compression plugins and just want to convert to WebP in WordPress, WebP Express is for you. It’s a simple, free plugin (no premium version to deal with) that does its job well.
There are a few ways to get it working. It uses a library to locally convert images to WebP with technology on your server. Not all web hosts support this, but don’t despair — you still have options. You can either connect to another site you own on a different web host that does support the local method, or you can purchase a $1 API key from EWWW and use their servers.
This is a bit of an advanced, do-it-yourself plugin. It handles the hard parts for you, but you will have to do some setup and settings tweaking. Try one of the above plugins if you’re not comfortable handling that yourself.
Cloudflare Polish

If you’re running a Cloudflare Pro plan, you have access to automatic WebP conversion through their Cloudflare Polish feature.
Polish is a specially optimized compression algorithm that automatically optimizes the images on your site with either lossy or lossless compression. And of course, WebP compression is an option either way. Cloudflare handles it entirely and ensures that WebP images are only shown to browsers that support them.
Activating Polish is as easy as logging into your Cloudflare account, going to the Speed section, and turning on either lossy or lossless compression. Don’t forget to tick the WebP option and you’re good to go. No plugin or manual setup required.
Smaller Images, Faster Loading with WebP and WordPress
WebP may not be officially supported by WordPress, but you can still make use of it on your site. Direct uploads won’t work properly, but plugins exist to make adding WebP to your site easy. You can also add these types of images manually, but it’s easier to use a plugin.
WebP’s quality isn’t as absolutely crisp as other file types, but the difference is negligible. You may want to avoid it if you’re displaying artwork or photography in a portfolio, but in most other cases (using images to garnish an article or decorate a webpage), it’s the superior choice.
WebP is smaller, loads faster, and looks better than other heavy compression options. You’ll barely be able to tell the difference between it and high-quality file formats like PNG. When you can afford to lose just a bit of quality in exchange for much faster loading speeds, use WebP.
Are you planning on switching to WebP? Why or why not? Tell us what you think in the comments.
The post WebP Images & WordPress: Why and How to Use Them (+Plugins) appeared first on Torque.