TLDR; If you just want a tutorial to set up your data science environment on Ubuntu using NVIDIA RAPIDS and NGC Containers just scroll down. I would however recommend reading the reasoning behind certain choices to understand why this is the recommended setup.
Cloud or local setup
Public clouds offer a great set of solutions for data professionals. You can set up a VM, container, or use a ready-made environment that presents you with a Jupyter notebook. They are also great in terms of productizing your solution and exposing an inference endpoint. Nevertheless, every data scientist needs a local environment.
If you are starting your career it’s better to understand exactly how all the pieces are working together, experiment with many tools and frameworks, and do it in a cost-effective way.
If you are an experienced professional you will always meet a customer which cannot put their data on a public cloud, ie. for compliance or regulatory reasons.
Additionally, I like to be able to take my work with me on a trip, and sometimes I’m not within range of a fast internet connection. Having your own machine makes a lot of sense.
Why Ubuntu for data professionals
In terms of operating systems for your local environment, you have a choice of Linux, Windows, and Mac.
We can drop Mac immediately, because it does not have an option to include NVIDIA GPU, and you need to have it for any serious model training. If you really like the ecosystem you can cut it with a MacBook and eGPU enclosure but it’s not portable anymore.
Another option would be Windows, and using WSL you can have a decent development environment where all tools and libraries work well but this option is still a niche in the machine learning community for now, and most of the community runs, tests and writes tutorials based on Linux.
Ubuntu is the most popular Linux distribution amongst data professionals because it’s easy to use, and lets you focus on your job, instead of tinkering with the OS. Ubuntu is also the most popular operating system on public clouds so whatever you develop locally you can easily move to production without worrying about compatibility issues.
Canonical is working with many partners to make AI/ML experience best for developers. You can find out more about it on Ubuntu website.
Hardware and software
The next thing to look into is hardware. Of course, this depends on your budget, but the reasonable setup I could recommend is:
- i7/i9 Intel CPU or Ryzen 7/9 from AMD
- At least 16GB of RAM, preferred 32GB or more
- NVIDIA GPU – there are RTX or Quadro devices for professional workstations but a gaming GPU from 20XX or 30XX series would be good as well
- Nice screen and keyboard – they impact your health a lot so don’t save on this and go for high quality
Thanks to Canonical’s collaboration with NVIDIA GPU drivers are cryptographically signed and make your setup much more secure.
For all the basic software development tools Ubuntu gets you covered, using apt install or snap install you can have your favorite IDE or editor one command away. As always I recommend emacs, especially using doom emacs configuration framework.
There are countless libraries and tools for machine learning. If you want a full suite of them that is well integrated, tested, and available in production environments you should go with RAPIDS.
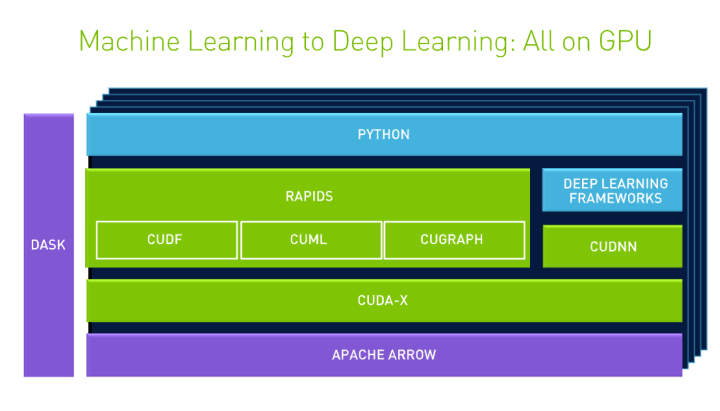
With RAPIDS you get:
cuDF – This is a data frame manipulation library based on Apache Arrow that accelerates loading, filtering, and manipulation of data for model training data preparation. The Python bindings of the core-accelerated CUDA DataFrame manipulation primitives mirror the Pandas interface for seamless onboarding of Pandas users.
cuML – This collection of GPU-accelerated machine learning libraries will eventually provide GPU versions of all machine learning algorithms available in Scikit-Learn.
cuGRAPH – This is a framework and collection of graph analytics libraries
Anaconda or NGC containers
Next choice is how to manage your environment. When you play with data for a longer time you will quickly get into a scenario where you have two projects (ie. work and pet project) that require different versions of Python, CUDA or Tensorflow. The two most effective ways to tackle this issue are Anaconda or containers.
I would recommend familiarizing yourself with both of them. For learning new things, doing some simple exploratory data analysis with a new plotting library I prefer to use conda, as it’s quick, low footprint and convenient.
If I even suspect that a project might go to production I prefer to use containers, as they are portable between my machine, customer’s private K8s cluster and a public cloud.
You can of course make your own container image and it’s a great skill to have, but you can also find ready made, well tested container images in NVIDIA NGC.
Moving to production
When you have a solution working and you start thinking about moving to production then you need to familiarize yourself with ML Ops. Best way to do it is joining the MLOps community slack.
Setup instructions
These instructions are valid for the latest Ubuntu LTS release, which is 20.04.
After installing Ubuntu 20.04 operating system we need to install the drivers for NVIDIA GPU
First check if your GPU is detected correctly
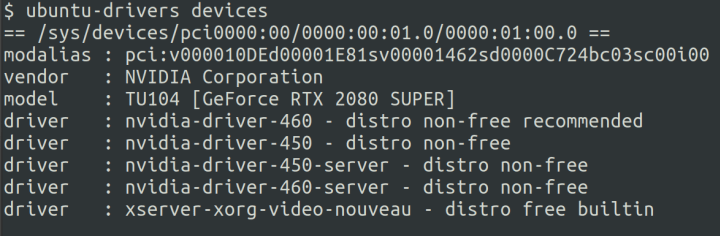
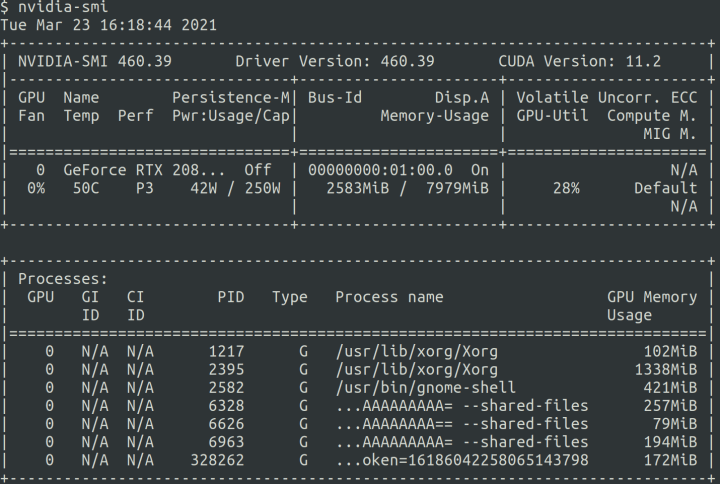
Then install the drivers. You don’t need to worry about figuring out which version is right for you, Ubuntu installer will take care of this for you.
sudo ubuntu-drivers autoinstall sudo rebootYou can check if everything is correctly installed using nvidia-smi command.
Option 1: Conda based RAPIDS environments
wget -P /tmp https://repo.anaconda.com/archive/Anaconda3-2020.02-Linux-x86_64.sh? bash /tmp/Anaconda3-2020.02-Linux-x86_64.shAnswer the installer questions and create the environment:
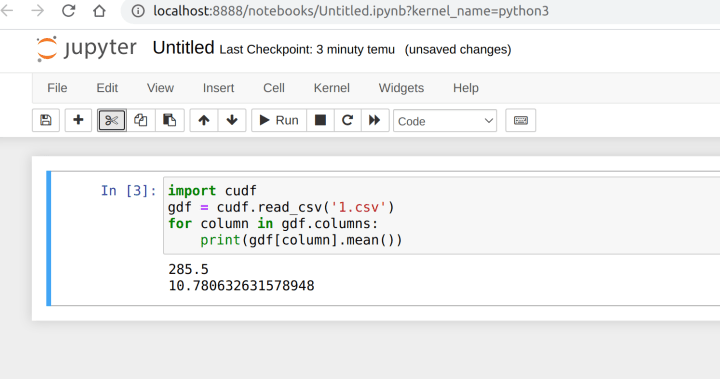
conda create -n rapids-0.18 -c rapidsai -c nvidia -c conda-forge -c defaults rapids-blazing=0.18 python=3.7 cudatoolkit=11.0 conda activate rapids-0.18 You can run a jupyter notebook then which will open your browser.
Option 2: Docker containers with RAPIDS from NVIDIA
Install docker
sudo apt-get install -y apt-transport-https ca-certificates curl gnupg-agent software-properties-common curl -fsSL https://download.docker.com/linux/ubuntu/gpg | sudo apt-key add – sudo add-apt-repository “deb [arch=amd64] https://download.docker.com/linux/ubuntu $(lsb_release -cs) stable” sudo apt-get update sudo apt-get install -y docker-ce docker-ce-cli containerd.io sudo usermod -aG docker $USERInstall nvidia-docker2
distribution=$(. /etc/os-release;echo $ID$VERSION_ID) curl -s -L https://nvidia.github.io/nvidia-docker/gpgkey | sudo apt-key add – curl -s -L https://nvidia.github.io/nvidia-docker/$distribution/nvidia-docker.list | sudo tee /etc/apt/sources.list.d/nvidia-docker.list curl -s -L https://nvidia.github.io/nvidia-container-runtime/experimental/$distribution/nvidia-container-runtime.list | sudo tee /etc/apt/sources.list.d/nvidia-container-runtime.list sudo apt-get update sudo apt-get install -y nvidia-docker2 sudo systemctl restart dockerCheck if the installation works correctly:
docker run --rm --gpus all nvidia/cuda:11.0-base nvidia-smi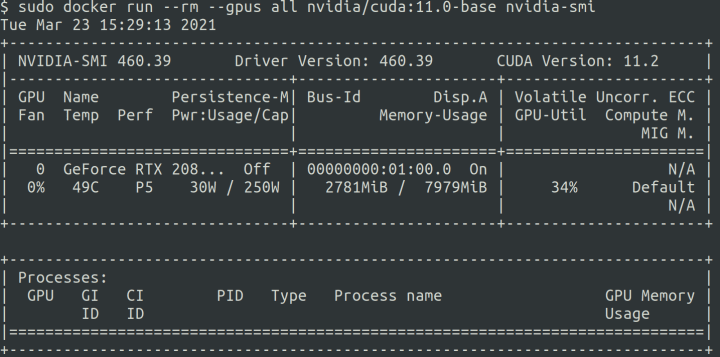
Now you can use the full set of NVIDIA containers from https://ngc.nvidia.com/catalog/ . Let’s assume that we have a project using Tensorflow library and python 3. Then you need to run
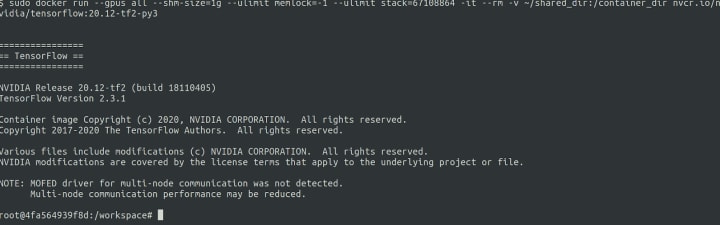
docker pull nvcr.io/nvidia/tensorflow:20.12-tf2-py3 mkdir ~/shared_dir docker run –gpus all –shm-size=1g –ulimit memlock=-1 –ulimit stack=67108864 -it –rm -v ~/shared_dir:/container_dir nvcr.io/nvidia/tensorflow:20.12-tf2-py3And your environment is ready
As you can see it’s very easy and straightforward to set up an environment for data projects. In five minutes from finishing Ubuntu installation you can land in a notebook or IDE and start being productive. This is not the final say from us. We will continue to work with our partners and by the end of the year we will get even better experience.
In case of any issues of suggestions you can find me and the rest of Ubuntu team on Discourse.