I recently tweeted out about the awesome boot menu option that NetApp has introduced in Ontap 9.x that saves a tonne of time called – Configure Advanced Drive Partitioning. In this post I will show you what steps to go through when using option 9 – Configure Advanced Drive Partitioning
NetApp Configure Advanced Drive Partitioning
WARNING: Using this option will perform a complete wipe of the data on your system!!! Unless you are performing this step on a brand new system or a system where you have migrated data off and is completely empty, you should not use this option.
If your system is an AFF, the Advanced Drive Partitioning will partition each disk with 3 partitions. Each disk partition will look like: R+D+D (1 x R = Root Partition, 2 x D = Data Partition)
If your system is non-AFF consisting of SAS drives, the Advanced Drive Partitioning will partition the disks with 2 partitions. Each disk partition will look like: R+D (1 x R = Root Partition, 1 x D = Data Partition)
In the example below, we are drive partitioning a non-AFF system
Steps to configure NetApp Advanced Drive Partitioning
Now that we have the warning out of the way let’s get started with Advanced Drive Partitioning:
Make sure you are either directly connected to the console or connected to the console via the service-processor.
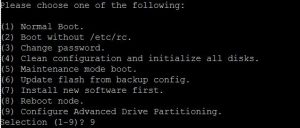
When you see “Press Ctrl-C for Boot Menu” press Ctrl-C
After a few more lines of text, you will see the Boot Menu. You will want to press option 9 on node 1 (leave node 2 at the boot menu for now)
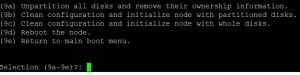
Within the Advanced Drive Partitioning menu, you need to select option 9a first. This will unpartition all disks and remove their ownership. Previously in Ontap 8.x we had to remove aggregates, unpartition disks and remove ownership manually. If you do not select option 9a first and try to jump to option 9b or 9c you will get the following warning:
It is mandatory to perform 9a before choosing 9b or 9c, please return back to the menu and perform 9a.
The system will go through and perform the following: destroy aggregates, unpartition drives and remove ownership. This is the output after selecting option 9a:
########## WARNING ##########
This is a disruptive operation and will result in the
loss of all filesystem data. Before proceeding further,
make sure that:
1) This option (9a) has been executed or will be executed
on the HA partner node, prior to reinitializing either
system in the HA-pair.
2) The HA partner node is currently in a halted state or
at the LOADER prompt.
Do you still want to continue (yes/no)? yes
Destroying existing aggregates..
Unpartitioning disks…
No disk found to be eligible for unpartitioning.
Removing disk ownership…
disk remove_ownership: No disks belonging to this host were found.
Disk ownership successfully removed.
bootarg.bootmenu.selection is ||
Now is a good time to perform the same steps on node 2 (Go to node 2 console and select option 9a)
Back on node 1 console, after deleting aggregates, removing partitions and disk ownership you are brought back to the Advanced Drive Partitioning Menu. You have the option of initializing the system with partitioned disks or unpartitioned disks.
Initializing node 1 with partitioned disks will cause the node to take ownership of all odd numbered disk drives. Initializing node 2 with partitioned disks will cause node 2 to take ownership of all even numbered disk drives.
Select option 9b and then type yes to continue, you will see the following output:
########## WARNING ##########
All configuration data will be deleted and the node will be
initialized with partitioned disks. Existing disk partitions must
be removed from all disks (9a) attached to this node and
its HA partner. The HA partner must be halted at the boot menu
or already initialized with partitioned disks (9b).
Do you still want to continue (yes/no)? yes
AdpInit: This system will now reboot to perform wipeclean.
bootarg.bootmenu.selection is |wipeconfig|
Terminated
.
Skipped backing up /var file system to boot device.
Uptime: 14m42s
System rebooting…
Wipe filer procedure requested.
AutoPartAFFDetermination: total_disks: 24 num_internal_disks: 24 num_ssds: 0 num_unknowns: 0 num_mediator_disks: 0 num_not_supported: 0 all_ssd? false
9b
AutoPartDiskScan: CandidateDisks: 24 UsableDisks: 12 LocalDisks: 0 UnusableSSDs: 0 PartitionMethod: Root+Data
AutoPartDistributionCheck: LocalExpected: 12 PartnerExpected: 12 CandidateDisks: 24 LocalAssigned: 0 NotYetAssigned: 24
AutoPartRootConfig: root d+p+s=8+2+2, root aggr size=112958795 (blks) per 8 disks, root partition size=14127145 (blks)
AutoPartRequestedDiskAssignment: DiskMaxCount: 12 CksumType: block Pool: 0 RPM: 10000 DiskType: SAS
AutoPartInfo: Disks must be from internal shelf
AdpInit: Root will be created with 12 disks with configuration as (8d+2p+2s) using disks of type (SAS).
bootarg.bootmenu.selection is |4|
AdpInit: System will now perform initialization using option 4
BOOTMGR: The system has 0 disks assigned whereas it needs 12 to boot, will try to assign the required number.
Sanown: Considering disks only from internal shelf
sanown_assign_disk_helper: Assigned disk 0a.00.23
sanown_assign_disk_helper: Assigned disk 0a.00.7
sanown_assign_disk_helper: Assigned disk 0a.00.13
sanown_assign_disk_helper: Assigned disk 0a.00.21
sanown_assign_disk_helper: Assigned disk 0a.00.15
sanown_assign_disk_helper: Assigned disk 0a.00.19
sanown_assign_disk_helper: Assigned disk 0a.00.11
sanown_assign_disk_helper: Assigned disk 0a.00.1
sanown_assign_disk_helper: Assigned disk 0a.00.17
sanown_assign_disk_helper: Assigned disk 0a.00.5
sanown_assign_disk_helper: Assigned disk 0a.00.9
sanown_assign_disk_helper: Assigned disk 0a.00.3
BOOTMGR: already_assigned=0, min_to_boot=12, num_assigned=12
You will then be presented with the cluster setup wizard. Now, you can go to the node 2 console and perform the same Advanced Drive Partitioning option (9b)
Below is the output of disk assigements for node 2:
sanown_assign_disk_helper: Assigned disk 0a.00.0
sanown_assign_disk_helper: Assigned disk 0a.00.6
sanown_assign_disk_helper: Assigned disk 0a.00.2
sanown_assign_disk_helper: Assigned disk 0a.00.22
sanown_assign_disk_helper: Assigned disk 0a.00.12
sanown_assign_disk_helper: Assigned disk 0a.00.16
sanown_assign_disk_helper: Assigned disk 0a.00.14
sanown_assign_disk_helper: Assigned disk 0a.00.8
sanown_assign_disk_helper: Assigned disk 0a.00.10
sanown_assign_disk_helper: Assigned disk 0a.00.20
sanown_assign_disk_helper: Assigned disk 0a.00.18
sanown_assign_disk_helper: Assigned disk 0a.00.4
BOOTMGR: already_assigned=0, min_to_boot=12, num_assigned=12
That’s it. I think all up it takes less than 10 mins to perform a full Advanced Drive Partitioning setup, whereas before with all the manual steps would of taken close to 30mins +
The post NetApp Ontap 9 Configure Advanced Drive Partitioning appeared first on SYSADMINTUTORIALS IT TECHNOLOGY BLOG.