Have you ever had to perform a large number of vol moves in order to evacuate or decommission an aggregate? This week I had to evacuate about 50+ volumes from an aggregate that is being decommissioned. Instead of typing out the vol move command 50+ times I decided to automate it with NetApp Powershell module.
If you have performed a large number of vol move before, you will know that ONTAP has a limit on the maximum number of vol moves you can perform at any one time. This is to prevent your system from running into any i/o or throughput performance issues that could cause your production workloads to suffer.
We are going to break down the script in sections so I can explain what each part does, what you need to change for your environment and a few other variables that you can optionally change. The script is available from my Github page by clicking here.
The requirements for this script are PowerShell and the NetApp PowerShell Toolkit (As of this blog post, toolkit 9.6 is the latest version)
NetApp Auto Aggregate Evacuation Script
This first part checks to see if the DataOntap PowerShell module is loaded. If it isn’t, then it will load the module
# Import Modules
IF (-not (Get-Module -Name DataOntap)) { Import-Module DataOntap }
The second part prompts you to enter in your NetApp storage credentials and saves them into a variable
# Get-Credentials
$netappcreds = Get-Credential -Message "Enter your NetApp Storage Credentials"
Next, we have created a function to connect to the NetApp storage cluster. We use the credentials variable created above for authentication.
# Connect to storage systems
Function connect-netapp { Connect-NcController 192.168.1.50 -credential $netappcreds }
This next part is a function that grabs the number of vol moves currently in-progress on the system. It outputs the volume name, destination aggregate, and percent complete. It also provides a counter number that is used in the script later on.
Function getvolmoves { # Get List of current volmoves $global:currentvolmoves = Get-NcVolMove | Where {$_.State -eq "healthy"} $global:counter = 0 ForEach ($volmove in $currentvolmoves) { $global:counter++ Write-Host $volmove.Volume "is still moving to" $volmove.DestinationAggregate "- Percent Complete =" $volmove.PercentComplete -ForegroundColor Yellow } }
Here we connect to the NetApp storage cluster by executing the function ‘connect-netapp’. The reason why I put the NetApp connection in a function is to make the script neater. Within larger scripts where you might need to connect to multiple NetApp clusters, I find it’s easier to reference a function. Lastly, if you need to make a change to the connection, you only need to make the change in the function, you don’t need to search through the script looking for each connection line.
# Connect to storage system
connect-netapp
Now we have the source aggregate we wish to evacuate from and the destination aggregate we wish to vol move to. Change these to suit your environment.
# Aggregate to evacuate
$evacaggr = "aggr1_CLUSTER96_01_data" # Destination aggregate
$destaggr = "aggr2_CLUSTER96_01_data"
The below command will get a list of volumes on the ‘source aggregate’ excluding any volume with the name ‘root’ in it. This is in case you have root load-sharing mirrors setup.
# Get list of volumes on aggregate
$listofvols = Get-NcVol | Where {$_.Aggregate -like $evacaggr -and $_.Name -notlike "*root*"}
This next part is the bread and butter of the script. The main loops.
First up we are going to start cycling through each volume within the variable $listofvols
I then get the latest ‘show vol move’ list with the command ‘Get-NcVolMove’ and look specifically for the volume we are currently working on in the loop. This is placed into the variable $volmovematch.
Now we call the function ‘getvolmoves’. The function will execute and provide a list of current vol moves in-progress as well as save the number of in-progress vol moves within the $counter variable.
Next we have a condition. If the vol move $counter is greater than or equal to 4, we are going to wait 10 mins and execute the getvolmoves function again. At the next run, if the vol move counter is still equal to or greater than 4, the script will repeat the 10min wait.
If the $volmovematch is empty, meaning that the volume to be moved is not in the list of current volume moves, then a vol move is triggered. BUT.. only if the $counter is less than 4.
ForEach ($vol in $listofvols) { # Look for vol match in list of current vols $volmovematch = Get-NcVolMove | Where {$_.Volume -eq $vol.Name} getvolmoves IF ($global:counter -ge 4) { Do { $date = (Get-Date).Tostring("HH:mm") Write-Host "$date - Vol move counter is greater than 4, sleeping 5 mins..." -ForegroundColor Yellow sleep 300 getvolmoves } Until ($global:counter -lt 4) } IF (!$volmovematch -and $global:counter -lt 4) { Write-Host "vol move counter is = " $global:counter Write-Host $vol.name "is now moving" -ForegroundColor Green Start-NcVolMove -DestinationAggregate $destaggr -Vserver $vol.Vserver -Name $vol.Name } }
NetApp Auto Aggregate Evacuation Script Screenshots
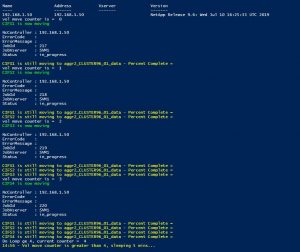
In this example, I need to migrate 8 CIFS volumes within my NetApp Ontap 9.6 simulator. The 8 volumes will be moving from source aggregate aggr1_CLUSTER96_01_data to destination aggregate aggr1_CLUSTER96_01_data
I use Windows PowerShell ISE to load and execute the script. In the screenshot below you can see that the script starts the vol moves for the first 4 volumes. It then realizes that there are 4 vol moves currently in place, it pauses for 5 mins before checking again.
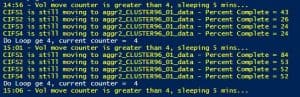
After 5 minutes the script checks the status of the vol moves again. It realizes that there are still 4 vol moves in progress and sleeps for an additional 5 minutes. In the output, you can see the progress of the current vol moves.
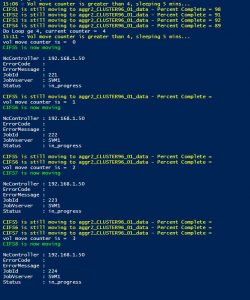
In this next screenshot, notice that the last sleep time was at 15:11. At the next check, you can see that the vol move counter is set to 0. This means there are no vol moves in progress. Therefore, the script starts the remaining 4 vol moves. Since there are no more volumes to be moved, the script ends.
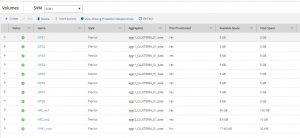
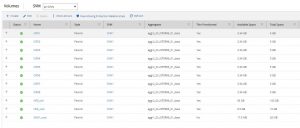
If we check back in our NetApp System Manager, we can see that all our CIFS volumes have moved to aggregate ‘aggr2_CLUSTER96_01_data ‘
The post NetApp Auto Aggregate Volume Evacuation With PowerShell appeared first on SYSADMINTUTORIALS IT TECHNOLOGY BLOG.