
I am using Lenovo laptop. I want to update my BIOS but do not have Windows installed my system. How do I update Lenovo BIOS from Linux without using MS-Windows operating system with the help of a USB stick?
This tutorial shows how to update the BIOS on a Lenovo ThinkPad that only runs Linux operating system. It is quite useful for users that do not have MS-Windows installed on the same system. The BIOS update also fixes bugs in Intel ME, provides Intel CPU microcode and other vulnerabilities such as Meltdown and Spectre. Hence I recommend updating BIOS to all.
Procedure to update Lenovo BIOS from Linux
- Download Lenovo BIOS Bootable CD for your Laptop model
- Use the geteltorito command to extract bootable image
- Run the dd command to write extracted image to USB stick or pen
- Reboot the laptop
- Interrupt boot process by pressing the ENTER key
- Press F12 key and select USB mass storage device as boot source
- The BIOS update utility should run now
Let us see all steps in details. I am going to update my BIOS for the Lenovo x230 laptop.
Step 1. Download Lenovo BIOS
Use Google or support.lenovo.com to search for “lenovo x230 bios”.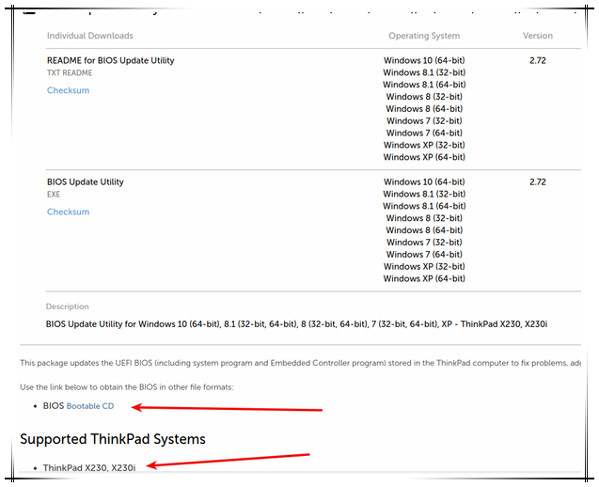
One can use the wget command or curl command to grab the bootable CD:$ cd /tmp/
$ wget https://download.lenovo.com/pccbbs/mobiles/g2uj28us.iso
Step 2. Install geteltorito cli on Linux
Type the following apt command/apt-get command to install it on a Debian/Ubuntu Linux:$ sudo apt install genisoimage
Fedora Linux user should type the following dnf command:$ sudo dnf install geteltorito genisoimage
CentOS/RHEL user need to type the following yum command:$ sudo yum install genisoimage
SUSE/OpenSUSE Linux user type the following zypper command:$ sudo zypper install genisoimage
Arch Linux user install the geteltorito AUR package using yaourt command:$ yaourt -S geteltorito
Another option is to just grab the Perl script:$ wget https://userpages.uni-koblenz.de/~krienke/ftp/noarch/geteltorito/geteltorito/geteltorito
$ chmod +x geteltorito
Step 3. Extract the image from iso file
geteltorito is an El Torito boot image extractor. The syntax is:geteltorito -o {output-image-name.img {Bootable-CD.iso}
geteltorito -o x230.img g2uj28us.iso
Sample outputs:
Booting catalog starts at sector: 20 Manufacturer of CD: NERO BURNING ROM
Image architecture: x86
Boot media type is: harddisk
El Torito image starts at sector 27 and has 65536 sector(s) of 512 Bytes
Write x230.img to the USB pen
You can identify USB stick with the following command:$ dmesg | more
$ sudo blkid
Run the following command to write the image named x230.img to the USB stick:$ sudo dd if=x230.img of=/dev/sdb bs=64K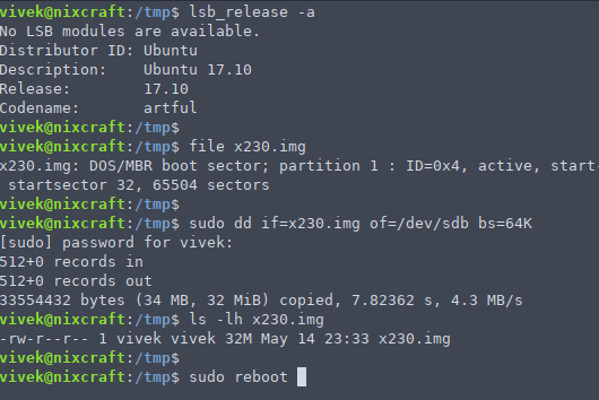
Please note that you can display progress with dd command:$ sudo dd if=x230.img of=/dev/sdc bs=64K status=progress
Finally, reboot your Linux based laptop with the reboot command or shutdown command:$ sudo reboot
OR$ sudo shutdown -h 0
Step 4. Updating the BIOS on Lenovo x230 laptop from Linux using a USB flash pen
First, interrupt boot process by pressing the ENTER key. Next hit the F12 key and select USB mass storage device as boot source. Make sure your laptop power supply plugged in. In some case, the battery must charge to 80-100%. Make sure you follow on screen info to update the BIOS.
Video demo: Updating the BIOS on Lenovo Thinkpad laptops from Linux using a usb pen
This video will give all guidance without using an old-fashioned MS-Windows or CD. You can update the BIOS on your Lenovo laptops from Linux using a USB flash stick: