
I’ve had some clients in the past who wanted to set up a free download in their WooCommerce store, as an email list building strategy.
In reality it can be a little cumbersome to do a free download in exchange for an email address within a store context because it takes several more clicks on the part of the user, than it would for a typical opt-in form. The steps I provide here will significantly streamline the process. I wouldn’t recommend it as your only opt-in process, but if you really want/need to use your WooCommerce store for this, the method below will certainly ease the pain points.
In one of his two posts about the pros and cons of this method, Doug Smith presents some interesting reasons you might want to do it this way.
What’s wrong with just setting a product to zero dollars?
A few things. If you don’t make any customizations to the process, you’ll have the following problems:
- Even though the customer doesn’t have to make a payment, they still have to go through the usual checkout flow which can be several pages…
- …And WooCommerce will still ask them for their billing info!
- You’ll have their email address as part of the order info, but you’ll have to manually add it to your email marketing software.
But, with the 4 easy tweaks below, we can fix these issues and make the process much smoother.
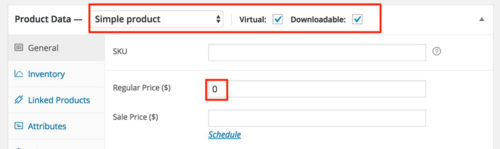
1. Set up your free product in WooCommerce by giving it a price of zero.
I’m assuming you’re giving away something like a free ebook or other downloadable item. So make sure you’ve marked it as Virtual and Downloadable, to make sure shipping is removed from the process.
2. Remove unnecessary billing fields from the checkout page.
By default, your checkout page is going to look something like this:
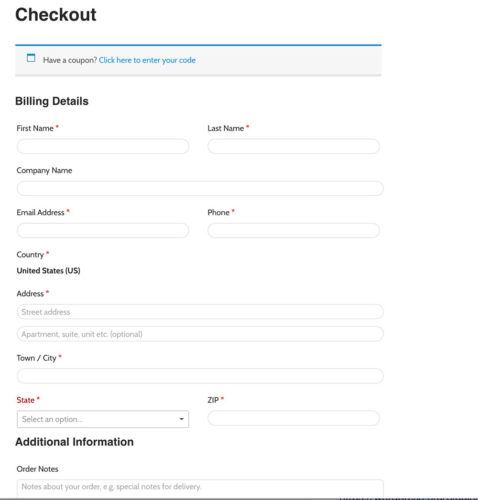
That’s a lot of unnecessary info for a freebie!
There are 2 ways you can modify this page.
One is by using this plugin: WooCommerce Checkout for Digital Goods. It gives you a simple interface to choose which fields to hide, and it works well. I tried some other plugins but they were overkilll for this particular purpose.
The other method is to copy/paste the following code, either in your child theme’s functions.php, in your own custom functionality plugin or in the My Custom Functions plugin.
The code is mostly courtesy of Skyverge, but has been tweaked a little to accomodate recent changes in WooCommerce:
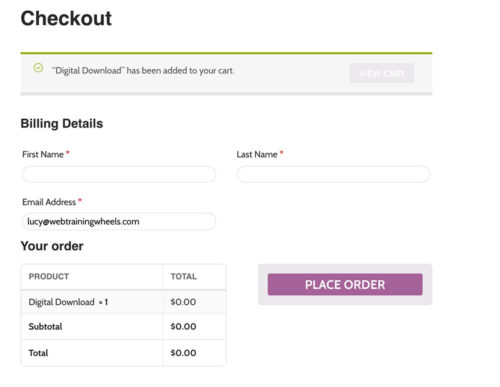
// hide coupon field as long as no item in the cart requires payment function hide_coupon_field_on_cart( $enabled ) { if ( is_cart()&& !WC()->cart->needs_payment() || (is_checkout && !WC()->cart->needs_payment() ) ) { $enabled = false; } return $enabled; } add_filter( 'woocommerce_coupons_enabled', 'hide_coupon_field_on_cart' ); function sv_free_checkout_fields() { // Bail if we're not at checkout, or if we're at checkout but payment is needed if ( ( is_checkout() && WC()->cart->needs_payment() ) ) { return; } // Remove the "Additional Info" order notes add_filter( 'woocommerce_enable_order_notes_field', '__return_false' ); // Unset the fields we don't want in a free checkout function unset_unwanted_checkout_fields( $fields ) { // add or remove billing fields you do not want // list of fields: http://docs.woothemes.com/document/tutorial-customising-checkout-fields-using-actions-and-filters/#section-2 $billing_keys = array( 'billing_company', 'billing_phone', 'billing_address_1', 'billing_address_2', 'billing_city', 'billing_postcode', 'billing_country', 'billing_state', ); // unset each of those unwanted fields foreach( $billing_keys as $key ) { unset( $fields['billing'][$key] ); } return $fields; } add_filter( 'woocommerce_checkout_fields', 'unset_unwanted_checkout_fields' ); // A tiny CSS tweak for the account fields; this is optional function print_custom_css() { echo '<style>.create-account { margin-top: 6em; }</style>'; } add_action( 'wp_head', 'print_custom_css' ); } add_action( 'wp', 'sv_free_checkout_fields' ); After you’ve implemented that code, the checkout page will now look like this – much more compact:
3. Slim down the checkout process
By default, after a product is added to the cart, the customer has to look at the cart page, then the checkout page, then complete payment. Again, that’s pretty cumbersome for a free download. Instead, let’s send the user directly to the checkout screen when they add the free download product to their cart.
To use this method, you should disable the WooCommerce option:
“Enable AJAX add to cart buttons on archives”
You will also need to grab the product ID of your free download. You can find the product ID on the All Products page:

Add the following piece of code (in the same place you used for the previous step) , making sure to edit line 13 with the product ID of your free WooCommerce download.
/** * Redirect users after add to cart. */ function my_custom_add_to_cart_redirect( $url ) { if ( ! isset( $_REQUEST['add-to-cart'] ) || ! is_numeric( $_REQUEST['add-to-cart'] ) ) { return $url; } $product_id = apply_filters( 'woocommerce_add_to_cart_product_id', absint( $_REQUEST['add-to-cart'] ) ); // Only redirect the product IDs in the array to the checkout if ( in_array( $product_id, array( 35) ) ) { $url = WC()->cart->get_checkout_url(); } return $url; } add_filter( 'woocommerce_add_to_cart_redirect', 'my_custom_add_to_cart_redirect' ); This code is courtesy Jeroen Sormani
4. Integrate with your email marketing system
The final, and most important piece of this is integrating with your existing email marketing system. The whole point of giving away freebies is to build your opt-in list. So when the visitor enters their email address on the checkout page, you need to be able to capture it and send it to your email marketing system. I always use Mailchimp, and it’s easy to integrate with WooCommerce.
There are 2 approaches to this:
- Automatically opt-in users when they get the free download.
To do this and not be spammy about it, you have to have clear wording on your product page that lets people know that by accepting the free download they are also opting in to your email list. - You can place a check box during the checkout process that your visitor will have to check (or un-check if they don’t want it).
You can use the following plugin to integrate your WooCommerce store with your Mailchimp account and can configure it to auto opt-in, or display a checkbox as you prefer : https://wordpress.org/plugins/woocommerce-mailchimp/
So there you have it – now you can use free downloads in your WooCommerce store to build your email list 🙂

![15+ Top Black Friday & Cyber Monday Deals for Developers and Designers [2023]](https://wiredgorilla.com/wp-content/uploads/2023/11/15-top-black-friday-cyber-monday-deals-for-developers-and-designers-2023.jpg)