These days WordPress lets you choose an admin username when you create a new installation, but there are probably still millions of WordPress sites out there with an admin username of “admin”. This is not great for security, as it is one less thing for a hacker to guess or obtain.
It’s far better to have a unique username for the main admin account, and if you have an existing installation with the admin username of “admin”, I suggest you follow these steps.
There are other ways to do this, but this is the easiest for the average user.
1. Log in
Log in to your site using your existing admin account details.
2. Add a new admin account
Hover over the Users item in the dashboard menu, and select ‘Add New’. Enter the information requested. You will need to specify a different email address than any existing user, but you can change it later. make sure you select “Administrator” in the role selection box.
3. Log in to the new admin account
Now you should log out of WordPress, and then log back in with the new details you entered in step 2.
4. Delete the old admin account
You can now delete the old admin account.
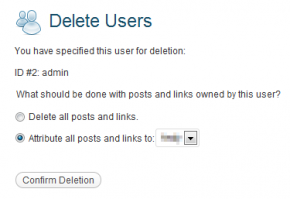
Click Users in the dashboard menu. Hover over the username of the old admin user account, and click ‘Delete’.
When WordPress asks you what to do with posts and links that belong to the old account, make sure you click the LOWER option (shown in the image), otherwise you could lose a lot of information.
5. Change preferences in the new admin account
Finally, hover over your name at the top right of the page and select ‘Edit My Profile’. Now you can reset your preferences, such as dashboard colour scheme, display name, email address, etc.