I set up a brand new Fedora Linux server in the cloud. How can I install and setup LXD on Fedora Linux? How do I create my first VM using LXD?
Linux container is an implementation of operating system-level virtualization for the Linux operating system. LXD is a system container manager. You get an experience similar to virtual machines but using Linux containers instead. You can run various Linux distros using LXD. This page shows how to set up, use LXD and create your first VM on Fedora Linux server. Finally, you will then learn how to route traffic to the container from the Internet.
Requirements to run LXD on Fedora Linux
- Fedora Linux server either running on bare metal or in the cloud. I tested with Fedora Linux version 28/29/30.
- Snapd installed and configured on Fedora
Let us see all steps to install and setup LXD on Fedora Linux server in details.
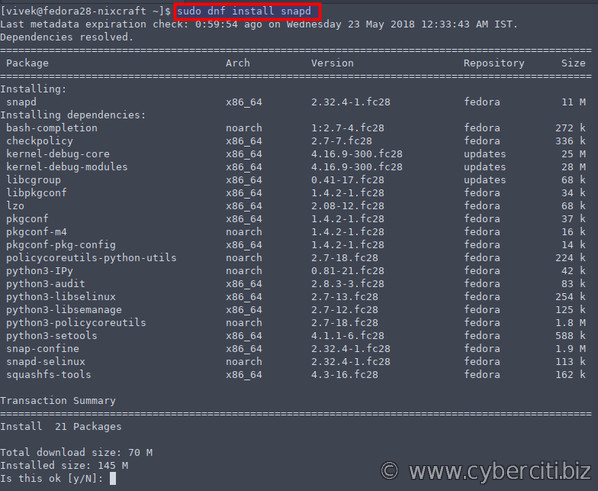
Step 1 – Install snapd
To install the snapd package type the following dnf command:sudo dnf install snapd
You must setup a symlink using the ln command, enter:sudo ln -s /var/lib/snapd/snap /snap
snap version
Sample outputs:
snap 2.39.2-1.fc30
snapd 2.39.2-1.fc30
series 16
fedora 30
kernel 5.1.12-300.fc30.x86_64
Step 2 – Install and setup LXD on Fedora Linux server
Type the following snap command:sudo snap install lxd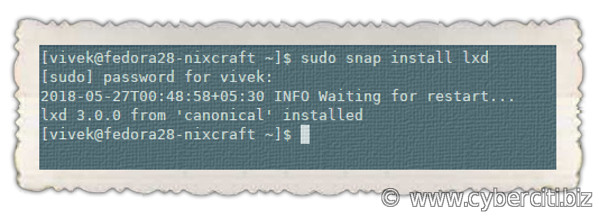
Verify LXD installation
Make sure lxd service enabled on the Fedora Linux:$ sudo snap enable lxd
$ sudo snap services lxd
Service Startup Current
lxd.daemon enabled active
Add a Linux user named ‘vivek’ to lxd group
Type the following usermod command (feel free to replace the username ‘vivek‘ with your actual username on Fedora Linux):sudo usermod -a -G lxd vivek
id vivek
newgrp lxd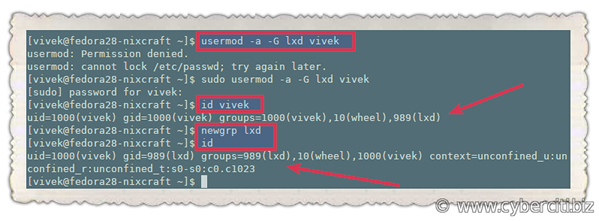
Step 3 – Configure the LXD networking and storage for VM
Type the following command:lxd init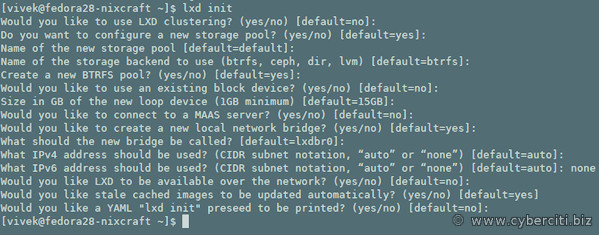
I suggest you use new backends such as ZFS, BTRFS, or LVM and along with DHCP based IP networking for ease of setup for each VM. As a result, you can use snapshots and other advanced features supported by new backends.
lxd verification
Make sure the lxc client is talking to the LXD daemon:lxc list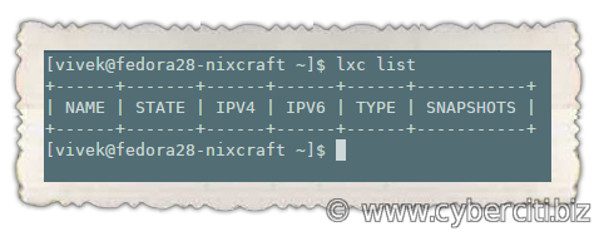
List all available Linux LXD (Linux Containers) VM images
lxc image list images:
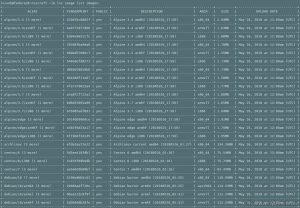
Most of the images are known by several aliases. To see a list, enter:lxc image alias list images:
lxc image alias list images: | grep -i arch
lxc image alias list images: | grep -i debian
lxc image alias list images: | grep -i fedora
Step 4. Create your first LXD VM on Fedora
It is time to create and use your first container. To create and start containers from images use the launch command:lxc launch images:{distro}/{version}/{arch} {container-name-here}
Let us see some examples to create and start containers from various Linux distro images as per your needs.
CentOS Linux 7 vm
lxc launch images:centos/7/amd64 cenots-7-vm
Fedora Linux 30 vm
lxc launch images:fedora/30/amd64 fedora-30-vm
OpenSUSE Linux 42.3 vm
lxc launch images:opensuse/42.3/amd64 opensuse-42-3
Gentoo Linux vm
lxc launch images:gentoo/amd64 gentoo-linux-vm
Arch Linux vm
lxc launch images:archlinux/amd64 arch-linux-vm
Ubuntu Linux LTS 18.04 VM
lxc launch images:ubuntu/18.10/amd64 ubuntu-nginx-vm
Debian Linux 9.x VM
lxc launch images:debian/9/amd64 debian-nfs-server-vm
Debian Linux 10.x VM
lxc launch images:debian/10/amd64 debian-10-vm
lxc list
Sample outputs:
+--------------+---------+---------------------+----------------------------------------------+------------+-----------+ | NAME | STATE | IPV4 | IPV6 | TYPE | SNAPSHOTS | +--------------+---------+---------------------+----------------------------------------------+------------+-----------+ | debian-10-vm | RUNNING | 10.205.77.80 (eth0) | fd42:400:b94d:ad98:216:3eff:fe7e:1ec5 (eth0) | PERSISTENT | | +--------------+---------+---------------------+----------------------------------------------+------------+-----------+ |
How to list all my containers/VMs
List the existing containers:lxc list --fast
lxc list | grep RUNNING
lxc list | grep STOPPED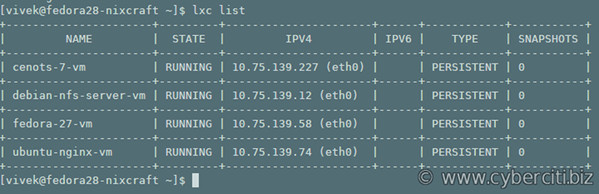
How to execute/run the specified command in a container VM
lxc exec containerName -- command
lxc exec containerName -- /path/to/script
lxc exec containerName --env EDITOR=/usr/bin/vim -- command
### run date, ip a, ip rm and other commands on various containers ###
lxc exec cenots-7-vm -- date
lxc exec ubuntu-nginx-vm -- ip r
lxc exec fedora-30-vm -- dnf update
lxc exec debian-nfs-server-vm -- cat /etc/debian_version
How to login to my containers/VMs
To gain login and gain shell access in a container named debian-nfs-server-vm , enter:lxc exec debian-nfs-server-vm bash
Now you can run commands or install packages for the VM:# cat /etc/*issue*
# apt-get update
# apt-get upgrade
# apt-get install nginx
To exit simply from container simply type exit:# exit
Sample session: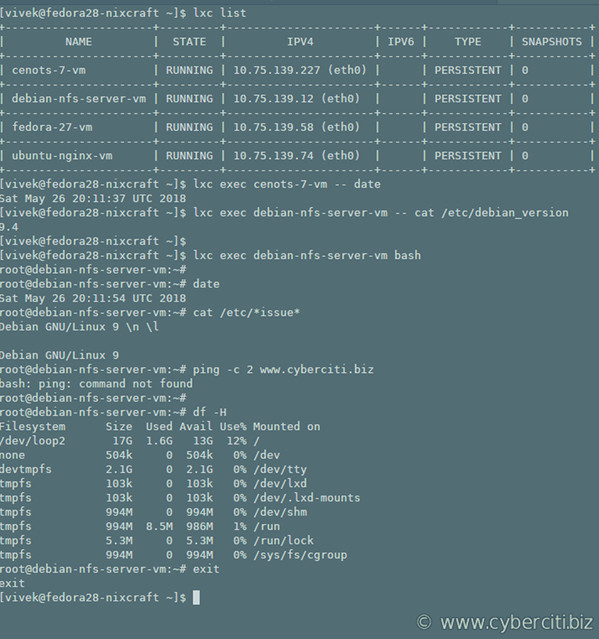
How to start/stop/restart my containers
lxc start containerName # <--- start it
lxc stop containerName # <--- stop it
lxc restart containerName # <--- restart it
lxc stop ubuntu-nginx-vm
lxc start ubuntu-nginx-vm
lxc restart ubuntu-nginx-vm
How to delete my containers
lxc stop vmName && lxc delete vmName
lxc stop ubuntu-nginx-vm && lxc delete ubuntu-nginx-vm
Get info about running containers
lxc info
lxc info containerName
lxc info ubuntu-nginx-vm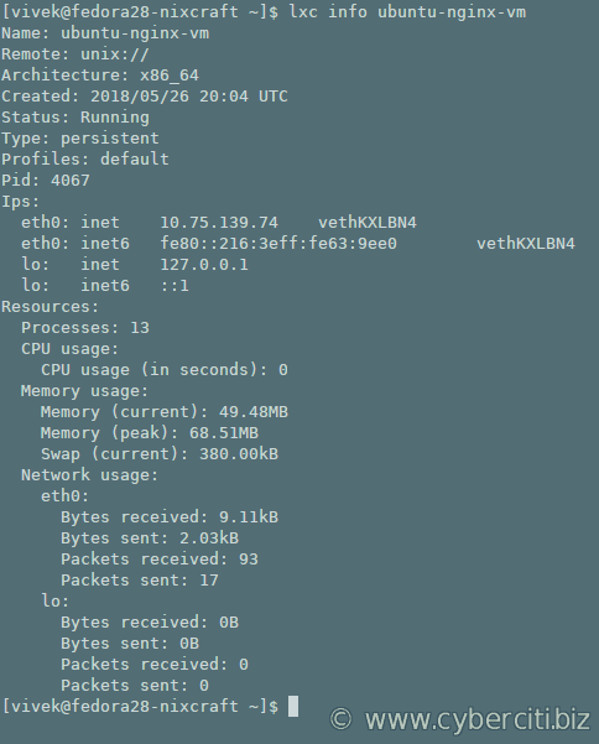
Step 5 – Forward incoming connections to the Linux container VM
First install the nginx server inside ubuntu-nginx-vm:lxc exec ubuntu-nginx-vm bash
apt update && apt upgrade && apt install nginx
systemctl enable nginx
systemctl status nginx
### update/create the default html file
cat /var/www/html/index.nginx-debian.html
Sample file:
<!DOCTYPE html> <html> <head> <title>Welcome to nginx running on LXD VM!</title> </head> <body> <h1><h1>Welcome to nginx running on LXD VM!</h1> </body> </html> |
Finally logout from the LXD vm:# logout
Find ubuntu-nginx-vm IP address:lxc list ubuntu-nginx-vm
Sample outputs:
+-----------------+---------+---------------------+------+------------+-----------+ | NAME | STATE | IPV4 | IPV6 | TYPE | SNAPSHOTS | +-----------------+---------+---------------------+------+------------+-----------+ | ubuntu-nginx-vm | RUNNING | 10.75.139.74 (eth0) | | PERSISTENT | 0 | +-----------------+---------+---------------------+------+------------+-----------+ |
You need to redirect/forward all incoming traffic on port 80 to Fedora Linux 28 public IP address say 104.20.187.5 to LXD private IP address 10.75.139.74.
Find the default firewalld zone
sudo firewall-cmd --get-default-zone
FedoraServer
Open port 80 for FedoraServer zone
sudo firewall-cmd --zone=FedoraServer --add-service=http --permanent
Forward port 80 to the LXD server 10.75.139.74 port 80
sudo firewall-cmd --permanent --zone=FedoraServer --add-forward-port=port=80:proto=tcp:toport=80:toaddr=10.75.139.74
Reload the fireall
sudo firewall-cmd --reload
Test it
Fire the web browser and type url:http://104.20.187.5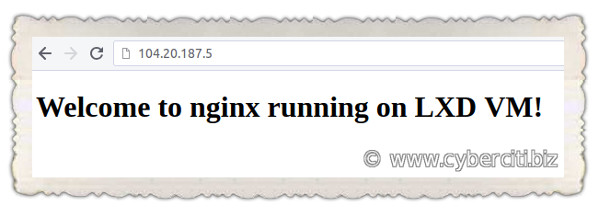
For more info see FirewallD docs here and LXD info here.
Conclusion
You just set up an LXD container running on Fedora Linux. Once the container is up and running, you could install additional services such as Nginx, MariaDB, PHP, Python and more. See LXD page for more info.