I am a new Ubuntu Linux user. How do I install Ansible on a Ubuntu Linux 16.04/18.04 LTS or 17.10/18.10 desktop control machine?
Introduction: Ansible is a simple and easy to use IT automation tool. One can use Ansible to deploy applications and systems/VM/containers. Ansible configuration is written in plain English and works on the remote/local server using SSH. No agents needed on the remote server.
In this guide, you will install latest version of Ansible on an Ubuntu Linux 16.04/18.04 LTS or 19.04 desktop system and learn some basics of how to use the software for automation purpose.
Please note that you can remove older version using sudo apt remove ansible command supplied by the official Ubuntu repo.
How to Install and Configure latest version of Ansible on Ubuntu Linux
You must configure the PPA on your system to install the latest version of ansible. To manage the repositories that you install software from various PPA (Personal Package Archives). It allow you to upload Ubuntu source packages to be built and published as an apt repository by Launchpad. Type the following apt-get command or apt command:$ sudo apt update
$ sudo apt upgrade
$ sudo apt install software-properties-common
Next add ppa:ansible/ansible to your system’s Software Source:$ sudo apt-add-repository ppa:ansible/ansible
Ansible is a radically simple IT automation platform that makes your applications and systems easier to deploy. Avoid writing scripts or custom code to deploy and update your applications— automate in a language that approaches plain English, using SSH, with no agents to install on remote systems. http://ansible.com/ More info: https://launchpad.net/~ansible/+archive/ubuntu/ansible Press [ENTER] to continue or Ctrl-c to cancel adding it. Hit:1 http://archive.ubuntu.com/ubuntu bionic InRelease Get:2 http://archive.ubuntu.com/ubuntu bionic-updates InRelease [88.7 kB] Get:3 http://security.ubuntu.com/ubuntu bionic-security InRelease [83.2 kB] Get:4 http://ppa.launchpad.net/ansible/ansible/ubuntu bionic InRelease [15.9 kB] Get:5 http://ppa.launchpad.net/ansible/ansible/ubuntu bionic/main amd64 Packages [536 B] Get:6 http://ppa.launchpad.net/ansible/ansible/ubuntu bionic/main Translation-en [344 B] Fetched 189 kB in 2s (96.1 kB/s) Reading package lists... Done |
Update your repos:$ sudo apt update
Sample outputs:
Hit:1 http://ppa.launchpad.net/ansible/ansible/ubuntu bionic InRelease Get:2 http://security.ubuntu.com/ubuntu bionic-security InRelease [83.2 kB] Hit:3 http://archive.ubuntu.com/ubuntu bionic InRelease Get:4 http://archive.ubuntu.com/ubuntu bionic-updates InRelease [88.7 kB] Fetched 172 kB in 2s (111 kB/s) Reading package lists... Done Building dependency tree Reading state information... Done All packages are up to date. |
To install the latest version of ansible, enter:$ sudo apt install ansible
Sample outputs:
Reading package lists... Done Building dependency tree Reading state information... Done The following packages were automatically installed and are no longer required: ieee-data libpsl5 publicsuffix python-certifi python-chardet python-jmespath python-kerberos python-libcloud python-lockfile python-netaddr python-openssl python-requests python-selinux python-simplejson python-urllib3 python-xmltodict wget Use 'sudo apt autoremove' to remove them. The following additional packages will be installed: python-setuptools sshpass Suggested packages: python-setuptools-doc The following NEW packages will be installed: ansible python-setuptools sshpass 0 upgraded, 3 newly installed, 0 to remove and 0 not upgraded. Need to get 4,271 kB of archives. After this operation, 35.9 MB of additional disk space will be used. Do you want to continue? [Y/n] y Get:1 http://ppa.launchpad.net/ansible/ansible/ubuntu bionic/main amd64 ansible all 2.7.5-1ppa~bionic [3,931 kB] Get:2 http://archive.ubuntu.com/ubuntu bionic/main amd64 python-setuptools all 39.0.1-2 [329 kB] Get:3 http://archive.ubuntu.com/ubuntu bionic/universe amd64 sshpass amd64 1.06-1 [10.5 kB] Fetched 4,271 kB in 13s (326 kB/s) Selecting previously unselected package python-setuptools. (Reading database ... 19558 files and directories currently installed.) Preparing to unpack .../python-setuptools_39.0.1-2_all.deb ... Unpacking python-setuptools (39.0.1-2) ... Selecting previously unselected package sshpass. Preparing to unpack .../sshpass_1.06-1_amd64.deb ... Unpacking sshpass (1.06-1) ... Selecting previously unselected package ansible. Preparing to unpack .../ansible_2.7.5-1ppa~bionic_all.deb ... Unpacking ansible (2.7.5-1ppa~bionic) ... Setting up python-setuptools (39.0.1-2) ... Setting up sshpass (1.06-1) ... Setting up ansible (2.7.5-1ppa~bionic) ... Installing new version of config file /etc/ansible/ansible.cfg ... Installing new version of config file /etc/ansible/hosts ... |
Type the following command:$ ansible --version
Sample outputs:
ansible 2.8.3 config file = /etc/ansible/ansible.cfg configured module search path = [u'/home/vivek/.ansible/plugins/modules', u'/usr/share/ansible/plugins/modules'] ansible python module location = /usr/lib/python2.7/dist-packages/ansible executable location = /usr/bin/ansible python version = 2.7.15+ (default, Nov 27 2018, 23:36:35) [GCC 7.3.0] |
Creating your hosts file
Ansible needs to know your remote server names or IP address. This information is stored in a file called hosts. The default is /etc/ansible/hosts. You can edit this one or create a new one in your $HOME directory:$ sudo vi /etc/ansible/hosts
Or$ vi $HOME/hosts
Append your server’s DNS or IP address:
[webservers]
server1.cyberciti.biz
104.20.187.5
104.20.186.5 [devservers]
10.98.222.4
10.98.222.7
10.98.222.8
I have two groups. The first one named as webserver and other is called devservers.
Setting up ssh keys
You must configure ssh keys between your machine and remote servers specified in ~/hosts file:$ ssh-keygen -t rsa -b 4096 -C "My ansisble key"
Use scp or ssh-copy-id command to copy your public key file (e.g., $HOME/.ssh/id_rsa.pub) to your account on the remote server/host:$ ssh-copy-id -i $HOME/.ssh/id_rsa.pub root@server1.cyberciti.biz
$ ssh-copy-id -i $HOME/.ssh/id_rsa.pub root@10.98.222.4
$ ssh-copy-id -i $HOME/.ssh/id_rsa.pub root@10.98.222.7
$ ssh-copy-id -i $HOME/.ssh/id_rsa.pub root@10.98.222.8
$ eval $(ssh-agent)
$ ssh-add
Now ansible can talk to all remote servers using ssh command.
Send ping requests to all servers
Just type the following command:$ ansible -i ~/hosts -m ping all
Sample outputs:
10.98.222.4 | SUCCESS => { "changed": false, "failed": false, "ping": "pong"
}
10.98.222.7 | SUCCESS => { "changed": false, "failed": false, "ping": "pong"
}
10.98.222.8 | SUCCESS => { "changed": false, "failed": false, "ping": "pong"
}
Find out uptime for all hosts
$ ansible -i hosts -m shell -a 'uptime' all
Sample outputs:
do-de.public | SUCCESS | rc=0 10:37:02 up 1 day, 8:39, 1 user, load average: 0.95, 0.27, 0.12 do-blr-vpn | SUCCESS | rc=0 16:07:11 up 1 day, 8:43, 1 user, load average: 0.01, 0.01, 0.00 ln.gfs01 | SUCCESS | rc=0 10:37:17 up 22 days, 5:30, 1 user, load average: 0.18, 0.12, 0.05 |
Where,
- -i ~/hosts : Specify inventory host path. You can setup shell variable and skip the -i option. For e.g.: export ANSIBLE_HOSTS=~/hosts
- -m shell : Module name to execute such as shell, apt, yum and so on
- -a 'uptime' : Module arguments. For example, shell module will accept Unix/Linux command names. The apt module will accept options to update remote boxes using apt-get/apt command and so on.
- all : The all means “all hosts.” You can speificy group name such as devservers (ansible -i hosts -m shell -a 'uptime' dbservers) or host names too.
Update all Debian/Ubuntu server using apt module
Run the following command:$ ansible -i ~/hosts -m apt -a 'update_cache=yes upgrade=dist' dbservers
Writing your first playbook
You can combine all modules in a text file as follows in yml format i.e. create a file named update.yml:
--- - hosts: dbservers tasks: - name: Updating host using apt apt: update_cache: yes upgrade: dist |
Here is my hosts file:cat hosts
Sample outputs:
[all:vars] # Username for ssh connection ansible_user='vivek' # Run commands as root user? ansible_become='yes' # How do I become root user? Use sudo. ansible_become_method='sudo' # Password for sudo ansible_become_pass='superSecretPassword' ################################################### # Password for sudo user i.e. ansible_user password # See https://www.cyberciti.biz/faq/how-to-set-and-use-sudo-password-for-ansible-vault/ # Read it from an encrypted file # ansible_become_pass='{{ my_sudo_password }}' ################################################### [dbservers] 10.98.222.4 10.98.222.7 10.98.222.8 |
Now you can run it as follows:$ ansible-playbook -i ~/hosts update.yml
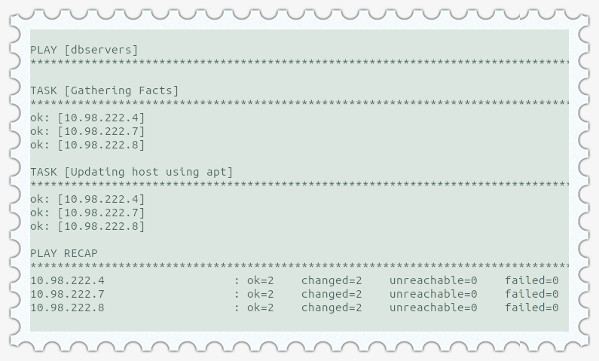
You just install and configure latest version of Ansible on Ubuntu Linux and ran your first playbook too.
A note about Python version 3
Ansible needs python installed on a remote server. You can specify remote version of python using the following syntax in hosts file:ansible_python_interpreter='/usr/bin/env python3'
For example here is my sample host file displayed using the cat command:cat hosts
[all:vars] ansible_user='{{ my_user }}' ansible_become=yes ansible_become_method=sudo ansible_become_pass='{{ my_user_pass }}' ansible_python_interpreter='/usr/bin/env python3' [bsdboxes] 192.168.2.30 192.168.2.31 192.168.2.32 192.168.2.33 |
Conclusion
That is all. Now you have a working ansible setup running on Ubuntu desktop/laptop and communication with remote servers. I suggest you learn how to write playbook and other stuff in the official documents.