As you may already know, Git is a powerful program. One wrong command
can wipe out important work. In this article, you’ll learn how to
“stash” changes so you can cleanly and easily checkout different
branches without destroying your work.
Git is a popular version control system for
anyone managing files on
private servers or
local file structure.
- Put your changes aside using the Git stash
- How do I list my git stashes?
- What’s in the stash?
- How do I restore a stash?
- Find out more about Git stashing options
Have you ever seen this error when trying to checkout a branch in Git?
error: Your local changes to the following files would be overwritten by checkout:
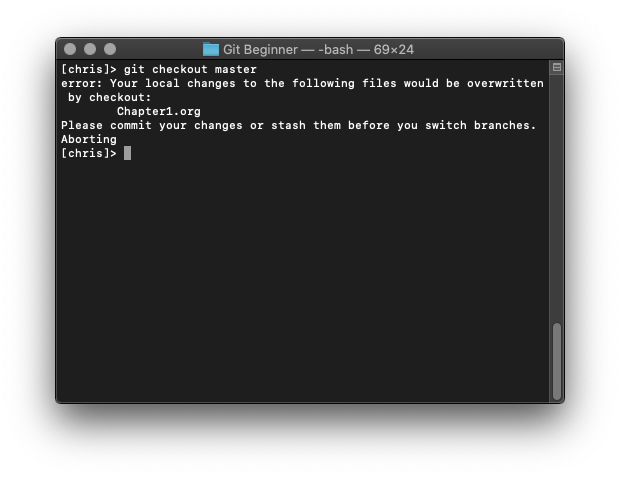
You’re seeing this error because you’re attempting to switch (or
“checkout”) a branch with uncommitted changes in your working
directory. This means if you go through with the checkout it will
overwrite the contents of your working directory.
To avoid overwriting your work you have two options:
- Commit changes
- “Stash” your changes
Commit changes. If you decide to commit changes, you are committing
your code as is. This means if any features are broken or incomplete,
they will be committed in a broken state. This is not a best
practice, so git provides an alternative via stashing.
“Stash” your changes. Stashing your changes basically sets them
aside in a separate blob that can be opened up later. This way, you
don’t have to rush any changes to make a decent commit, and you can
create as many stashes as you need.
Using The Git Stash
To do a clean checkout of a different branch, you can “stash” your
changes with the git stash command.
git stash
Just running that simple command is all you need to do to stash
your changes.
Once your changes are stashed, you could run git status to make
sure.
You should see a notification that your working directory is clean
(clean meaning identical to the commit referenced by HEAD):
“On branch <branch-name>
nothing to commit, working tree clean”
List Your Stashes
As you return to the branch you were working in, you can first check
to see if you have one stash or multiple.
Do this with the git stash list command:
git stash list
This command outputs a list of all your stashes.
Check To See What’s In Your Git Stash
As you’re stashing items here and there, you will want to know
what’s inside of those stashed items. You can accomplish this with
the git stash show command.
git stash show
By itself, git stash show will show you a summary of changes made
in the most recent stash.
If you have multiple stashes, add the stash number.
git stash show <number>
stash@{0} will always be the latest entry into the stash.
Subsequent entries (stash@{1}, stash@{2}, and so forth) will be
numbered as such. The higher the number the older the stashed
content.
Restore The Content of a Stash
Now you know how to stash, how to list and view your stashes, so now
you only need to learn how to restore stashed content.
In order to restore content from a stash, just pop it, followed by
the stash number:
git stash pop <number>
Remember, you can get the stash numbers with git stash list.
Going Deeper Into Git Stashing
All of the commands demonstrated in this article can be expanded with
various options.
To see the most detailed and comprehensive listing of options you
can use in construction of advanced Git commands, check out the full
Git stash documentation.