

MemberPress is one of my go-to plugins for easily protecting and charging for access to your content. I appreciate the fact that they stay focused on this core goal and don’t overload it with extraneous features. So it does not have a member directory feature built-in, but by using an additional free plugin you can add this capability.
In this use-case the requirements of the directory are simple: a front-end listing of site members, that other users can browse.
When people register for your MemberPress offerings, they are added to the existing user system within WordPress. That means that any plugin which taps into that to display WordPress users should work fine with MemberPress. You don’t have to look for anything that is MemberPress-specific.
There are several fully-featured and fairly complex directory plugins available on the WordPress repo, but they are generally aimed at being all-in-one solutions for creating and monetizing the directory. They aren’t really designed to be used in conjunction with an existing membership site.
There are fewer plugins that take a simpler approach, and even fewer that do a good job.
The best non-technical solution
For the everyday website owner, the simplest solution I found is the Dynamic User Directory plugin. This works well, right out of the box.
After activating, go to Settings > Dynamic User Directory to grab the shortcode. Place that in a page to display the directory.

There are numerous display and sort options you can choose to configure. I’ll highlight just a couple of the important ones here, such as Directory Type.

Alphabet Letter Links looks like this:
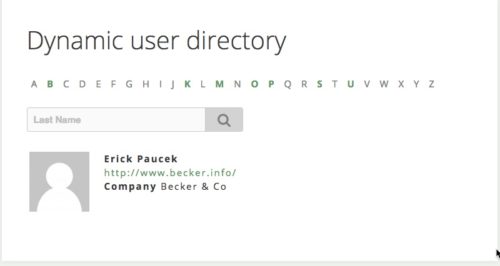
This is probably best if you have many members to display.
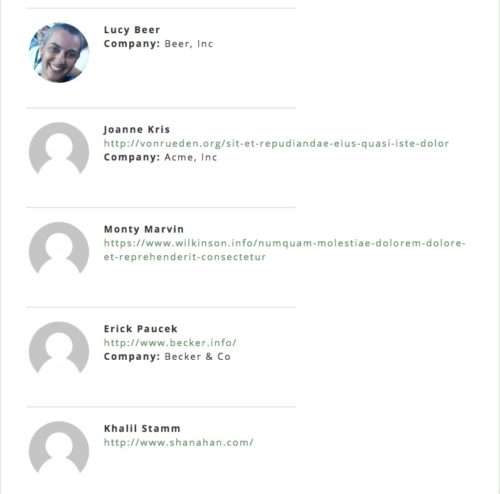
Otherwise you can choose Single Page Directory:
Customize the displayed info
Each of your MemberPress users has a profile within WordPress containing their username, email address etc. You can choose which profile information to show in the directory. MemberPress also allows you to collect additional custom information. You can modify the information asked for at sign-up by going to:
MemberPress > Options > Fields > Custom User Information Fields.
For example, here I have added Company Name as a field on the registration form:

Dynamic User Directory also allows you to show such custom information in your directory if you choose. To do that you’ll need the Meta Fields Settings. Each field that you have set up in MemberPress will be listed in the WordPress Meta Key Names box, prefixed with mepr_:
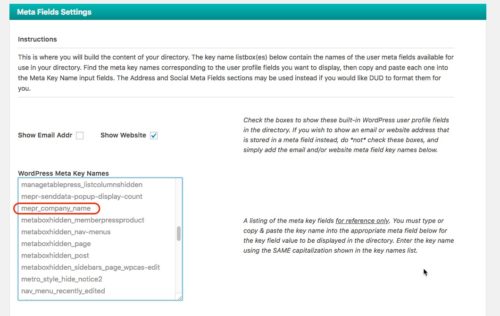
To display one of these fields, copy/paste the name into one of the Meta Key Name fields below and give it a label, i.e. the text that will show on the front end:

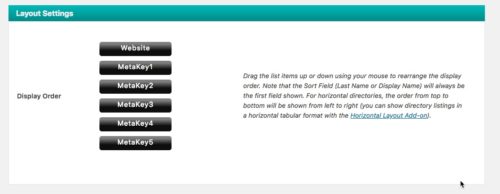
In the Layout Settings section at the bottom, you can drag n’ drop to order the display of the information:
The free version of Dynamic User Directory will be adequate for many sites, but should you need additional functionality, there are several paid add-ons available which offer even more options and customization. They are very reasonably priced, should you need to purchase any.
All in all, Dynamic User Directory is fantastic for non-technical site owners who just want something easy to get up and running with.
The best solution for developers
On the other hand, if you are a developer, want a bit more control and don’t mind doing some PHP, I would highly recommend having a look at Simple User Listing.
There aren’t any settings for this plugin – just a shortcode that you place in a page to output a list of all your users. In the shortcode you can sort the output according to the parameters of the WP_User_Query class.
But to more deeply customize it, you can override any of the plugin’s templates by copying the template file into a “simple-user-listing” folder in your theme. This gives you all the flexibility that you need. Expect to do some CSS as well to tweak the visual display.
This approach is great for developers who want a lightweight solution and more control over the output and display.
Whichever plugin you choose, you can decide whether you want the directory to be 100% public to non-paying visitors to your site, or whether it’s a benefit of one of your memberships. In the latter case you would just protect it with a MemberPress rule like any other content on your site.
If you’ve come across other solutions for user directories with MemberPress, please share in the comments!


![15+ Top Black Friday & Cyber Monday Deals for Developers and Designers [2023]](https://wiredgorilla.com/wp-content/uploads/2023/11/15-top-black-friday-cyber-monday-deals-for-developers-and-designers-2023.jpg)